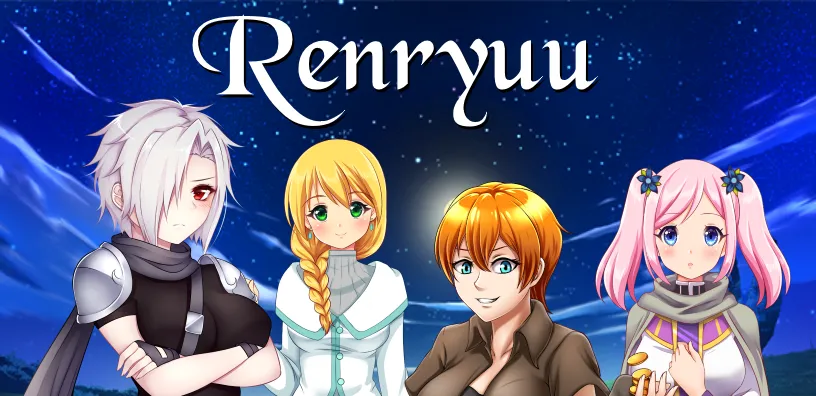
This Renryuu: Ascension Walkthrough will cover every aspect of the game. Including every lady’s scene unlocked, and every quest completed.
version 23.07.11
Main Characters – Renryuu: Ascension Walkthrough
Ryen – Renryuu: Ascension Walkthrough
The main protagonist. He is a dragonic, a race that descends from a mix of dragons and humans, who is definitely better with the sword than with words.He can be cruel and cold-blooded at times, but he usually doesn’t enjoy murdering. He is simply so used to killing that he has no hesitation about it and it invokes no emotions anymore.
After his troublesome and bloody past he went to a military academy. He was hoping to change himself and find his peace of mind there.
Skills: Flameblade, Combo Attack (level 6+), Roar (level 10+), Dark Blade (level 15+)
Traits: Sword dual wield, General/Light/Royal Armor
Elements: Fire (50%), Water (200%), Ice (200%)
Tsubaki – Renryuu: Ascension Walkthrough
A cheerful girl but none the less dangerous. She trained swordsmanship for most of her life, as it is tradition in her family. When Ryen joined the military academy and soon became its strongest, she started to hang around and train with him a lot in hopes of learning from him. Since killing is no problem to her, she was fine with Ryen’s sometimes problematic attitude.
Skills: Dual Attack, Whirlwind (level 7+)
Traits: Katana, Increased hit chance, General/Light/Heavy Armor
Elements: No special effects
Favorite present: Book [Sold at Thremten, bottom right building (Author’s House)]
Character events sequence:
- First CG scene is directly at the start of the game. (TitFk CG)
- Talk with Tsubaki twice at the sleeping chambers in your castle to get the quest “Bookworm?”. The needed author is in a house in Thremten.
- Her second CG scene requires 60+ relationship and that the headmaid showed you the hidden room behind your bedroom. (Nude CG)
- Talk with her again at the sleeping chambers with 100+ relationship to start her training events. During the events you get the standing blowjob CG and at the end the sex scene with two different poses and one animation.
- When all main characters are at 100+ relationship, you can talk with Trey to unlock the marriage system. The events leading to Tsubaki’s wedding include a kissing CG. The wedding itself will show you several new full body CGs of Tsubaki.
Trey – Renryuu: Ascension Walkthrough
The head of the royal guards. Trey is a brave and honest person, who has fought many battles for his beloved country already. It is his duty to protect Ryen as the new king, but he also made it clear that if Ryen abuses his powers, Trey and the royal guards will be ready to turn against him.
Skills: Weak Heal, Small Light, Cover
Traits: Spear, Magic. Small/Heavy Shield, General/Light/Heavy Armor
Elements: Light (75%)
Character events sequence:
- Talk with Trey twice at the sleeping chambers to start a short quest about finding a lesser demon at Thremten.
- After introducing yourself at the Aldlyn castle, go upstairs in the fort in Parverhill. The fight against two traitor guards will unlock a new dialog with Trey at the sleeping chambers and start the traitor questline.
- Talk with Trey to start the event which unlock the character Pandora. It requires the laboratory on the overview map built, the vanguard battle system to be unlocked, the first appearance of female Ryen at the bathhouse, and the sex scene with Kavrala.
- After the events of the traitors, and the events of Pandora, you can talk with Trey multiple times for events with him, Brad, and Ryen. (CG scene with Brad)
Mira – Renryuu: Ascension Walkthrough
The angel Mira is really weak, but even if she can’t fight very well, her healing ability is still a valuable addition to every party. She is always cheerful and loves to help people, but there seems to be quite a big shadow hidden behind that smile.
Location: Can be found in the „Abandoned barrack“ (Map no. 3)
Skills: Heal, Small Light, Cure, Panic Traits: Cane, Magic, General/Magic Armor Elements: Light (25%)
Favorite present: Golden Cross [Sold at Calterburry top left store (Staff Insignia)]
Special: Mira gets a 20% M.ATK buff for 7-10 turns by praying at crosses on the map.
Character events sequence:
- If you talk with Mira at the sleeping chambers before going to the big gate in the north dungeon, you get the quest “Exploration”
- Talk with Mira when she is level 10+ to get the “Evil Spirit” quest.
- Talk to Mira again at the sleeping chambers. Requires Mira on level 15+, relationship on 70+ and Headmaid Ryia must have shown you the secret room next to your bedroom. (Oral CG)
- After the evil spirit quest, you can meet the angel Maria in front of the Drunken Cave in Begus. The events will lead you to the Ironholm prison, where you need the help of the ghost girl Shey to advance. Shey can be found in the dungeon below Old Ashton.
- Maira will now appear with Aura at the Havaria port. Talk with them there to start the temple island events.
- Finish the Thremten festival (starts at the Aldlyn city board), have Mira at 100+ relationship, the abandoned barracks repaired and the dual blowjob scene with Vampire done to unlock Mira’s dialog at the sleeping chamber for the first sex scene.
- Second sex scene is in the temple island dungeon.
- When all main characters are at 100+ relationship, you can talk with Trey to unlock the marriage system. You can select Mira on the marriage screen once you have all of her previous events done, and Vampire is in your party.
- After you proposed to Mira, you can repair the temple island to have the thrid sex scene with her in the repaired house in the cave below the temple.
Out of sequence: Talk to the dark sorceress at the bitterroot farm south in Central (Map. no. 12). Requires quest No. 32 in order to get to the sorceress. (Nude CG)
Bonus Scene: Starts in Vampire’s events. (Dual Blowjob CG)
Vampire – Renryuu: Ascension Walkthrough
The mysterious vampire is the tsundere of the group. She often gets angry when someone treats her like a child, but at the same time she loves to be spoiled. Ryen finds her sealed away in a dungeon by chance, but it seems as if the two of them are somehow connected.
Location: Can be found in the „North dungeon“ (Map no. 4) Requires Mira to open the big stone gate.
Skills: Fire, Life Leech, Soul Strike Traits: Dagger, Magic, General Armor Elements: Light (200%), Darkness (50%)
Favorite present: Book [Sold at Thremten, bottom right building (Author’s House)]
Character events sequence:
- Talk with Vampire at the sleeping chamber with Ryen’s level at 10+ to start the quest “Friendly Turn”.
- Go to the army camp in Amagal and follow the path on the right side to get the dialog that a volcano is over there. This will unlock Vampire’s dialog for the quest “Into The Fire”.
- Talk with Vampire with 40+ relationship and the secret room behind your bedroom known to Ryen. (Nude CG)
- The next step requires 70+ relationship and that the events with Mira are advanced to step no. 3 (oral scene). Dual Blowjob CG with Mira.
- Check the Aldlyn city board to see a note about hunting a Vampire and finish the quest. Rewards you with the footjob CG scene when you talk with Vampire again at the sleeping chamber after the quest is done.
- Once you’re far enough in the main story to enter Dorgania, and talked with the woman in the nature area at the bottom of the north dungeon, a new dialog at the sleeping chamber will start the “Vampire’s Past” quest.
- The maid Louise is now two tiles right from Vampire at the sleeping chambers. Talk with her to start the CG scene with Vampire in maid uniform.
(Maid and teasing Cgs).
- Talk with Vampire again with 100+ relationship for the “Library Exploration” quest. After the quest you can talk with Vampire once more for her first sex scene.
- After the fight against Raziel in the main story, the Windspirit will appear in the top left corner of Aldlyn and trigger the next events of Vampire. (Sex with whip CG).
- Vampire’s wedding on the marriage screen becomes available after Mira’s wedding is done. It requires the previous events of Vampire to be done, including the encounter with Neya in Kagabangui, the dragonic event which unlock Ryen’s dragonic powers, and the blowjob with Mira and Vampire.
Bonus Scene: In the bathhouse if you have 60+ relationship and the nude scene done.
Mirel – Renryuu: Ascension Walkthrough
As most elves, Mirel is very skilled in handling her bow. After her parents died she was raised by their towns chief.
Location: Can be found in the shed of „Blue villa“ (Map no. 6) The shed door key is in a chest inside of the villa.
Skills: Double Shot, Take Aim, Special Shot (level 8+)
Traits: Bow, General Armor
Elements: Earth (50%), Wind (50%), Thunder (50%), Fire (200%)
Favorite present: Flowers [Sold in Aldlyn, at the stand in the bottom left corner]
Character events sequence:
- Talk with Mirel with 20+ relationship to get the quest to find her old bow. This quest is skipped if you found it before talking with Mirel about it.
- Talk to her again with 35+ relationship after getting the bow. (Nude CG)
- Talk with the town chief in Ebron after solving the bandit issue in their forest and when Mirel’s relationship is 70+ to start the coming off age ceremony. (Blowjob CG)
- You need to sleep with the Earthspirit in the forest of Ebron to get the quest “Earth Element Magic” from Mirel.
- Talk with Mirel at the sleeping chamber when she is level 25+, and after you’ve visited the forest west of Ebron with Phraan. At the end of these events, you can decide whether to make Mirel change her class to sniper or druid.
(Entangled CG, Kissing CG, Nude CG, and Blowjob CG)
- After changing Mirel’s class, talk to her again for the “About Racism” quest. During this quest, you get a side quest from Seldanna in Orchel, to fix the old bow of Mirel’s father. Once that quest is done, and the relationship with Mirel is at 100+, you can start her first sex scene at the sleeping chambers. (Sex CG)
- When all main characters are at 100+ relationship, you can talk with Trey to unlock the marriage system. The events before Mirel’s wedding will unlock a CG scene with her and Liana in Ebron, but also multiple CGs with Ryen and Mirel. The wedding itself will show you several new full body CGs of Mirel as well.
Sandra – Renryuu: Ascension Walkthrough
A fugitive from another country, or at least that what she claims to be. Her ability to pick locks and other skills leave some doubts to her honesty, but they often come in handy. It’s easy to tell from those abilities that she used to live in the streets and managed to survive through them.
Location: Can be found in the dungeon below Witton (Map no. 8)
Skills: Pickpocket, Vanish, Backstab
Traits: Dagger dual wield, General Armor, Increased hit, evade and crit chance
Elements: No special effects
Favorite present: Jewel [Sold at the jewelry story in Thremten]
Character events sequence:
- Special chest in the swamps near the Bitteroot farm. (Map No. 12) (Nude CG)
- Talk with Sandra at the sleeping chamber with 60+ relationship. (Oral CG)
- Constructing the second mine on the overview map will allow you to go to the treasure dungeon with Sandra.
- A stripping scene starts at Newkungu after having the event with Moriko to find the thieves guild and help their leader with some problems. (Moriko’s events begin with a note at the Aldlyn city board after building and upgrading the police headquarters. After purchasing the upgrade you need to leave and re-enter the map to apply the change.)
- Once you’re far enough in the main story to have the mithril pickaxe, a new dialog will unlock for Sandra. She wants to look for Bob, who is at the Wooden House in Begus, where you got the mithril lockpick from Glen.
- After finishing the events to help the dwarf Bob to find a jade vein, you can talk with Sandra twice at the sleeping chambers to trigger her first sex scene. The scene includes two different CGs with several variations and one animation. (It’s not necessary to finish the haunted house events to get this scene.)
Requires 100+ relationship with Sandra.
- Starts in Havaria port, where you can find the thief Shirinsya from Moriko’s events again. Requires the events with Flaire to get the gold armor and weapon recipes first, Sandra needs to be in your party and her previous events must be done, and Moriko’s events must be past the choice for her good or bad route in the police HQ.
Sex scene at the brexeet isles, which unlocks Sandra for marriage.
Brad – Renryuu: Ascension Walkthrough
A former slave that ran away from his owner. Having lost everything he ever had, he sure knows the true value of the word freedom and the price for it. Because he had to fight for the amusement of his owner, Brad is now a fairly good brawler.
Location: Can be found in the „South fort“ (Map no. 7) Skills: Uppercut, Preparation, Fearless Charge (level 12+) Traits: Glove, General Armor, Slightly decreased hit chance Elements: No special effects
Character events sequence: Brawl battles:
- Seiho near the arena in Aldlyn will challenge Brad to a 1on1 brawl battle. A victory will give you the Brawler Stamp Card item, and Brad learns the skill Leg Kick.
- After defeating Seiho, you can challenge three more brawlers to learn more skills:
- Uruk at the military academy where the game starts. (Counter Stance skill)
- Aika Thanka in the bar of calterburry in Begus. (Footwork skill)
- Zaleria in Orchel in Dorgania. (Provocation skill)
During the event with Zaleria, you’ll get the option to transform Brad into a girl for a very short moment. (Female full body CG)
- After defeating at least 4 other brawlers, you can challenge Ash and Grimace in Kagabangui, the capital of Dorgania.
(Class change from Brawler to Martial Artist. New skill Bodyguard and Hook Combo)
- When Brad is a martial artist, he can fight against Tsiom in the base camp of the Brexeet Isles. Afterwards she’ll teach him 3 water element skills.
The Brexeet Isles become available during Sandra’s events (Step 7)
Female Brad:
1. After the events of the traitors in your castle, and the events of Pandora, you can talk with Trey multiple times for events with him, Brad, and Ryen. (CG scene with Brad) These events aren’t directly connected to Brad’s brawl battle events.
Chiyo – Renryuu: Ascension Walkthrough
A young mage, who is still weak and ignorant to the world, but she has a big talent and improves fast. Her abilities are mostly magic spells of different elements. She used to live a peaceful life in Amagal, until the Earl gained more power.
Location: Can be found in Manastyr (Map no. 18)
Skills: Fire, Spark, Blizzard (level 12+), Thunderstorm (level 16+), Rainstorm (level 21+)
Traits: Cane, Magic, General/Magic Armor
Elements: No special effects
Favorite present: Book [Sold at Thremten, bottom right building (Author’s House)]
Character events sequence:
- Catch her while changing when entering her room with 30+ relationship.
- The quest “Magic License” start with 45+ relationship. You might need to talk with her two or three times before you get the dialog.
- When you’re at the point of the main story where you have to search for Frall in Amagal, you can talk with Chiyo for the “Varea” quest. If you meet Varea and Frall before talking to Chiyo the quest and dialog is skipped.
- When entering her room with Kayelinth’s playlust over 80 and previous scene. (Chiyo and Kay playing in the river CG)
- Talk with Chiyo with 70+ relationship for her teasing scene.
- Her “alchemy” events start when you had the introduction dialog about alchemy tables (all blacksmith with an alchemy table trigger the dialog) and the festival of Thremten done. The second step requires the mithril pickaxe, which you get during the main story events. (Kissing CGs)
- Talk with Chiyo when the main story is at it’s current end (Varea in your Castle) and you’ve met King Merius of Amagal. King Merius can be found when going to the Yang Tower and fixing the magical circle in the cellar. The circle requires that Chiyo’s magical knowledge is at 50+ to repair it.
- Talk with Chiyo again for her masturbation scene.
- The next step requires that Chiyo is level 25+ and that you have constructed the big farm on the country overview map. (The farm where you can release monstergirls) The dialog will give you the “Gold License” quest.
- First sex scene is available when talking with Chiyo after the gold license test.
- You get a threesome with Chiyo and Kayelinth at a foggy forest. The event starts when you talk with Chiyo at the sleeping chambers.
Requires Chiyo’s first sex scene, Kayelinth’s first sex scene, the river scene with Chiyo and Kayelinth, the encounter with Raidy on the challenge floor of the Spire of Courage, and the dialog about stone plates as teleport options in Lalizan in Dorgania.
- After the foggy forest events, and when you advanced the main story to the point where Varea moves into your castle, you can select Chiyo on the marriage screen to get her wedding events.
Elly – Renryuu: Ascension Walkthrough
One of the very few gunslingers left in the world. Because her fighting style costs a lot of money, she works as a high prized mercenary. Usually she is a very calm and collected person but sometimes drinks a bit too much.
Location: Can be found in the blacksmith of Calterburry. (Map no. 31)
Skills: Taking Cover, Concentration, Barrage, Explosive/Flash/Ice/Holy Grenade
Traits: Gun, General Armor
Elements: No special effects
Favorite present: Whisky [Sold at the bar in Aldlyn]
Character events sequence:
- The nude CG scene starts at the sleeping chamber with 21+ relationship.
- The quest “Special Drink” becomes available with 60+ relationship after the headache from first scene was cured. (It can be cured by sleeping in your bed for example) (Paizuri CG scene)
- Event starts at the sleeping chambers after you had the events with the Queen of Begus to the point where she is ready to sleep with you. Advance the political meetings with Begus to get the events with their Queen.
[You don’t need to sleep with the Queen to unlock Elly’s event.]
- After the events with Adrianna from step 3, a new dialog will become available with Elly at the sleeping chambers when you have 100+ relationship with her. (Masturbation, titFk and first vaginal sex CG scene)
- After the quest “Ryoko’s Quest” from Ryoko’s event line, you can talk with Elly to have sex with her, which unlocks her marriage event. This event requires the wedding system and the vanguard battle system to be unlocked .(Animated sex scene)
- A threesome scene starts after events with the dwarf Adrianna, which start in the bar of Calterburry after Adrianna’s first CG scene, Elly’s second scene (after the events with the Luminous Order) and after you supported Varea for the throne of Amagal.
Bonus: Threesome and foursome scene after events with Grey. Requires that Grey was not turned back into a guy during his gender change events.
Ryoko – Renryuu: Ascension Walkthrough
Ryoko has been a slave ever since she was a child. Because of that, she has a hard time making decisions on her own and has a constant urge to receive orders from her master. Her need for orders is increased by non-“Order“ skills, while the Order skills make use of her need and set it back to 0.
Location: Can be found in the dungeon below Crysthaven. The entrance is in the bottom left corner of the map. (Map no. 15)
Skills: Delay, Wake Up Call, Weaken, MP Transfer, MP Transfer All, TP Transfer, Order: Attack!, Order: Move It!, Order: Protect!
Traits: Axe, General/Light/Magic Armor
Elements: Thunder (50%), Water (200%), Ice (200%)
Favorite present: Meat [Sold at the Bitterroot farm]
Character events sequence:
- You need 30+ relationship and the „Need For Orders“ at 50+ to get her nude CG scene. Her need for orders is increased by certain skills during combat.
- With 50+ relationship you get a new event, during which you go to the Aldlyn blacksmith with Ryoko to let him make her a new weapon.
- Event starts by talking to Kirsten in the bottom right corner of Calbridge Stronghold. Requires the first public health upgrade (construction of the clinic). (masturbation scene)
- Talk with Ryoko again while Elly is in your party to trigger their drinking night.
- A note will appear on the Aldlyn city board, which starts the quest “The Meeting” for Ryoko’s next events. Talk with Ryoko again after the quest is done to get her first sex scene.
- A new dialog will be available in the sleeping chambers after you had the first meeting with Akai in the workarea near Aldlyn, Shey’s event including her help for Maria at the Ironholm prison, that you defeated Raidy in the Spire of Courage challenge floor to get to the raid area, and that all previous events for Elly are done. It’ll start the quest “Ryoko’s Quest,” which brings you to a new area in the south. Ryoko’s marriage becomes available after the quest.
(Second sex scene)
Kayelinth – Renryuu: Ascension Walkthrough
A young dragonic girl, who is still completely ignorant to the world. Her hunger and play lust value increases over time. Hunger can be reduced with vegetables or meat, playlust with toys or by a special event.
Location: Can be found in the “South dungeon“ (Map no. 11) Skills: Fire, Tough Body, Flame wall (level 9+), Roar (level 15+) Traits: Mace, Magic, General Armor
Elements: Fire (25%), Darkness (50%), Light (125%), Water (150%)
Favorite present: Vegetables [Sold in Aldlyn, at the stand in the bottom left corner]
Character events sequence:
- Feed her at the storage in Aldlyn until you have 30+ relationship with her. (Nude CG)
- Talk with Kayelinth at the sleeping chambers to get the “Vegetable Garden” quest. You can find the “secret garden” by going up north at the right side of the castle. Don’t cross the river. The “lost and found” center for the hammer is a normal looking soldier In the entrance of the castle (the map you get to by entering the castle through the big gate).
- The next step requires 70+ relationship and you need to construct the bathhouse on the country overview map. (Oral CG)
- You can now find Kayelinth’s mother Jaylin in the Jewelry store in Thremten. After helping her in the search of her daughter, she’ll move into the castle.
- The next event requires that you’re entered Minsk Harbour during the main story, that Mira had the event about her wings (second sex scene), and that your relationship with Kayelinth is at 100+. It starts with a dialog in the sleeping chamber, where Kayelinth will ask you to go to the Greencoast Tower. (First flight CGs)
- Talk with Kayelinth to get the “Food Town” quest. Afterwards you can talk with her again in the castle for the next step of these events. (Tail masturbation scene)
- Talk with Kayelinth again for her next event, the construction of her own farm. (First sex scene)
- When all main characters are at 100+ relationship, you can talk with Trey to unlock the marriage system. Kayelinth is available for marriage after her first sex scene and
the events with Jaylin about the different shapes of dragonics.
- After the wedding, and when you had the sex scene with Kavrala in Orchel, you can talk with Kayelinth at the sleeping chambers to get the quest “Double Attention” from her, which’ll unlock her next sex scene.
- You get a threesome with Chiyo and Kayelinth at a foggy forest. The event starts when you talk with Chiyo at the sleeping chambers.
Requires Chiyo’s first sex scene, Kayelinth’s first sex scene, the river scene with Chiyo and Kayelinth, the encounter with Raidy on the challenge floor of the Spire of Courage, and the dialog about stone plates as teleport options in Lalizan in Dorgania.
Bonus: Involved in a threesome with her mother Jaylin at the Amaranthe beach.
Side Characters
CG room Central 1 – Renryuu: Ascension Walkthrough
Kurohime
Originally Kurohime was hired as an assassin to kill you, but after catching and training her in your secret prison she will become your personal servant. She appears in the secret room behind your bedroom after you’ve finished the traitor quest line (Quest no. 14).
After her training in the secret prison is finished, a third CG scene is available. The thrid scene together with declaring your intentions to prepapre a war against Dorgania in a dialog with Theremis will enable you to send Kurohime on a spy mission in Luolambo. At the end of this mission, Kurohime becomes recruitable as a vanguard squad leader. Once you’ve recruited her, a new event will be available on the overview map, in the forest east of Aldlyn, which will trigger Kurohime’s fourth CG scene.
4 CG scenes
Lielle
You can find Lielle taking a bath by following the west path in Ebron. At first, the way is blocked by Phraan until you accept to help her gather some herbs.
Second scene starts at the Aldlyn city board, when Ryen is level 30+. Solution for the dungeon is in the FAQ section of the walkthrough.
Third scene starts at the magic shop in Newkungu in Dorgania. Requires Tsubaki’s events to be advanced.
3 CG scenes
Lind
You first encounter Lind as an enemy in the battles on the overview map with your vanguard forces. After capturing her, she’ll eventually come to your side and become a general. After giving her a lot of gold to improve your forces, you need to wait some real time while the game is running before the upgrade is done. Afterwards you get her animated thigh scene.
- standing CG and 2 CG scenes
Lady Akira
After the event about Grey being turned into a girl, you can meet Lady Akira at the brothel and have a sex scene with her there.
Her second CG scene requires that you advance the events with female Grey and the artist Scarlett.
- CG scene
Dark Sorceress Zady
A mysterious woman you meet at the Bitterroot farm. She’s a little troublemaker and eventually makes you angry enough at her, to make you feel the need to „punish“ her.
- CG scene
Moriko
After upgrading the police headquarters, a note will appear on the Aldlyn city board asking for hints about a theft. Once you read the note, Moriko will be at the bar in Havaria port. The first bad path CG scene unlocks during the chase of the criminal, second one becomes available at the thieves’ guild bar, after finishing all their quests.
The good path CG scene becomes available after advancing the events of the thieves guild and the second raid against the assassins guild.
3 CG scene
Jenny
Jenny is a bodyguard at the thieves guild. You can get to the thieves guild after building and upgrading the police headquarters and finishing the events with Moriko at the Aldlyn city board. Jenny’s scene unlocks after events with Sandra at the casino in Newkungu.
1 CG scene
Flaire
The leader of the thieves guild below Thremten. After building the police headquarters and upgrading it in site, you get a quest on the Aldlyn city board with police officer Moriko which will bring you to the thieves guild. During the events with the guild, you’ll attack a hideout of some assassins. If you betray Flaire during this event and throw her into your secret prison, you can rape her there. When you don’t betray her, you get a different CG on her good path.
1 CG sex scene.
Scarlett
Self-opinionated artist. She lives in Aldlyn. She makes a picture for Ryen, and later has a part in the events with female Grey.
- CG sex scene during the events with Grey.
Sara
You can obtain a quest from Sara on the city board to capture a kunoichi in Begus. After finishing the quest, you can watch the two girls making out in the cellar of Sara’s house. When you advance the good route with Dea, Sara will appear for a second CG scene at the Shrine of Flunis.
- CG scene
Jackie
One CG scene with the slimegirl Lexi, after Jackie’s previous events when you’ve build the monsterhall in your castle.
- CG scene
Jaylin
Kayelinth’s mother. You can find her at the jewelry store in Thremten after advancing Kayelinth’ events far enough. She will appear at the beach of the island Amaranthe after talking with Kayelinth there and re-entering the area. This is where her sex CG scene starts. The events for her blowjob scene start when you talk with her in the treasury when Kayelinth’s farm is built and you had the events about Ryen’s dragonic powers.
- CG scenes
CG room Central 2: – Renryuu: Ascension Walkthrough
Jessy
Squad leader of the vanguard forces. After saving Mira at the old barracks, and repairing them on the overview map, you can meet Jessy there. She’ll give you the quest to find the other squad leaders, which unlocks the strategy battle system for the overview map.
Her CG scene requires that her squad is level 3+, that you had the teasing CG scene with Vampire, and that the maid Louise is in the treasury.
(Requires you to walk out to the worldmap and back into the barracks after the quest “Bandit Investigation,” as the trigger to advance the event is on the exit.)
1 CG scene
Worilla
A squad leader of the vanguard forces. Her CG scene starts at the barracks of the vanguards when her squad is level 3+.
1 CG scene
Fang
A squad leader of the vanguard forces. No CG scene
Magdalene
A squad leader of the vanguard forces. Her CG scene starts at the barracks of the vanguards when her squad is level 3+.
1 CG scene
Ailluin
A squad leader of the vanguard forces. Her CG scene starts at the barracks of the vanguards when her squad is level 3+, and when you unlocked the CG scene with Jessy.
1 CG scene
Bristol
A squad leader of the vanguard forces. No CG scene
Nina
After building the bakery on the country overview map, you can enter it from the worldmap and find Nina inside of the bakery. After the event about baking with your entire party, re-enter the bakery to get the choice to come back later by yourself. This choice will start Nina’s CG scene.
1 CG scene
Della
The first gun squad leader for your vanguard forces. You can get her after the events of Ryoko and Elly with the Luminous Order by asking Cassedy in the sleeping chambers about forming a gun squad. Her CG scene requires that you talk with her at the barracks multiple times. The final step of the dialogs requires that her squad is at least level 7.
1 CG scene
Citrinne
After the spy mission with Kurohime in Luolambo (which unlocks her as a vanguard squad leader) and when you unlocked the private beach on the island Amaranthe, a new sparkling icon will appear near Witton on the overview map. This event will introduce Citrinne and unlock several small missions with her and Kurohime, which at the end reward you with Citrinne’s CG scene.
1 scene with two different CGs
Enaris
A nun in the church of Aldlyn. After you talked to Trey when all main girls are at 100 relationship, you can interact with Enaris to get to a new area of the church where you can select girls for marriage.
1 full body CG
Cookie
A small elf girl which you can meet in the bottom right corner of Parverhill. Depending on your choices, she’ll open a portal in that corner, the top right corner of Parverhill, or in the prison of the fort in Parverhill. The portal will bring you to the Magicspirit in the Yin Tower in Amagal.
- full body CG
CG room Central 3: – Renryuu: Ascension Walkthrough
Headmaid Ryia:
Head of the 6 maids serving you in your castle. She is dedicated to do everything needed to help and please you. She’ll show you the „hidden room“ once you talk to her at the sleeping chambers in your castle. She has a special screen selection to bring you girls to the hidden bedroom for your amusement.
- CG scenes in the hidden room
Vivian
The maid Vivian works at your castle and can usually be found in the noble’s living quarters. You can get her blowjob CG scene by letting the headmaid call Vivian to the hidden room behind your bedroom.
She has a sex CG scene when you talk with her at the monsterhall after her blowjob scene. 2 CG scene
Flora
Available for a sex scene at the headmaid’s girl selection screen after you finished the Mirel’s event, where Flora teaches her earth element magic.
1 CG scene
Linda
Linda is a maid in your castle. She usually stays in the sleeping chambers. She is very caring, and will help you to take care of Aleah, should you make Aleah a maid, and help you with the ring for Sia.
Her CG scene starts when you select her from the screen of the headmaid. 1 CG scene
Mary
Mary grew up on a vineyard, but because of money issues left her home to earn money in Aldlyn. Then the Headmaid took her in when she was almost starving.
Her scene becomes available on the girl selection screen of Headmaid Ryia after you talk with Mary in the throne room with Elly in your party.
1 CG scene
Bess
The scene with Bess can be started at the secret room behind your bedroom, by asking the headmaid to bring her there.
1 CG scene
Miyako
You can buy several slaves, either at the thieves guild below Thremten, or in the brothel when buying slaves is legal. You can send bought slaves to different places. The dungeon and the brothel allow for their „evil path“ scenes, while sending them to your castle will allow for the
„good path“ scene later. Most good path CGs are used in the brothel as well, for a „not so forceful“ scene.
3 CG scenes (1 good path, 2 bad path)
Chieko
Same as Miyako above.
- CG scenes (1 good path, 1 bad path)
Grime/Yami
Same as Miyako above. On her good path events as maid in your castle, she gets renamed to Yami.
- CG scenes (2 good path, 1 bad path)
Glyntris
Same as Miyako above.
2 CG scenes (1 good path, 1 bad path)
Aleah
Aleah is a sex slave, you can find in a secret prison in Parverhill. Depending on your choice, she is either thrown into your secret dungeon and becomes your toy, or you set her free and she becomes a maid in your castle.
Good path: 69 , blowjob in maid uniform, sex scene vaginal or anal Bad path: Rape scene with 4 different poses (vaginal, anal or blowjob)
Louise
One of the maids in your Castle. She has some events, but no CG scene yet. 1 Full body CG
CG room Non-humans 1 – Renryuu: Ascension Walkthrough
Mai
After the events with Mira at the temple island you can get to the lower cellar of the casino in Newkungu. There you can win the slave Mai in a game of dice. Mai has a good path as your maid and a bad path as a toy in your dungeon.
When Mai is on her good path, you can get a scene with Mai and Dea at the bakery in Central after Dea’s first sex scene.
5 CG scenes including a wedding scene on her good route.
Dea
Former slave and older sister of Mai. You meet her at the entrance to your castle after Mai becomes your mistress/ plaything. She was separated from her sister when they were young and devoted her life to search for Mai. When you earn Mai’s trust to the point that she feels comfortable around you, you can meet Dea outside of your castle in Aldlyn. For her sex scene you need Naevy’s seconds sex scene, and to talk with the headmaiden at the Shrine of Flunis after finishing Dea’s previous events. The blowjob scene starts in your bedroom, and requires Sara’s CG scene and the secret hot spring to be unlocked.
4 CG scenes including a wedding scene on her good route.
Mozaik
Mozaik is a Sphinx and can be found in a special dungeon during Chiyo’s gold magic license test.
1 full body CG and 1 sex scene. Sex scene starts at the big farm in Central.
Neya
Neya is a fruit vampire that feeds by sucking out fluids from fruits. You can meet her when you go up or down the stairs in the east in Kagabangui after Vampire’s events are advanced far enough.
1 full body CG and a CG with her in a pillory.
Coral
The mermaid Coral can be found at the beach of Amaranthe. She is a cheerful girl and a hopeless romantic.
1 full body CG and 1 CG sex scene
Akai
After building the work area near Aldlyn on the country overview map you can enter it on the worldmap and find Akai in her workshop. She is overflowing with curiosity and loves her machines. Her biggest weakness is that she can’t stop talking once she started to get going.
1 full body CG and 1 CG sex scene
Lili
You need to advance the political meetings and the events with Begus and their Queen, for Lili to appear in the top right corner of Pumumu.
Her CG scene requires that you have all 12 party members, that her squad is level 3+, and that you rented and visited the Amaranthe beach before.
1 CG sex scene
Aiyana
After advancing the main story to the point where you opened the fragment chest in Sunee, you can meet Aiyana in Havaria Port near the dock 3 for ships to Dorgania.
The event for her CG scene requires that you had Flora’s first CG scene, that you finished Aiyana’s quest “Summoning Blade” with giving her back her blade Eagle, and that you used the exit or entrance of Havaria port after finishing the quest.
1 full body CG and 1 CG scene
Ziki
Works with Kathreena and a bunch of assassins and bandits, but secretly helps Naomi and Shanna. After Shanna’s first sex scene, you can get an event with Shanna and Ziki in the Snow Forest in Pumumu. This event unlocks CG scenes for both Shanna and Ziki.
1 CG scene
Naomi
Naomi is the owner of the casino in Newkungu. She is the younger sister of Shanna, despite having a more mature body.
After the optional onsen scene with Shanna, you can get Naomi’s solo CG scene when you go into the secret prison area behind your hidden bedroom. Also requires that you had the encounter with Cookie in Parverhill and met the Magicspirit.
(1 Full body CG, 1 solo CG scene, 1 optional onsen scene)
Shanna
Shanna can be found on a far away temple island during the events of Mira (Step 5 of her event sequence). After finishing the events on the island, you can find Shanna at Pumumu. There are two different options for her following events:
- 1. When you closed the peeping hole at the secret onsen: Shanna’s solo CG scene becomes available in Pumumu immedaitely.
- 2. When you left the peeping hole at the secret onsen open: The events for Shanna’s and Naomi’s onsen scene now starts when you enter the Newkungu casino. Shanna’s solo CG scene becomes available in the casino after finishing the onsen events.
(1 Full body CG, 1 solo CG scene, 1 optional onsen scene)
Nemorvyra
A succusbus who lives in the south dungeon in Central. She can raise your relationship to other countires when you give her presents in return.
During her eloquence training, she’ll give you a quest to bring a letter to Calterburry. You get her CG scene after this quest.
1 CG sex scene
CG room Non-humans 2: – Renryuu: Ascension Walkthrough
Hellhound
Hellhound can be found at the bottom of the dungeon below Old Ashton. She won’t join you, but occasionally appear in random places. If you help Leneth at Calbridge Stronghold (Quest
49) you’ll get the option to sleep with her at the trainings cave near the academy.
3 CG scenes
Dai-Xinyue
The leader of the hellhound village below the volcano in Amagal. She is feared even by the other hellhounds for her incredible strength.
1 full body CG and 1 CG sex scene.
Shui
Dai-Xinyue’s right hand and second strongest of the hellhound village below the volcano in Amagal.
1 full body CG and 1 CG sex scene.
Luoyang
A member of the hellhound village below the dungeon of Amagal. She is a bit troublesome at times, but can hold back just enough to not kill you.
1 full body CG and 1 CG sex scene.
Xyani
The most cheerful member of the hellhound village. She’s still very strong and deadly, but in a way cuter way.
1 full body CG and 1 CG sex scene.
Yimu
The most childish of the hellhound village, but you still need to be wary of her. Many adventurers found their death when joining Yimu to “play” with her.
1 full body CG and 1 CG sex scene.
Liu
The blacksmith of the hellhound village below the volcano in Amagal. She takes great pride in her work.
1 full body CG and 1 CG sex scene.
Mia
When Lind is your general, with her events are advanced far enough, and female soldiers allowed on the finances and policies screen, you can get a dialog about Mia applying as a soldier.
1 full body CG
Alcena
A centaur that can be found in the challenge floor of the Spire of Courage. 1 full body CG
Nemelphia
A dryad that can be found in the challenge floor of the Spire of Courage. 1 full body CG
Maria
An angel, who can be found at the drunken cave during the events of Mira. After Mira’s wedding, you can talk with Maria to get her CG scene.
1 TitFk scene
CG room Non-humans 3 – Renryuu: Ascension Walkthrough
Firespirit:
A spirit found deep in the „South dungeon“ (Map no. 11). She teaches Ryen „Fire Recovery“ if you beat her in a fight.
1 CG on first encounter and 1 CG scene later.
Icespirit:
The Icespirit is met as part of Mira’s character quest Evil Spirit (Quest no. 25). You can decide to help and release the spirit or fight and seal her. In the current version this only affects your relationship with Mira but will have more consequences later in the game.
1 CG on first encounter.
Earthspirit:
A spirit found in the forest past the map „Elf village“ (Map no. 13). She loves male seed and makes no secret out of it.
- CG scene on first encounter.
Windspirit
Can be found at the bottom of the south dungeon. She has a part in Vampire’s events. 1 CG sex scene.
Waterspirit
Can be found in a dungeon in Siriveta. She is part of the main story events. No CG scene yet.
Magicspirit
Lives in the Yin tower in Amagal. There is no direct path to get to her room, but the elf thief girl in the bottom right corner of Parverhill opens a portal to the spirit during her events. After those events, you can return to the spirit by using the “Teleport stone Amagal.”
No CG scene.
Pandora
To unlock Pandora, you need the event when you talk with Trey at the sleeping chambers after the laboratory on the overview map is build, the vanguard battle system is unlocked, you had the first appearance of female Ryen at the bathhouse, and you had the sex scene with Kavrala. During the event with Trey, you’ll get a box from Bristol. Interact with the box in your bedroom to meet Pandora.
Pandora has 2 sex scenes, one in her “female Ryen” shape, and a second scene in her original shape.
- CG scenes.
Baemeth
Lives in a hidden area of the challenge dungeon of the Spire of Courage. You can only find her during an event of Chiyo’s, which requires Chiyo’s first sex scene, Kayelinth’s first sex scene, the river scene with Chiyo and Kayelinth, the encounter with Raidy on the challenge floor of the Spire of Courage, and the dialog about stone plates as teleport options in Lalizan in Dorgania.
No CG scene.
CG room Monstergirls 1 – Renryuu: Ascension Walkthrough
After events at the Whisperwind farm, you can capture monstergirls with Soul Lanterns and release them at one of the following locatons:
Big Spidergirls and Big Harpies can be released at the big farm, slightly south-west of Aldlyn. Grey Imps, Red Imps and Ice Alraines can be released at the Whisperwind farm in Begus.
Alraunes, Mummies, Anubis, and all Salamanders can be released at the monsterhall in your castle in Aldlyn.
You can pet them and give them presents to increase your relationship. At 100 you can get a sex scene with them.
Blue Slimegirl:
A monstergirl which can be found in many dungeons. 1 CG on first encounter and 1 CG scene later.
Red Slimegirl:
A monstergirl which can be found in many dungeons. 1 CG on first encounter and 1 CG scene later.
Greem Slimegirl:
A monstergirl which can be found in many dungeons or in the swamps south of the Bitterroot farm in Central..
1 CG on first encounter and 1 CG scene later.
Grey Imp
A monstergirl which can be found in many dungeons. 1 CG on first encounter and 1 CG scene later.
Red Imp
A monstergirl which can be found in many dungeons. 1 CG on first encounter and 1 CG scene later.
Alraune
A monstergirl which can be found in many dungeons. 1 CG on first encounter and 1 CG scene later.
Ice Alraune
A monstergirl which can be found in many dungeons. 1 CG on first encounter and 1 CG scene later.
Weak Mummy
A monstergirl which can be found in many dungeons. 1 CG on first encounter and 1 CG scene later.
Strong Mummy
A monstergirl which can be found in many dungeons. 1 CG on first encounter and 1 CG scene later.
Small Harpy:
A monstergirl which can be found for example at the singing mountain. The only entrance to this area is in Witton, when you follow the path up north inside of the walls of the fort.
1 CG on first encounter and 1 CG scene later.
Big Harpy:
A monstergirl which can be found for example at the singing mountain. The only entrance to this area is in Witton, when you follow the path up north inside of the walls of the fort.
1 CG on first encounter and 1 CG scene later.
Ice Harpy
A monstergirl which can be found in many dungeons. 1 CG on first encounter and 1 CG scene later.
CG room Monstergirls 2 – Renryuu: Ascension Walkthrough
Small Spidergirl
A monstergirl which can be found in many dungeons. 1 CG on first encounter and 1 CG scene later.
Big Spidergirl
A monstergirl which can be found in many dungeons. 1 CG on first encounter and 1 CG scene later.
Anubis
A monstergirl which can be found in many dungeons. 1 CG on first encounter and 1 CG scene later.
Anubis-Lamia
This monstergirl is not in the game yet. No CGs.
Thunderkitty
A monstergirl which can be found in many dungeons. 1 CG on first encounter and 1 CG scene later.
Black Salamander
A monstergirl which can be found in many dungeons. 1 CG on first encounter and 1 CG scene later.
Pink Salamander
A monstergirl which can be found in many dungeons. 1 CG on first encounter and 1 CG scene later.
Red Salamander
A monstergirl which can be found in many dungeons. 1 CG on first encounter and 1 CG scene later.
Raijuu
A monstergirl which can be found in many dungeons. 1 CG on first encounter and 1 CG scene later.
Water Lamia
A monstergirl which can be found in many dungeons. 1 CG on first encounter and 1 CG scene later.
Cowgirl
A monstergirl which can be found in many dungeons. 1 CG on first encounter and 1 CG scene later.
Jiangshi
A monstergirl which can be found in the dungeon below Witton during an attack against a hideout of some assassins, and in the black lair dungeon in Dorgania.
Captured Jiangshi can be released and befriended with for a CG scene at the graveyard in Central, after you build it on the country overview map.
1 CG on first encounter and 1 CG scene later.
CG room Monstergirls 3 – Renryuu: Ascension Walkthrough
Funeral
One of the two twins from the fire raid in the Spire of Courage. All details to the battle and how to win it can be found in the FAQ section.
1 full body CG.
Shika
One of the two twins from the fire raid in the Spire of Courage. All details to the battle and how to win it can be found in the FAQ section.
1 full body CG.
Frozen Queen
A boss enemy in the ice raid in the Spire of Courage. You need her panties + Memory Orb 3 for the group scene, and panties + Memory Orb 5 for the solo scene. Panties and memory orbs can be obtained in the raid.
Full body CG + 2 CG scenes.
Tiena
A boss enemy in the ice raid in the Spire of Courage. With need her panties and memory orb 2 for her group scene, and memory orb 4 for her solo scene. Panties and memory orbs can be obtained in the ice raid.
Full body CG + 2 CG scenes.
Kiki Glitterfoot
Leader of the supervisors in the nature raid dungeon. After defeating all three supervisors, you can talk with Kiki to unlock the challenge battles. In this mode, you have to fight three battles back to back. Depending on who you fight in the last battle, you can have sex with either Kiki, Levia, Green Lamia, or Roseris.
Full body CG + 1 CG scenes.
Levia
One of the supervisors in the nature raid dungeon. You can unlock her sex scene during Kiki’s challenge battles.
Full body CG + 1 CG scenes.
Green Lamia
An enemy in the nature raid. You can unlock her sex scene during Kiki’s challenge battles. Full body CG + 1 CG scenes.
Roseris
One of the supervisors in the nature raid dungeon. You can unlock her sex scene during Kiki’s challenge battles.
Full body CG + 1 CG scenes.
Ice and Water Dragongirl
An enemy in the ice raid. You can watch their sex scene with the memory orb 1. Full body CG + 1 CG scenes.
Nessa
You meet Nessa during the events of Mai and Dea. Full body CG
CG room Monstergirls 4 – Renryuu: Ascension Walkthrough
Goat Blond
One of the four goat girls from Mount Alberrane. You need to advance the events with Ellanore from Ebron, and after her dialogs in the castle with some guy in front of the clinic in Aldlyn, to meet the goat girls.
1 full body CG
Goat Red
One of the four goat girls from Mount Alberrane. She is the tallest, physically strongest and most aggressive girl of the four goat sisters.
1 full body CG
Goat Pink
One of the four goat girls from Mount Alberrane. She is usually shy and quiet, and gets constantly bullied by her sister Red.
1 full body CG
Goat Grey
One of the four goat girls from Mount Alberrane. She is the youngest of the sisters, and the blond goat is raising her like a mother. All of her other three sisters protect and take care of her with love.
1 full body CG
Bee guard
The quest “Bee Infestation” is available via the Aldlyn city board after you had the Thremten festival events and the events with the Dark Sorceress to know about the dangerous forest near Thremten.
After this quest, you can advance the events with the bee girls to get their CG scenes.
The bee guard used to be a guard for the hive, but due to their limited numbers, she has to be more flexible with her duties now.
Full body CG and sex scene
Bee Worker
The quest “Bee Infestation” is available via the Aldlyn city board after you had the Thremten festival events and the events with the Dark Sorceress to know about the dangerous forest near Thremten.
After this quest, you can advance the events with the bee girls to get their CG scenes.
The bee worker used to be a craftswoman for the hive, but due to their limited numbers, she has to be more flexible with her duties now.
Full body CG and sex scene
Bee Queen
The quest “Bee Infestation” is available via the Aldlyn city board after you had the Thremten festival events and the events with the Dark Sorceress to know about the dangerous forest near Thremten.
After this quest, you can advance the events with the bee girls to get their CG scenes. Full body CG and sex scene
CG room Elves 1 – Renryuu: Ascension Walkthrough
Eloen
To start the scenes of the elves of Ebron you need to be far enough in the main story (meeting Lucilla in Dorgania, finding the fragment chest in Sunee and then report back to Varea in Manastyr) and finish the event with helping Eloen at the west side of Ebron.
1 foursome CG scene and 1 solo scene by talking to the headmaid after the foursome scene.
Phraan
Same as Eloen above.
1 foursome CG scene and 1 solo scene by talking to the headmaid after the foursome scene.
Knocky
Blacksmith in the elf village Ebron. Takes part in the foursome with Eloen and Phraan. Her solo scene requires that you finish the racism and trade route events in Orchel.
Knocky gives you the recipe for the Katryx Blade and the Mithril Pickaxe during the main story events.
1 foursome CG scene and 1 solo CG scene.
Nori
You can help Nori to become a police officer at the police HQ after building it on the overview map. Later, after the events with the raid of the thieves guild against the assassins, you can find her on the right side of Aldlyn near Scarlett’s house, where you can trigger her CG scene.
- CG sex scene.
Ariana
You encounter Ariana in the easy dungeon area of the Spire of Courage, where she jumps out of a teleport gate, while being chased by an orc. If you win the battle, you can get one of two different CG scenes depending on whether you wake her up or imprison her.
- CG scenes
Wendy
Wendy was a student with Ryen at the academy in Aldlyn, who you can meet again later at the challenge floor the Spire of Courage in Begus. After talking to her there you can find her in the inn of Calterburry to get her scene.
She becomes available as a squad leader for your vanguard forces at the inn of Calterburry after you had her first sex scene, and the first sex scene with the archery squad leader Ailluin.
1 CG scene
Ellanore
An elf from Ebron. Her events at Ebron will make her move to the sleeping chambers in your castle.
After talking with Ellanore in your castle, a guy called Rhethos will appear in Aldlyn in front of the clinic. His dialog will start the quest which unlocks Ellanore’s CG scene.
1 CG scene
CG room Elves 2 – Renryuu: Ascension Walkthrough
Sariandi
Villager in the elf village Orchel in Dorgania. After the events of playing with some girls in Orchel, you get a quest to go to the old village of the tribe elves with Sariandi. At the end of the eventline, the entire tribe will move to Central, where you get the sex scene with her.
1 CG sex scene.
Lymseia
Villager in the elf village Orchel in Dorgania. Has a sex scene after her tribe moves to Central. 1 CG sex scene.
Renna
Villager in the elf village Orchel in Dorgania. Has a sex scene at Bitterroot farm, after Mirel’s “About Racism” quest is done.
1 CG sex scene.
Maescia
Villager in the elf village Orchel in Dorgania. Has a sex scene after her tribe moves to Central. 1 CG sex scene.
Filauria
Villager in the elf village Orchel in Dorgania. Her sex scene requires the Orchel trading route quest to be done.
1 CG sex scene.
Seldanna
Villager in the elf village Orchel in Dorgania. After the “About Racism” quest from Mirel’s events, and the events about the tribe elves leaving Orchel, you can talk with Seldanna to trigger a sequence of dialogs with her, which’ll lead to her sex scene.
1 CG sex scene.
Thaola
Villager in the elf village Orchel in Dorgania. Her sex scene requires the cooking contest of Keylessa to be done.
1 CG sex scene.
Syvis
Villager in the elf village Orchel in Dorgania. During the “About Racism” events, you get a “Beauty Contest” quest from Syvis. If you had sex with either Elanil or Sarya, and the beauty contest is done, talk with Syvis again for her sex scene.
1 CG sex scene.
Saphielle
Villager in the elf village Orchel in Dorgania. Talk with Saphielle for the “Orchel Trade Route” quest. It requires a bunch of things to be done before you can start the quest:
- The “About Racism” quest from Mirel must be done.
- The “Old Bow repair” quest from Sledanna must be done
- The “Alchemy Maniac” quest from Zentha must be done
- You must’ve had the dialog with Darude during the main story, where he gave you the permit to enter Dorgania. (Should be a given when you’re at Orchel).
- The storage building near the Red Keep on the overview map needs to be constructed.
- You must’ve repaired the Bitterroot farm.
- You must’ve finished the events about the tribe elves at Orchel
- The border to Dorgania needs to be open on both sides.
- The party needs to know the location of Ebron
- You need the first events with Elina, and Maid Louise, to the point where Elina is now standing at the noble living quarters, and not in your throne room anymore.
Talk with Saphielle again, after the trade route quest is done, to get her sex scene. 1 CG sex scene.
Cremia
Villager in the elf village Orchel in Dorgania. During Saphielle’s “Orchel Trade Route” quest, you have to upgrade/repair the old shed and tent in Orchel via the overview map. The sex scene with Cremia automatically starts after you pay for the repairs.
1 CG sex scene.
Deulari
Villager in the elf village Orchel in Dorgania. During Saphielle’s “Orchel Trade Route” quest, you have to upgrade/repair the old shed and tent in Orchel via the overview map. Once the wood shed is upgraded to a workshop, and you gathered the three research documents for Deulari during the quest, you can talk with her there to start her sex scene.
1 CG sex scene.
Keylessa
Villager in the elf village Orchel in Dorgania. After talking to her and Thaola for Mirel’s “About Racism” quest, and Kayelinth’s event at Rakake, you can talk to Keylessa for a cooking contest. Her and Thaola’s sex scene become available after the contest.
1 CG sex scene.
CG room Elves 3 – Renryuu: Ascension Walkthrough
Zaleria – Renryuu: Ascension Walkthrough
Villager in the elf village Orchel in Dorgania. When Brad has the Brawler Stamp Card from Seiho, Zaleria will challenge him to a brawl battle. After those events, you can watch Zaleria Fk Ashryn with a magic D.
1 futa CG scene with her sister Ashryn
Ashryn – Renryuu: Ascension Walkthrough
Villager in the elf village Orchel in Dorgania. When Brad has the Brawler Stamp Card from Seiho, Zaleria will challenge him to a brawl battle. After those events, you can watch Zaleria Fk Ashryn with a magic D.
Her solo scene requires that you advanded the “About Racism” quest from Mirel a few steps, and have the futa scene with Zaleria unlocked.
1 futa CG scene with her sister Zaleria, and 1 bondage scene
Zentha
Villager in the elf village Orchel in Dorgania. Talk with Zentha after Ashryn’s bondage scene, and after you’ve finished Zentha’s “Alchemy Maniac quest”, to start her sex scene.
1 CG sex scene.
Allisa
Villager in the elf village Orchel in Dorgania. After constructing the brothel on the overview map, you can invite Allisa to work there.
1 CG scene.
Rina:
The twins Rina and Rena live at Orchel in Dorgania. After helping the tribe elves to find a new home, and when you have all 12 party members, you can play hide-and-seek with them to get their nude full body and sex scene CGs.
1 CG scene.
Rena:
The twins Rina and Rena live at Orchel in Dorgania. After helping the tribe elves to find a new home, and when you have all 12 party members, you can play hide-and-seek with them to get their nude full body and sex scene CGs.
1 CG scene.
Elanil
Villager in the elf village Orchel in Dorgania. After you’ve finished the “About Racism” quest, you can talk with Elanil to trigger an event with her and Sarya. You can pick to sleep with either of them during the events, but you can still trigger the missed scene for the other girl afterwards.
1 CG sex scene.
Sarya
Villager in the elf village Orchel in Dorgania. After you’ve finished the “About Racism” quest, you can talk with Elanil to trigger an event with her and Sarya. You can pick to sleep with either of them during the events, but you can still trigger the missed scene for the other girl afterwards.
1 CG sex scene.
Kavrala
Villager in the elf village Orchel in Dorgania. Her scene starts at her store, after the workshop for the “Orchel Trade Route” quest is done, and the scene if Zaleria with Ashryn is unlocked.
1 CG sex scene.
Lyrandis
Villager in the elf village Orchel in Dorgania. Her sex scene requires Mirel’s “About Racism” quest to be done.
1 CG sex scene.
Elmyra
Villager in the elf village Orchel in Dorgania. Her sex scene becomes available after you had sex with Zentha.
1 CG sex scene.
Phyrra
Villager in the elf village Orchel in Dorgania. During Mirel’s “About Racism” quest, you get the “Dancer Phyrra” quest from the dialog with Phyrra, which’ll unlock her sex scene.
- CG sex scene.
CG room Begus 1 – Renryuu: Ascension Walkthrough
Queen Jeanne Apelia – Renryuu: Ascension Walkthrough
You meet the Queen of Begus Jeanne Apelia during the main story line and the political meetings with Begus. After those events, you can find an invitation from her to her castle in Calterburry on your desk where usually the paperwork can be found.
- CG scenes
Millaine – Renryuu: Ascension Walkthrough
Commander of a mine in Begus (Map no. 27) , which was overrun by undead. She asks you to get a box out of the mine without looking into it. If you ignore her plea and look into the box, you’ll find something you can use against her and obtain the CG scene.
1 CG scene.
Kimiko – Renryuu: Ascension Walkthrough
Kimiko lives in the Norhall stronghold in Begus. After helping her to deliver a letter, return to the library in the top left corner of the castle in Calterburry to continue her events and unlock her CG scene.
- CG scene
Adrianna
A guard of Queen Jeanne Apelia. Can be found in the bar in Calterburry during Elly’s events. Her sex scene is available after you finish the quest “The Situation in Begus.” That quest starts at the desk in your bedroom. It requires the events about Maria and your journey to the water temple island to fight Katreena, the events with Elly and Adrianna, the sex scene with Queen Jeanne, and that you use the teleport orb once after all of the previously mentioned conditions are met.
A threesome scene with Elly becomes available after a quest about a hidden dwarf fortress. The quest starts in the bar of Calterburry after Adrianna’s first CG scene, Elly’s second scene (after the events with the Luminous Order) and after you supported Varea for the throne of Amagal.
- sex scene
Lady Forbes
A commander in Begus. No CG scene Demoness
Can be found in the hard dungeon in the Spire of Courage, during the events with Naevy. 1 Battler CG and 1 special scene with 3 CGs
Irinlia
A succubus that lived in the Redwood Mansion in Millwater. During her events, you prove her guilt in the murder case of Lord Redwood. Throwing her into your own dungeon gets you onto her bad path, while giving her to the soldiers will put her on her good path. You need to remove Tsubaki’s wounded debuff, for example by sleeping, before talking to Irinlia at the Ironholm prison will advance her good path events.
- CG scenes (Good path, bad path, and bad path bonus scene together with Lace)
Sia
Sia is a shy but curious snow girl. She lives in an Igloo at the north-east of Begus, which she can’t leave due to the danger of the sun melting her.
1 standing CG and 2 CG scenes
Naevys’yesmyâr
You meet Naevy on the medium difficulty floor of the Spire of Courage, where she was fighting on her own while searching for a husband.
1 Battler CG, 1 sex scene and 1 bonus CG scene
Ghost Shey:
Can be found in the dungeon below Old Ashton in Begus. She will come to your sleeping chamber after you bury her bones in the graveyard of Old Ashton.
During the events of the quest “Ryoko’s Quest” Shey is given a mechanical body to control, which the scientist Cassedy later improves to make her look almost perfectly like a normal girl.
3 different full body CGs
Leneth:
Leneth is a very clumsy wyvern who constantly stumbles and gets herself somehow into trouble. When you find her she is kept as a prisoner in the storage of the Norhall stronghold. You’ll need to talk with the fort commander in order to release her. After she is released you’ll take you to the trainings cave near your old academy, where you can have the sex scene with her.
1 CG on first encounter and 1 CG scene later.
Libelle
She can be found at the Jade Cave in Begus. After being chased for being a “monster” (half cat/half dragon) she is a bit shy but very grateful for any help.
1 full body CG and a sex scene starting at the sleeping chambers.
CG room Begus 2:
Tami – Renryuu: Ascension Walkthrough
Talk with Tami in Pumumu for a cooking event. Afterwards she’ll be interest to role play your wife, which’ll lead to a sex scene.
1 CG scene
Mii – Renryuu: Ascension Walkthrough
A villiger of Pumumu. You can get a quest from her, which unlocks her CG scene, after you had the first sex scene with Shanna.
1 CG scene
Elanil – Renryuu: Ascension Walkthrough
A villiger of Pumumu.
No CG scene
Claire
A villiger of Pumumu.
No CG scene
Lartia
A villiger of Pumumu. You can get a quest from her, which unlocks her CG scene, after you had the first sex scene with Mii.
1 CG scene
Naeleth
A villiger of Pumumu.
No CG scene
Dora
A villiger of Pumumu.
No CG scene
Rutia
The leader of Pumumu.
No CG scene
Jiliesh
A villiger of Millwater. You can find her in the Spire of Courage challenge floor after the murder case is done. The dialog there will unlock a new event with her at Millwater, which leads to her CG scene.
1 CG scene
Jillia
A villiger of Millwater. You can get an event with her after solving the murder case and catching Irinlia, which will lead to her CG scene at the end.
1 CG scene
Fane
A villiger of Millwater. You can get an event with her after solving the murder case and catching Irinlia, which will lead to her CG scene at the end.
1 CG scene
Winoa
A villiger of Millwater. No CG scene
CG room Begus 3 – Renryuu: Ascension Walkthrough
Raidy
Part of the raider group in the callenge floor of the Spire of Courage. 1 CG scene
Firah
Part of the raider group in the callenge floor of the Spire of Courage. Her scene can be unlocked in the caves of the ice raid.
1 CG scene
Aelynthi
Part of the raider group in the callenge floor of the Spire of Courage. Her scene becomes available in the nature themed raid dungeon, when you bring her the legendary bow Molten Fury.
1 CG scene
Kalia
Part of the raider group in the callenge floor of the Spire of Courage. Her scene can be unlocked in the caves of the ice raid.
- CG scene
CG room Others 1:
Varea
The big sister of Chiyo. You meet her during the main story. By advancing the events with Chiyo and Amagal you’ll eventually get an option to help her win the throne of Amagal.
During these events you’ll get a CG scene with her.
- CG scene (with 2 different CGs). Require the events of Chiyo and Amagal to be advanced.
2nd scene is a threesome with Jeanne Apelia, which requires that you advance the political events with Begus.
Grey:
Self-proclaimed rival of Ryen at the military academy. He was the academy´s ace before Ryen showed up. Even after Ryen left the academy and became king, Grey worked hard to surpass him.
Can be turned into a girl after events at the bathhouse. Requires that you have the bathhouse constructed and went there to have the first gender bend event. The event with Grey starts on the Aldlyn city board.
4 CG scenes and 1 full body CG as a woman
“The violet beast” Katreena
Kathreena is the leader of a bandit group with no good intentions. She is very strong and proud, but will retreat when the odds are too bad.
- Full body CG
Raziel
Ryen’s brother, who you meet during the main story events. No CG scene
Fuka
A member of Raziel’s group. Her special ability is to become invisible. No CG scene
Lace
Lace is encountered as an enemy several times during the main quest, but can be captured in the Drunken Cave after you made a Katryx Blade to destroy her armor. She appears in The Drunken Cave after speaking with Varea in Manastyr. Varea will be available in Manastyr after meeting Lace during the main story line.
- CG scenes (1 for her good, and 1 for her bad route) – 2 full body CGs
Emilia
A member of Raziel’s group. No CG scene
Mio
A member of Raziel’s group. No CG scene
Tsiom
Tsiom is a water element brawler. You can meet her on the base camp of the brexeet isles, and she can teach Brad up to 3 new skills.
No CG scene
CG room Others 2:
Gatling Girl
A clone soldier of the Luminous Order. You encounter her during the quest “Ryoko’s quest” at the area south of Central.
No CG scene
Sniper Girl
A clone soldier of the Luminous Order. You encounter her during the quest “Ryoko’s quest” at the area south of Central.
No CG scene
Pistol Girl
A clone soldier of the Luminous Order. You encounter her during the quest “Ryoko’s quest” at the area south of Central.
No CG scene
Grenade Girl
A clone soldier of the Luminous Order. You encounter her during the quest “Ryoko’s quest” at the area south of Central. She is blind, but makes up for it with a sharp hearing ability.
No CG scene
Cassedy
A scientist who worked for the Luminous Order. You encounter her during the quest “Ryoko’s quest” at the area south of Central.
She is the creator of Ryoko, and her research was the foundation for the creation of the four clone soldier girls.
1 tentacle CG scene
CG room Dorgania 1:
Palasha
The party can find her in Rakake in Dorgania, which starts a long quest which introduces her character and reveals that she is the princess of Dorgania.
During her quest, when you have to search for her in the north of Dorgania, she stands in the top left corner of Minsk Harbour and looks at the sea.
1 CG scene
Lucilla
A pure blooded demon girl. You encounter her first in Minsk Harbour in Dorgania during the main story events. Her scene starts at the entrance of Minsk Harbour, after the main story and events of the Dorgania rebellion are advanced far enough.
1 CG scene
Ash
Brawler in Kagabangui. After defeating her and Grimace, you can get a new quest from her. The quest in this event requires that you increase Brad’s popularity to at least 10. You can do so by doing various events, and with the new “Brawler Perfume” item. There are 5 such events in Kagabangui, 1 in Minsk Harbour, 2 in Newkungu, 1 in Rakake, and 1 in Tajurata Fort. You can buy the brawler parfume in Lalizan and Orchel. Both are unique, and can be purchased only once.
1 scene with a good or bad path option.
Sinrul
Sinrul is the leader of a group of bandits in Dorgania. Her CG scene unlocks during the events with the rebels and their fight against slavery.
You can get the same CG with her, regardless of whether you support the rebels or the government during the rebellion events in Dorgania.
1 CG scene
Kippy
This bunny girl can be found when talking to a guy in the top right area of Lalizan (Dorgania). Requires Kayelinth in your party and 1500 gold to get access to the storage.
When you had the first meeting with Hellhound in the dungeon below Old Ashton, and met Kippy in Lalizan, you can see Hellhound chasing Kippy on top of a building in Kagabangui. After entering Kagabanui four times while those two are running around on top of the building, you can walk past the building, one tile left of the entrance door, to trigger an event. Afterwards you can find the two girls again at the Black Lair (Orange stone building south of Kagabangui, which only serves as an entrance to a dungeon), and then in Rakake. Once you had the dialog in Rakake, Kippy will be in Lalizan, and you can get a CG scene when you talk with her there.
1 CG scene
Servant
A servant in the castle of Kagabangui in Dorgania. She has no scene or name yet. No CG scene
Zonja
Zonja is a slave that you can buy in Sunee. The slave trader won’t offer her, unless you have at least 100,000 gold in your pocket. She costs 50,000 gold or 60,000 if you declined the offer at first. She can be send to the dungeon, your castle, or to the brothel if it’s build. The CG scene is basically the same in all locations.
1 CG scene
Monstergirls
Aldlyn castle monsterhall
| Monstergirl | Gift until affection | Gift between affection | Gift from affection |
| Alraune | 20 Apple | 21-50 Fish | 51 Meat |
| Slimegirl Green | 20 Hay | 21-40 Bread | 41 Vegetables |
| Cute Salamander | 40 Flowers | 41-70 Toys | 71 Love Potion |
| Aggressive Salamander | 40 Fish | 41-70 Meat | 71 Steel Mace |
| Tall Salamander | 40 Small TP Potion | 41-70 Book | 71 Steel Blade |
| Slimegirl Red | 20 Apple | 21-50 Meat | 51 Whiskey |
| Thunderkitty | 50 Fish | 51 Cheese | |
| Anubis | 40 Earring | 41-70 E. Necklace | 71 Jewel |
| Mummy | 20 Apple | 21-50 Meat | 51+ Gazer Eye |
| Strong Mummy | 20 Earring | 21-50 Necklace | 51+ E. Necklace |
| Slimegirl Blue | 50 Fish | 51-64 Cheese | 65+ Mixed Food |
| Ice Harpy | 20 Fish | 21-50 Hay | 51 Toys |
Big Farm
| Small Spidergirl | 40 Stimulant | 41-70 Fish | 71+ Goldbar |
| Big Spidergirl | 40 Meat | 41-70 Gazer Eye | 71+ Katryx Ore |
| Raijuu | 40 Vegetables | 41-70 Apple | 71+ Thunder Blade |
| Small Harpy | 20 Hay | 21-40 Toys | 41+ Vegetables |
| Big Harpy | 20 Earring | 21-40 Necklace | 41+ E. Necklace |
| Cowgirl | 40 Big Potion | 41-70 Hay | 71+ Excellent Potion |
| Water Lamia | 40 Beer | 41-70 Whiskey | 71+ Water Shield |
Whisperwind Farm
| Ice Alraune | 20 Whiskey | 21-50 W. Dispel Herb | 51+ Coal |
| Imp | 20 Meat | 21-40 Fish | 41+ Iron |
| Red Imp | 20 Meat | 21-40 Fish | 41+ Iron |
It’s possible to catch several Monstergirls with Soul Lanterns and bring them to the whisperwind farm, the big farm in Central, or the monsterhall !in Aldlyn. You can befriend them there and harvest their essence without harming them.
Each monstergirl has 1 Battler CG and most have 1 CG scene.
Monstergirl locations – Renryuu: Ascension Walkthrough
CENTRAL
Ebron: Blue Slime Girl, Green Slime Girl, Alraune
North Dungeon:
- Entrance: Blue Slime girl
- North East Path: Ice Harpy, Ice Alraune
Red Keep- Blue Slime Girl, Thunder Kitty, Small Spider Girl, Lamia NOTE: Dungeon only unlocks after event with Kayelinth’s Mother.
South Dungeon:
- Entrance: Blue Imp
- 1F: Blue Imp
- 2F: Blue Imp, Red Slime Girl
- 3F: Blue Imp, Red Slime Girl
- 4F: Red Imp
Bitterroot Farm: Green Slime Girl, Alraune
Witton: Small Harpy, Big Harpy BEGUS
The Drunken Cave: 2F: Ice Harpy
Dhranholl Mine: 2F: Mummy, Strong Mummy
Old Ashton:
- 1F: Red Slime Girl
- 2F: Ice Harpy, Ice Alraune
Calterburry: 2F : Ice Harpy, Ice Alraune ( None after Ice Spirit leaves the place)
AMAGAL
Chrysthaven : Thunder Kitty
DORGANIA
Sunee: Small Spider Girl, Anubis
Siriveta: Floors paths starting from North East in clockwise direction at dungeon entrance map.
- Main Map: Cow Girl
- Entrance: Blue Slime Girl, Thunder Kitty, Alraune, Small Spider Girl, Big Spider Girl, Gazer (Non capturable but needed for gazer eye)
- 1F: Red Imp, Red Slime Girl, Tall Salamander, Aggressive Salamander, Cute Salamander
- 2F: Ice Harpy, Blue Slime Girl, Ice Alraune
- 3F: Mummy, Strong Mummy, Thunder Kitty, Anubis
Sinasoka:
- Main Map: Small Spider Girl, Large Spider Girl
- Cave: Tall Salamander, Aggressive Salamander, Cute Salamander
Maps
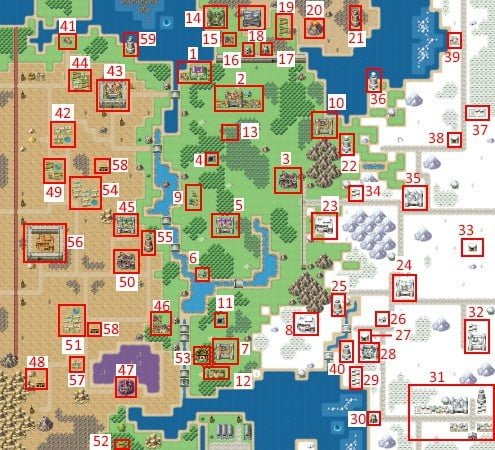
CENTRAL AMAGAL BEGUS DORGANIA
| 1. Academy/ Havaria Port | 14. Broken fort | 22. Fision tower | 41. Minsk |
| 2. Aldlyn | 15. Crysthaven | 23. Ironholm prison | 42. Sunee |
| 3. Abandoned barrack | 16. Yin tower | 24. Meddling Castle | 43. Kagabangui |
| 4. North dungeon | 17. Yang tower | 25. Twin ale tower | 44. Lalizan |
| 5. Red keep | 18. Manastyr | 26. Wooden house | 45. Lualombo |
| 6. Blue villa | 19. Army camp | 27. Jade cave | 46. Sinasoka |
| 7. Calbridge Stronghold | 20. Lava dungeon | 28. Norhall Stronghold | 47. Poisonwood Keep |
| 8. Witton | 21. Tower of Ash | 29. Old Ashton | 48. El Arma Gravesite |
| 9. Thremten | 30. Snowruin | 49. Siriveta | |
| 10. Parverhill | 31. Calterburry | 50. Old Lualombo | |
| 11. South dungeon | 32. Whitestone Citadel | 51. Newkungu | |
| 12. Bitterroot farm | 33. Dhranholl mine | 52. Orchel | |
| 13. Ebron | 34. Whisperwind farm | 53. Shrine | |
| 53. Shrine | 35. Diminus Castle | 54. Rakake | |
| 36. Skylo Tower | 55. Greencoast Tower | ||
| 37. Pumumu | 56. Tajurata Fort | ||
| 38. Drunken cave | 57. Sinrul’s Mansion | ||
| 39. Millwater | 58. Black Lair north/south entrance | ||
| 40. Spire of Courage | 59. Seaside Tower |
Academy/Havaria Port
Noteworthy events:
Academy:
Fight with Grey,
Commander telling some background story (after cave event)
Treasures:
Academy:
Chest (1 Potion) middle, Chest (1000g) top right corner
Cave outside:
Chest (500g) right side,
Hole (Big TP Potion) bottom left corner
Havaria Port:
Chest (3 Big Potions, Iron Blade) at Dock 1 – requires a ticket Chest (1500g) left port authority building,
Chest (Gambling Coin) bar
Aldlyn
Castle:
Noteworthy events:
Your 4 ministers: Theremis, Thor, Günther and Sir Edward. Headmaid Ryia in your bedroom.
Treasures:
Throne room:
Simple Coat beside table with presents,
Chest (5000g) top left corner – requires key from David the treasurer. Castle entrance:
Magic book usable with Chiyo in party. Noble living quarters:
Chest (Magic Up) top room in the middle, Chest (Elixir) top right corner
Sleeping chambers: Chest (Elixir) your bedroom
City:
Noteworthy events:
Outside: Battlearena, Merchant Darude Blacksmith: Elven Chief (Need Mirel) Bar: Catgirl mercenary (For quest no. 14) Church: Blessing choice for Trey
Treasures:
Outside: Hole (Beer) right side of castle, Hole (Big Potion) top right side of river, Hole (Small TP Potion) bottom right corner
Inn: Chest (500g) Blacksmith: Chest (500g) Bar: Chest (300g) Storage: Chest (Whisky)
Random houses: Chest (Gambling Coin), Chest (500g), Chest (Dispel Herb), Chest (Golden Cross)
Barracks: Chest (Potion)
Official Storage: Chest (Gambling Coin), Chest (Simple Mace) after obtaining Kayelinth
Underground: Chest (Nice Dagger) available during character quest for Sandra
Abandoned barrack
Noteworthy events:
Fight with a ghost, acquiring location for Mira Treasures:
Upstairs: Chest (Trap 500dmg), Heavy Armor left of the chimney
North dungeon
- Dungeon
Noteworthy events:
Stone gate requires Mira to open, acquiring location for Vampire, Windspirit on lowest level. Mimic trap as green chest
Treasures:
1st floor before gate: Chest (1000g) bottom, Chest (Iron Blade) top right corner 1st floor behind gate: Chest (1000g) left side
2nd floor: 2000g lying on the ground, Chest (Fire Gloves) top side
6th floor: Chest (Improved Cane) right side, Chest (20x Special Arrow) bottom right corner
Dark fort
Noteworthy events:
Part of the first character quest for Vampire. She’ll take constant damage after entering the fort.
Treasures:
Chest (Magic Water) main hall, Chest (Excellent Potion) 2nd floor, Chest (3x Raw Orangium) cellar
Red keep
Noteworthy events:
First political meeting with Begus in the command center, Storage door can be opened by Sandra
Treasures:
Outside:
Chest (Big Potion) top left corner, Chest (Dispel Herb) top right corner
House with red roof: Chest (Dispel Herb) Storage:
Magic book usable with Chiyo in party, Chest (Hard Leather Armor),
Chest (Big Potion),
Chest (Improved Magic Water), Chest (Magic Mace)
Blue villa
Noteworthy events:
Acquiring location for Mirel in Shed – requires Sandra or the key from inside the villa Treasures:
Upstairs:
Chest (10x Special Arrow) bottom left corner, Chest (Gambling Coin) in the shed
Calbridge Stronghold
Noteworthy events:
Acquiring location for Brad in the left building either by talking to the moving box or once you left the building once, he’ll talk with a guard when you re-enter.
Gambler Hiroku in the top right corner.
Treasures:
Left house: Chest (1000g) below a bed Storage: Chest (Iron) top right side
Witton
- Outside
Noteworthy events:
Quest for cutting trees Treasures:
Chest (20x Special Arrow) at the fort,
Hole (Excellent Potion) behind the right wall of the fort
Inside
Noteworthy events:
Lady Akira in the fort, entrance to a dungeon through the fort cellar Treasures:
Soldier (Iron Spear) left fort building, Chest (Strength Up) red house,
Chest (750g) grey house,
Chest (Big Potion) wooden house on bottom side
Dungeon
Noteworthy events:
Acquiring location for Sandra Treasures:
1st floor: Chest (3000g) top right corner, Chest (Iron) small room in the middle
3rd floor: Chest (Iron Knife) top right corner behind bridge – requires Sandra to unlock chest
4th floor: Rope lying on the ground
Thremten
Noteworthy events:
Grey will appear for a fight after you introduced yourself in the castle, Book author in the bottom right building
Treasures:
Hole (Dispel Herb) top right corner, Chest (600g) beside the road,
Chest (Potion) storage
Parverhill
Noteworthy events:
Little thief event in bottom right corner, traitors in the fort, hidden prison below the building on a hill
Treasures:
Hole (Iron Katana) Top right corner, Chest (Big TP Potion) House top left side, Chest (Magic Up) house above church, Chest (Skillstone) house on hill,
Chest (Elixir) house on hill,
Chest (Running Shoe) fort 1st floor, Chest (Mana Up) fort 1st floor, Chest (1000g) fort 1st floor,
Chest (Skillstone) fort 2nd floor
South dungeon
Noteworthy events:
Mimic as green chest on 1st floor, Green Dragon on 2nd floor – acquiring location for Kayelinth, Succubus on 3rd floor, Firespirit on 4th floor, Splitting quest on 4th floor
Treasures:
Chest (Strength Up) 1st floor, Chest (750g) 2nd floor,
Chest (Iron Shield) 2nd floor, 2000g on ground 3rd floor, Chest (Fire Plate) 3rd floor,
Chest (Earring) splitting scene room
3x 500g and 3x Goldbar behind green dragon.
Bitterroot farm
Noteworthy events:
Farmer selling Meat, Flowers, Vegetables and Logs. Chest for Sandras first CG scene in the swamps below the farm.
Treasures:
Hole (Beer) behind the farm,
Chest (Rope) inside the farm building,
Chest (20x Special Arrow) swamps top left corner, Chest (Simple Coat) swamps right side
Ebron
Noteworthy events:
Half-elf Ellanore, Battle with bandits in the forest. (Map is only accessible when Mirel talked to the elven Chief at the capitals blacksmith and met him again south of the forge)
Treasures:
Village:
Chest (20x Special Arrow) left from the Chief, Chest (1500g) top right behind a tree,
Chest (Excellent Potion) Townhall, Chest (2000g) Townhall,
Chest (1000g) Treehouse,
Chest (Leather Armor) Small house, Chest (Magic Up) Big house
Forest:
Chest (20x Special Arrow) top left corner, Hole (Improved Cane) top middle,
Chest (Old Bow) top right corner, Chest (750g) bottom right corner,
Chest (Agility Up) past a secret way at the top right corner
Bandit camp:
Chest (3000g) in camp, 3 beer in a tent, Leather Shoe in a tent
Broken fort
Noteworthy events:
Possible first meeting with Lace Treasures:
Chest (2000g) top left side, Skillstone on top of the building, Chest (Small TP Potion) 1st floor, Chest (Beer) 1st floor,
Chest (Stimulant) 2nd floor,
Magic book usable with Chiyo in party on 2nd floor, Chest (Big Potion) 2nd floor
Crysthaven
Noteworthy events:
Acquiring location for Ryoko through a dungeon entrance in the bottom left corner.
Treasures:
Outside:
Chest (20x Special Arrow) right side Dungeon:
Chest (Iron Knife) top right side, 3x Crystal at the bottom side, Chest (Ring) bottom,
Rope on ground at bottom left corner
Yin tower
Noteworthy events:
You can meet the Magicspirit on the third floor if you followed the thief girl from the bordertown through the teleporter.
Treasures:
Chest (Simple Helmet) inside top right corner, Teleportstone Amagal from the Magicspirit,
Magic book usable with Chiyo in party on 2nd floor
Yang tower
Noteworthy events:
Trap in the cellar – Mirel protects you if she’s in the party Treasures:
Chest (Gambling Coin) cellar right side, Chest (Magic Up) cellar right side, Chest (Fine Cloth) cellar middle
Manastyr
Noteworthy events:
Entering the castle requires requesting a meeting with Theremis in your castle first. Acquiring location for Chiyo in the storage below the prison. Secret mining base through a portal if you have the Amagal uniforms from the big camp (Map no. 19)
Treasures:
Castle:
Chest (Book Of Resistance) library,
Magic book usable with Chiyo in party in library, Chest (Ring of Wisdom) room on left side,
Chest (500HP damage trap) storage below the prison
Secret base:
Chest (beer) base,
Chest (Dispel Herb) base, Chest (Iron) base,
3x box with Purple Ore in base
Secret mine:
Chest (1200g) left on first choice,
Chest (Big Potion) down on second choice,
Chest (Iron) right on fifth choice, Chest (Iron) right on last choice,
Chest (3000g) beside mages after cart ride, box with Purple Ore beside mages after cart ride
Pink forest:
Chest (Mana Up) bottom left side, Chest (2000g) right side,
Chest (3000g) right side – requires Sandra, Chest (Small TP Potion) top center
Army camp
Noteworthy events:
Location to receive the „Uniforms of the Amagal Army“ item needed for entering the secret mining base in the Amagal castle.
Treasures:
Hole (2000g) outside top right corner, Chest (Big Potion) building on bottom,
Chest (Improved Magic Water) building on bottom, Chest (Mana Up) building top left side,
Chest (Big TP Potion) building top left side, Chest (Skillstone) building top left side, Chest (Magic Up) officers quarters
Lava dungeon
Noteworthy events:
Accessible after finding the way to the Volcano at the map „Big camp“ (Map no. 19) as part of Vampires character quests.
The “hellhound village” becomes available inside of the volcano, after you got far enough in Hellhound’s and Vampire’s events. The event requires that you impregnant the wyvern Leneth, to get Hellhound’s scene in maid uniform at your secret bedroom in the castle. The maid scene is not always available, as the trigger for it is a randomly generated number, which can be re-rolled by using the teleport stone.
Treasures:
Chest (Fire Shoe) center left side, Chest (Fire Dagger) top left corner, Chest (1500g) top center,
Chest (Big Potion) bottom center
8x Raw Orangium in center – reappears when you enter the dungeon again.
Tower of ash
Noteworthy events:
Boss fight in front of main gate, teleporter to third floor in the top left corner, Old Document for quest 18 on second floor.
Treasures:
First floor:
Magic book usable with Chiyo in party, Chest (3000g), Chest (Skillstone),
Chest (Elixir) Second floor:
Chest (3000g) requires Sandra, Chest (Old Document)
Third floor:
Chest (Stimulant)
Fision tower
Noteworthy events:
Invisible enemy will block your way further into the tower at first.
Treasures:
Well (Big Potion) behind the tower, Hole (Elixir) outside top left corner,
Chest (2000g) top right corner entrance hall, Chest (Dispel Herb) 2nd floor,
Magic book usable with Chiyo in party on 3rd floor,
4th floor:
Expensive Necklace, Nice Cane, 2000g,
Excellent Potion and Improved Magic Water in chests. 2X Goldbar on table.
Ironholm prison
Noteworthy events:
Location to obtain Sandra, if you didn’t help her during the first encounter in the dungeon below the snowfort.
Treasures:
Chest (Vegetables) building with red stone walls
Meddling Castle
Noteworthy events:
Lady Forbes will help you in quest no. 30.
Treasures:
Chest (Big Potion) storage,
Chest (Iron Blade) officer quarter,
Chest (Leather Armor) top left side in main building, Chest (Golden Cross) on table right side from the entrance
Twin ale tower
Noteworthy events:
None. Treasures:
None
Wooden house
Noteworthy events:
Location for increasing Sandra’s lock picking during her first character quest to open the chest in the swamps (Map no. 12).
Treasures:
Chest (Iron) in the cave behind the house
Jade Cave
Noteworthy events:
Sex CG with Millaine, if you open her box. First fight with Lace in the dungeon.
Treasures:
Dungeon:
Chest (Magic Hat) top right corner, Chest (Fine Cloth) left side,
Chest (Golden Cross) right side,
Chest (Millaine’s Box) bottom right corner, Chest (1500g) center left side
Norhall stronghold
Noteworthy events:
Quest „Crumbly Fort“ (Quest No. 30) from girl in blue dress.
Treasures:
Hole (Skillstone) outside top left corner, Chest (Iron Spear) storage,
Chest (3000g) storage,
Chest (Leather Armor) storage
Old Ashton
Noteworthy events:
CG for Shey and Hellhound in dungeon.
Treasures:
Village:
Chest (800g) left house,
Chest (Golden Cross) upper house, Chest (600g) right house,
Chest (Vegetables) right house, Chest (Necklace) church,
Dungeon 1st floor:
Chest (Dispel Herb) top left corner, Chest (2000g) top left side,
Chest (Running Shoe) bottom right corner Dungeon 2nd floor:
Chest (Big TP Potion) bottom right side, Chest (Leather Glove) bottom center, Chest (3000g) top left corner,
Chest (Skillstone) top left corner, Dungeon 3rd floor:
Chest (3000g) top right corner
Snowruin
Noteworthy events:
Elly is required to enter the ruin. A broken switch will require a mechanic (Quest 17).
Treasures:
Hole (1500g) outside top left corner, Chest (Magic Up) entrance bottom left,
rope on ground at the entrance bottom right side, Chest (Resist Up) room on right side
Treasures behind the demon:
3x beer, 1750g, 2000g, Magic Hat,
Good Heavy Armor.
Additional reward if Elly is in party when defeating the demon:
10,000g, Skillstone, Life Up, Iron Shield
Calterburry
Noteworthy events:
Acquiring location for Elly. Sneaking minigame in the church cellar for Elly’s quest. Dungeon „Haunted mines“ opens during Mira’s character quest.
Treasures:
Chest (3000g) barrack on top left side, Chest (500g) Inn, Chest (Mana Up) Inn, Chest (Heavy Helmet) Inn,
Chest (Nice Shield) blacksmith,
Chest (Gambling Coin) bottom right side, Chest (Elixir) church cellar,
Chest (Expensive Earring) church cellar
Haunted mines 3rd floor:
Chest (Frost Shield) top left corner,
Chest (Uniforms of the Begus Army) top right side, Chest (Bunnyears) right center,
Chest (Improved Magic Water) bottom left side
Whitestone citadel
Noteworthy events:
Middle house at top gives a quest to help a group of mercenaries (Quest 36).
Treasures:
Hole (Elixir) outside bottom right, Chest (1500g) left house,
Chest (Small TP Potion) left house,
Chest (Hard Leather Armor) middle house, Chest (Book Of Resistance) training hall,
Magic book usable with Chiyo in party in fort entrance room, Chest (Dispel Herb) fort kitchen
Dhranholl mine
Noteworthy events:
Has katryx ore that can be mined to make the weapon during quest no. 46.
Treasures:
Several sources of Iron and Katryx ore that can be mined repeatedly. 1st Floor: Chest (1500g) bottom right corner.
2nd Floor: Chest (Strength Up) at the entrance, Chest (2000g) bottom left corner,
Chest (Improved Gun Recipe) bottom right corner.
Whisperwind farm
Noteworthy events:
Woman that gives you a Soul Lantern to catch Imps or Slimegirls. Once you bring her a filled Soul Lantern, the creature will run around on the farm and you can interact with it. Up to 3 of each kind can live on the farm.
Treasures:
Outside: Hole (Small TP Potion),
Left house: Chest (Cooking book), Chest (Dispel Herb) Storage: Chest (Love Potion)
Diminus Castle
Noteworthy events:
Second political meeting with Begus.
Treasures:
Outside: Hole (Big Potion), Hole (Agility Up) Mage Store: Chest (Excellent Potion) Blacksmith: Chest (Goldbar)
Big house: Chest (2500 gold) Castle cellar: Chest (Beer)
Skylo Tower
Noteworthy events:
Encounter with a Necromancer.
Treasures:
Outside: Hole (Skillstone) 2nd Floor:
Chest (Golden Cross), Chest (Beer)
3rd Floor: Chest (Mixed Food)
4th Floor: Chest (Magic Apple), Chest (Skillstone),
Chest (3000 gold), Necklace,
2x goldbar
Pumumu
Noteworthy events:
Quest for Mii and afterwards Lartia when you had Shanna’s first sex scene. Event with Ziki and Shanna in the Snow Forest after Shanna’s first sex scene.
Treasures:
Outside:
Chest (100x Special Arrow), Chest (Magic Water)
Left house: Chest (Cheese)
The Drunken Cave
Noteworthy events:
- Rematch with Lace if unlocked.
- Second meeting with the Ice Spirit Treasures:
House: Chest (Bread)
1st Floor: Chest (Nice Axe)
Lava Floor: Chest (Fire Plate), Chest (Skillstone) Ice Floor: Chest (Skillstone), 5x Crystal
Millwater
Noteworthy events:
Murder case of Lord Redwood.
Treasures:
Outside:
Chest (Fish),
Hole (Love Potion)
Left house: Chest (Cheese) Mansion: Chest (Golden Cross) Church: Chest (Skillstone) Middle house: Chest (Cheese)
Spire of Courage
Noteworthy events:
Easy dungeon end: Encounter with Ariana
Medium dungeon end: Encounter with the Tigergirl Naevys’yesmyâr Advance dungeon end: Rematch with Hellhound, if you fought her before.
Treasures:
1st Fighting floor: Chest (Big Potion) 2nd Fighting floor: Chest (Magic Water) 3rd Fighting floor: Chest (Elixir)
Easy dungeon 1st floor: Iron Ore Easy dungeon 2nd floor: Iron Ore
Easy dungeon 3rd floor: Chest (Improved Magic Water) Medium dungeon 1st floor: Coal
Medium dungeon 2nd floor: Coal x2
Advanced dungeon 1st floor: Coal x2, Chest (Resist Up), Chest (Fire Plate) Advanced dungeon 2nd floor: Chest (Fire Shoe)
Minsk
Noteworthy events:
Continuation of the main story, after defeating Lace.
Treasures:
Outside:
Chest (3000 gold), Hole (Beer)
Left house: Chest (2500 gold) Big house: Chest (Armored Shoe) Wood storage: Chest (Goggles) Farm house: Chest (Dispel Herb) Farm storage:
Chest (Strength Up), Chest (Elixir)
Sunee
Noteworthy events:
Secret dungeon when interacting with the statue in the top right corner.
Treasures: Dungeon:
Chest (Magic Up), Chest (5000 gold), Chest (Nice Mace),
Chest (Hard Leather Armor)
Kagabangui
Noteworthy events:
None (yet) Treasures:
Castle: Magic book usable with Chiyo in party
Inn: Chest (3000 gold), Chest (Nice hat)
House: Chest (Book)
Lalizan
Noteworthy events:
None (yet) Treasures:
None
Lualombo
Noteworthy events:
Fragment dungeon for the main story line (riddle solution in the FAQ section) Treasures:
Magic book usable with Chiyo in party, Chest (Love Potion), Chest (Iron), Chest (Talisman of Protection)
Sinasoka
Noteworthy events:
Fragment dungeon for the main story line (riddle solution in the FAQ section) Treasures:
Hole (Love Potion), Chest (Skillstone), Chest (Steel),
Chest (Elixir)
Poisonwood Keep
Noteworthy events:
Fragment dungeon for the main story line (riddle solution in the FAQ section) Treasures:
Chest (Big TP Potion), Chest (Dispel Herb), Chest (Skillstone)
El Arma Gravesite
Noteworthy events:
Fragment dungeon for the main story line (riddle solution in the FAQ section) Treasures:
At El Arma’s grave: 247,500 gold, Gold Dagger,
Jewel,
2x Expensive Necklace, 4x Goldbar,
Skillstone,
Siriveta
Noteworthy events:
Waterspirit in the dungeon is part of the main story events.
Treasures:
Hole (Improved Magic Water), Chest (Exp. Scroll),
Chest (10000 gold), Chest (Luck Up), Chest (Love Potion),
Chest (Talisman of Speed), Chest (Vegetables),
Chest (Magic Up), Chest (Skillstone), Chest (Elixir), Chest (Fire Gloves),
Chest (Love Potion), Chest (Big TP Potion), Chest (Goldbar), Chest (Magic Up), Chest (Skillstone), Chest (Resist Up)
Old Lualombo
Noteworthy events:
Part of the main story events. The “empty” fort can’t be entered before those events.
During the event you have the option to open a black chest, which contains a Skillstone on the left side and a Magic Apple on the right side.
The yellow chests at the top contain 200000 gold each, but depending on your choices only 2-5 of the 7 chests can be looted.
Treasures:
Chest (Weak Love Potion), Chest (Excellent Potion), Chest (25000 gold)
Newkungu
Noteworthy events:
Depending on your choices, it might be necessary to go to Newkungu during the events with the Queen of Begus.
After the events with Mira and Maria on the faraway island, you can talk with the foxgirl Naomi in the casino to start a new event from which you could get Mai.
Treasures:
Chest (Elixir),
Chest (Love Potion),
Magic book usable with Chiyo in party, Chest (Skillstone),
Chest (Strength Up), Chest (Bread), Chest (Beer)
- Orchel Noteworthy events: Nothing yet.
- Shrine Noteworthy events: Nothing yet.
Rakake
Noteworthy events:
An event for Kayelinth brings you to Rakake, the city of food and cooking.
Greencoast Tower
Noteworthy events:
The first flight events for Mira and Kayelinth take place at the Greencoast tower.
The connection of the doors inside is randomised every time you enter the tower from the front door.
Tajurata Fort
Noteworthy events:
Nothing yet.
Sinrul’s Mansion
Noteworthy events:
Nothing yet.
Black Lair
Noteworthy events:
Has two different entrances/exits. In the dungeon is a simple switch riddle. Most switches are blocked at first, and you unlock them one by one when you activate the available switch.
Therefore, it’s a lot of going back and forth.
Seaside Tower
Noteworthy events:
An event of Shanna and Naomi chasing after Kathreena takes place here.
The elite bandits on this map are very strong when you first come to Dorgania, but they give a lot EXP.
The forgotten Brexeet Isles – Renryuu: Ascension Walkthrough
Base Camp
Noteworthy events:
When Brad had his class change to martial artist, he can train water element skills with the brawler Tsiom at the base camp.
Treasures:
Chest (Defense Up) in the big tent
Volcano island
Noteworthy events:
There is a mighty red salamander at the bottom of the area, who is much stronger than usual red salamanders, but also drops a lot of gold, a skillstone, and a love potion.
There are four treasure spots in this area, which you can loot once you got the right hint from Shirinsya in Havaria Port. Check the FAQ for a solution of the riddles and treasure locations.
Treasures:
Chest (40,000 gold) in the top right corner Chest (Resist Up) in the bottom left corner
Dry riddle island
Noteworthy events:
Once all orbs are glowing, a treasure chest appears at the bottom of the area.
The color of the orbs show which other orbs they activate or deactivate when you interact with them:
- Red = The orbs activate each other clockwise.
- Yellow = Counter clockwise
- Green = Opposite site
- Blue = Corners over cross, middle for themselves
Big tree with forest
Noteworthy events:
This area is part of the quest “The Forgotten Brexeet Isles.”
You need to find three switches in the labyrinth in the top right and interact with them in the right order to make an opening appear in the big tree.
Below the tree you’ll find a dungeon where you need to press colored buttons to make crystals of the same color disappear. But they only disappear for a short amount of time, so you need to hurry.
Treasures:
Chest (3x Expensive Necklace) in the top Chest (5x Iron) on the left side
Chest (Agility Up) on the right side
Chest (Strength Up) in a remote area, which you can only access once during the events with Sandra.
Big tree
Noteworthy events:
A 6 color combination is randomly generated when you enter the map, and can be seen when you interact with the yellow smoke. Once you memorized (or wrote down) the combination, you can interact with the orbs in the top left corner in the same order to get the reward.
Rewards are either gold, a love potion, or a skillstone. Can be repeated endlessly, by going to Central and back to the island.
Stone riddle island
Noteworthy events:
You need to push stones away to get to a cave, in which you need to solve a switch riddle, to get a bit treasure chest at the end.
Check the FAQ for a solution of the riddles. Treasures:
Chest (Luck Up) in the top right corner Hole (40,000 gold) in the bottom left corner
Hole (40,000 gold) in the bottom right corner
Abandoned house
Noteworthy events:
Inside the house are several diary pages that you can read to get hints about how to solve some of the riddles on other islands.
You can find a Resist Up inside the broken box in the bottom left corner of the house.
Fairy Oasis
Noteworthy events:
There are unqiue fairy enemies in this area. Their Strange Fairy Dust drop is necessary to obtain the treasure of this island. You need to put at least 5 dust into the flame in the center of the area to make the treasure in the hole in the north obtainable. All dust you have your inventory is removed when you put it into the flame, even if you have way more than 5.
Broken Tower
Noteworthy events:
On the first floor, you need to get through the location of the hexagons while they’re not glowing.
There is an invisible hexagon trap directly below the mirror in the top right corner.
On the second floor, you need to move the black and white stones with the four swtiches to open the path to the treasure. Using the teleports will change which stone you move with the switches.
Dark Cave
Treasures:
Big treasure chest (75,000 gold, 3x TP Potion, 4x Goldbar, 10x Iron, 4x Jewel, and 3x Love Potion) on the right side
Chest (Magic Up) in the top right corner Chest (Mana Up) in the bottom left corner
Quests
A Cheerful Adventurer(Quest no.182)
You meet the adventurer Palasha in Rakake, who invites you to explore some special locations with her. During the quest, you learn that she is actually the princess of Dorgania.
During the fifth step of the quest, you have to search for Palasha in the north of Dorgania. You can find her in the top left corner of Minsk Harbour.
Quest location: Obtained in Rakake in Dorgania. Reward: 2000 exp
A Complex Spell (Quest no.86)
Starts at the Aldlyn city board, if you helped Ariana during the first encounter with her.
Quest location: Obtained at the Aldlyn city board. Reward: Potion
A Dwarf Called Bob (Quest no.123)
Sandra wants to help her old friend, the dwarf she calls Bob, as he got fired from his position as a guard for helping Sandra to escape.
Reward: 2000 exp
A Vampire’s Release (Quest no.96)
Mike asked for your help to have a vampire in the prison in Kagabangui be released, so that she can help his group with something.
Quest location: Left bottom corner of Kagabangui. Requires 35+ trust with Brad to get the quest from Mike.
Reward: +Trust with Brad, 15000 gold, 500 exp
About Racism (Quest no.138)
Mirel wants to find a way to reduce racism. For this purpose, she wants to talk with the elves in Orchel to learn about their stories.
Quest location: Obtained from Mirel at the sleeping chambers. Reward: 7,000 exp
About Servants and Princes (Quest no.95)
A slave working in the castle of Kagabangui needs help to escape from the intrusive Prince.
Quest location: Right side in the Castle of Kagabangui. Reward: +Trust with Brad
Access Permit (Quest no.48)
In order to enter the Dhranholl mine, you need a permit from Commander Walcot of Whitestone citadel. [Walcot is in the sleeping chambers of Whitestone Citadel in Begus. He’s a guy with green hair.]
Quest location: Obtained from a guard blocking the way into the Dhranholl mine if you’ve been told about the katryx ore inside by Knocky before during quest no. 46
„Armor Breaking“. Reward: 1500 exp
Accommodation (Quest no.36)
You meet a group of mercenaries who’re in need of a new home. The quest requires you to talk to Sir Günther after obtaining Mirel and having the old couple of the blue villa in the prison. If you talk to Sir Günther before meeting the requirement, he won’t be able to help you and tells you to talk to him again later. Once you have agreed to give the blue villa to the mercenaries, you’ll have to go back to them and inform them about it.
Quest location: Obtained from Val at Begus south fort. (Map no. 32) Reward: 1500 exp, 1 Whiskey
Alchemy Maniac (Quest no.142)
This quest requires the dialog with Elmyra and Zentha during the About Racism quest. Quest location: Elmyra in Orchel.
Reward: 500 exp
Amagal Succession (Quest no.116)
Varea needs help to save Amagal from King Merius and Earl Rotiart. You have to discuss with them both and choose to help one of them before it becomes possible to talk with Varea in your castle and help her prepare for the duel.
Reward: 3000 exp, Relationship with Amagal +30
An Angels request (Quest no.79)
Maria, a friend of Mira, asked you to bring her through the Drunken Cave in Begus. She wants to summon the spirit Aura deep in the Cave.
Quest location: Obtained in front of the Drunken Cave after you either helped or sealed the Ice Spirit during Mira’s events.
Reward: None
Angel Feather (Quest no.33)
Meeting the dark sorceress from quest 32 without Mira will give you this quest to come back with an angel or an angel feather. Talking to the sorceress again after obtaining Mira will finish the quest. Due to the events during the dialog, the quest is always a failure and the quest reward can’t be obtained.
Quest location: Obtained from the dark sorceress Zady in the farm building of Bitterroot Farm.
Reward: 2000 gold
Annexation (Quest no.151)
Obtained when you decided to continue your support for the rebels after their attack on Minsk Harbour.
Note: Preparing a war doesn’t mean you declare war yet. Reward: 30000 exp
Anti-Cold Equipment (Quest no.154)
To solve this quest, you need to build the university, talk with the professor upstairs, bring him 1x electric fur, 1x water lamia scale, and 1x yellow essence. Afterwards you can craft the Anti-Cold armor and bring it to Sehtia. For the mass production, it’s requires that you capture and release 2 Anubis, 2 Raijuus, and 1 Salamander monster.
Quest location: Speak with the weaver in the work area left of Aldlyn, after you interacted with one of the three equipment icons on the command center screen.
Reward: Army equipment level raised by 1.
Anti-Heat Equipment (Quest no.155)
To solve this quest, you need to talk with Silver Goldtwine after receiving the quest from Sehtia. He’ll unlock the construction of the deep mine slightly below Parverhill on the country overview map. Talk inside the mine with Goro. The first expension of the mine requires that you posses the mithril pickaxe when you talk with him, the second expresion requires that you give him 5 explosive grenades. Afterwards you receive access to black iron ore and a location to fill mithril buckets with lava, which are both needed for hardened black steel. The mithril bucket is part of the recipe you get from the anti-cold equipment quest.
Talk with Sehtia after you have crafted the armor to advance the events. If you have at least 2 ice harpies, 2 spidergirls, and 1 water lamia captured and released, the quest will be done.
Quest location: Speak with the weaver in the work area left of Aldlyn, after you interacted with one of the three equipment icons on the command center screen.
Reward: Army equipment level raised by 1.
Anti-Magic Equipment (Quest no.156)
The first step is to craft an anti-magic armor as prototype for Sehtia. You need katryx ore for this, which you can get in the Dhranholl mine in Begus once you have advanced the main story far enough to have the access permit.
After showing Sehtia the prototype of the armor, you get the construction project for a katryx mine above Witton on the country overview map.
Talk with Sehtia again after building the mine, and when you have at least 2 thunderkitties and 2 mummies captured and released, to finish the quest.
Quest location: Speak with the weaver in the work area left of Aldlyn, after you interacted with one of the three equipment icons on the command center screen.
Reward: Army equipment level raised by 1.
Archery Range Inspection (Quest no.153)
Günther suggested that you visit the archery range and talk with the new archery instructor.
Quest location: Obtained via the tasks to improve your troops in the screen of the command center. The command center has to be build on your country overview map before you can access it.
Reward: 1500 exp
Arevis (Quest no.180)
After the quest “Mushroom Gathering” by Mii in Pumumu, you can talk with Lartia to get this quest. To solve it, you need to go north in Pumumu to enter the Snow Forest area and then go north again. In this area, you need to defeat harpies until Arevis appears and then defeat Arevis.
Reward: 15000 gold
Armor Breaking (Quest no.46)
In order to defeat Lace with her impenetrable armor you’ll need to find a weapon that can nullify it’s power and breaks her armor. The blacksmith you need to talk to is Knocky in Ebron (Map no. 13). She’ll tell you about Katryx ore in the Dhranholl Mines but you need to finish quest 48 before you can enter the mine and get the ore.
Quest location: Obtained during the quest no. 44 Fragments (2). Reward: 2500 exp
Arrest All Rebels (Quest no.163)
One of the two options to crush the rebellion in Dorgania is to help Sinrul and the government of Dorgania with the hunt of the rebels, who have scattered around Dorgania.
Only this or quest 164 “Raise Antipathy” are needed to get Sinrul’s CG scene and finish the route of supporting the government in Dorgania, but you can finish both quests.
Quest location: Obtained from Sinrul in Dorgania on the route to support the government in the events ot the Doragnia rebellion.
Reward: None
Bandit Investigation (Quest no.145)
The quest starts when you talk with the vangaurd leader Jessy after her squad reached level 3 or higher. The quest will lead to Jessy’s CG scene with the follow up quest “Jessy’s New Clothes”. (Requires you to walk out to the worldmap and back into the barracks, as the trigger to advance the event is on the exit.)
Reward: 1500
Bathhouse Request (Quest no.63)
The doctor would like the government to build a bathhouse. You can get it by buying the second public health upgrade from Sir Edward in your castle.
Quest location: Obtained from the city board in Aldlyn if you don’t have the upgrade already. Requires the previous “public health upgrade” which is to build the clinic.
Reward: None
Beauty Contest (Quest no.141)
This quest is unlocked when you talk with Syvis in Orchel during the About Racism quest.
Quest location: Obtained from Syvis in Orchel. Reward: 300 exp
Bee Infestation (Quest no.189)
This quest becomes available on the Aldlyn city board after you had the Thremten festival events and the events with the Dark Sorceress to know about the dangerous forest near Thremten.
After this quest, you can advance the events with the bee girls to get their CG scenes. Quest location: Can be found on the Aldlyn city board
Reward: 400 exp
Blind Eye (Quest no.117)
After the construction of Shrine, Dea will be at sleeping chambers.You have offered your help to remove the curse on Dea’s eye. According to Mira, Alchemist Kavrala of Orchel can fix the problem.
Reward: 1500 exp
Bodyguard Request (Quest no.60)
The catgirl Jackie needs some help to protect a merchant on his journey. You can find her at the herbalist in Aldlyn.
Quest location: Obtained from the city board in Aldlyn. Reward: 3500 gold
Book Request (Quest no.50)
The girl Sheri made a request to bring her a book to Havaria Port. You can get one from an author in Thremten. It’s not a specific book but just one present item „book“.
Quest location: Obtained from the city board in Aldlyn. Reward: 1500 gold
Bookworm? (Quest no.10)
Tsubaki asks you at the sleeping chambers for a book on warfare. You can get it from the author in Thremten.
Quest location: Obtained when you talk with Tsubaki in the sleeping chamber. Reward: 1000 exp
Bordertown (Quest no.7)
Talk to Commander Brick in the fort in Parverhill.
Quest location: Obtained from Günther in the throne room. Reward: 1500 exp, 3000 gold
Bow Maintenance (Quest no.140)
During the quest About Racism, Seldanna will offer to repair Mirel’s old bow. Quest location: Seldanna in Orchel.
Reward: 1250 exp
Brad’s feast of gratitude present (Quest no.70)
You decided to get a first aid kit as a present for Brad. You might be able to get one in a clinic.
Quest location: Obtained from the desk in your room after reading the note about the feast of gratitude at the city board. Requires all previous paperwork, which requires you to have Kurohime’s training done, and the bathhouse.
Reward: A present for Brad.
Broken Home (Quest no.129)
The refugees at Orchel are treated badly, so you want to learn more about their situation to see if you can help them.
Reward: 1500 exp
Calterburry Beer (Quest no.133)
Elly has a craving for a beer in Calterburry. You promised to visit the bar in the capital of Begus the next time you’re close by. You meet the dwarf Adrianna during this quest.
Reward: 1750 exp
Catgirl In Training (Quest no.41)
You need to train Kurohime until you can be sure she’ll do anything you wish for. You need to bring her stats to 100 Obedience and Pleasure with Health and Mind over 20.
Quest location: Kurohime in the secret prison. Reward: 1500 exp
Cave Map (Quest no.87)
Flaire wants you to get her map of the Begus cave system. You can get it in the town Pumumu, north east in Begus.
Quest location: Obtained from Flaire Reward: Gold armor recipe
Caverns of the Enigmatic Warlord (Quest no.187)
After the first events about genderbending in your group, the female trio of Ryen, Brad and Trey go into a special area for an adventure.
Quest location: Obtained from Trey, when you “take a day off” in his dialog options. Reward: 20000 exp
Chiyo’s feast of gratitude present (Quest no.71)
You want to get an alchemy set for Chiyo but don’t know where to get one. Maybe someone in the library of Manastyr can help you.
Quest location: Obtained from the desk in your room after reading the note about the feast of gratitude at the city board. Requires all previous paperwork, which requires you to have Kurohime’s training done, and the bathhouse.
Reward: A present for Chiyo.
Chiyo’s Release (Quest no.31)
If you didn’t help Chiyo during your first encounter, she can be found in prison. Talking to her will start this quest to help releasing her. All you need for this is the item „Uniforms of the Begus Army“, which can be found in the haunted mine. (Map no. 31)
Quest location: Obtained from Chiyo in the prison of Amagal’s castle, if you choose not to help her during the first meeting in the storage below the prison.
Reward: 1500 exp
Clemency Plea (Quest no.24)
In the paperwork on your desk you’ll find the clemency plea. This will allow you to enter the prison in the capital. Talking to the prisoner will give you the choice what his punishment shall be.
Quest location: Obtained from the desk in your room at the sleeping chambers after finishing the previous paperwork quest. (Quest no. 22)
Reward: 750 exp
Clinic Request (Quest no.62)
A doctor would like the government to build a clinic. You can build the clinic on the country overview map, which you can access by talking with Sir Edward in your throne room.
Quest location: Obtained from the city board in Aldlyn if you don’t have the upgrade already.
Reward: None.
Convincing Sinrul (Quest no.160)
Mike wants you to convince Sinrul to switch sides, or at least stay out of the conflict between the rebels and the government. Leads to a CG scene with Sinrul in the end.
Quest location: Obtained from Mike in Kagabangui after the attack of the rebels on Minsk Harbour when you’re on the rebels side in the conflict.
Reward: 2000 exp
Coronation (Quest no.3)
Enter the castle in Aldlyn and introduce yourself as the new king. Quest location: Obtained automatically.
Reward: 1500 exp
Crime Fighting (Quest no.104)
You offered your help to get the funding for the repairs of the Norhall Stronghold in Begus. Talk with Lady Forbes at the Meddling Castle to receive their uniforms. While wearing the uniform, you need to defeat several criminals to improve the reputation of the fort.
Quest location: Starts when going to the library of the castle in Calterburry after reporting back to the girl from quest 30 “Crumbly Fort”. You have three choices and you can get either no quest, quest 104 or 105 based on your decision.
Reward: 2000 exp
Criminal Hunt (Quest no.82)
You saw a note on the city board, of the police looking for the thief of several gold armor recipes. The recipes might be of use for you, so you decide to help the police in the search for this criminal.
Fastest solution for the switch riddle: 1x yellow, 1x green, 2x red, 2x yellow, 1x blue
The quest can’t be finished successful, since the criminal is already gone by the time you arrive at the thieves guild.
Quest location: Obtained from the Aldlyn city board. Reward: None
Criminal Scum! (Quest no.11)
Get rid of the bandits in the forest east of Ebron. Afterwards report back to the Chief. Quest location: Obtained from the elven Chief in Ebron.
Reward: 2500 exp, 1500g
Crown Support (Quest no.118)
You get this quest when you agree to help Varea with her duel for the rulership over Amagal. (Requires Quest 116 to be finished and Chiyo’s events to be advanced far enough).
For the required staff you can find the recipe at Witton, the gems at the jewelry store in Thremten, the oak staff rod in Orchel and the carsus roots in stores in Begus.
Reward: 2000 exp
Crumbly Fort (Quest no.30)
The girl in a blue dress in Norhall Stronghold asks for your help to bring a message to Lady Forbes in Meddling Castle (Map no. 24). Lady Forbes will send you to the Capital of Begus Calterburry (Map no. 31), to a priest with pink hair in the library of the castle. After talking to the priest report back to the girl in a blue dress to finish the quest.
Quest location: Obtained from the girl in a blue dress at the broken fort. (Map no. 28) Reward: 2000 exp, 2500g
Cursed! (Quest no.34)
Talking to the dark sorceress again at the farm south (Map no. 12) after finishing quest no. 32 will make her curse Mira. The quest is finished by talking to Mira in the sleeping chambers of your castle.
Quest location: Obtained from the dark sorceress. (Map no. 12) Reward: 1000 exp
Dancer Phyrra (Quest no.139)
Phyrra would like to perform in front of a crowd again, but she can’t do it in Dorgania, so you arrange for it in Central.
Quest location: Obtained from Phyrra in Orchel. Requires her dialog during the About Racism quest.
Reward: 750 exp
Dark Sorceress (Quest no.32)
Commander Hankin will ask you to check on the farmer south from Calbridge Stronghold. When you talk to the famer, he gives you the key to enter the building on the farm and talk to the sorceress. Talking to her will finish the quest.
Quest location: Obtained from Commander Hankin in Calbridge Stronghold. Reward: 2000 exp
Demon Trouble (Quest no.43)
Trey received a report about a lesser demon in human shape near the village Thremten. You offered to help with the problem instead of letting Trey deal with it by himself.
Quest location: Obtained from Trey at the sleeping chambers. Reward: 1500 exp
Dragon Shape (Quest no.157)
Training events, which’ll unlock new skills for Ryen and Kayelinth to use their full dragon shape in battle.
Quest location: Obtained from Jaylin in your treasury in the castle of Aldlyn. Requires the events of Kayelinth where you build an entire new farm area for her.
Reward: 5000 exp
Doppelganger Pandora (Quest no.161)
Questline about Pandora to figure out more about her past and race. Leads to her CG scene, and to her changing into her true shape eventually.
Quest location: Requires an event with genderbend Trey, to get a box from Bristol, in which you find the doppelganger Pandora.
Reward: 1200 exp
Dorgania Deserter (Quest no.99)
Queen Lancafew of Dorgania asked you to take care of a few deserters that fled to Central. They’re at the Calbridge Stronghold and the Bitterroot farm.
Quest location: Obtained from Queen Lancafew in Kagabangui. Reward: 3000 exp, Relation with Dorgania +20
Dorgania Slaves (Quest no.148)
For this quest you need Brad and Sandra in your group, open borders with Dorgania, the events with Mike and the release of a vampire in Kagabangui done, and the dialog with King Lancafew about his opinion on slavery.
Once you have all requirements, a burned note will appear near the palm trees in the top right corner of the center of Kagabangui, left of the gallows.
Reward: 3x Skillstone
Double Attention (Quest no.176)
Part of the events of Kayelinth. You can get it after the wedding with Kayelinth by talking with her at the sleeping chambers. Also requires the CG scene with Kavrala in Orchel in the south of Dorgania.
Reward: None
Earth Element Magic (Quest no.81)
Mirel would like to learn a new skill, to use pure earth element magic. This quest requires you to go to the Earth Spirit first and afterwards to talk with Flora. Once the quest is complete, Flora becomes available at the headmaid’s girl selection screen for her CG scene.
Quest location: Obtained from Mirel in the castle, after her coming of age ceremony. Reward: New skill for Mirel
Elly’s feast of gratitude present (Quest no.72)
The blacksmith’s wife in Calterburry can make upgrades for Elly’s gun. I should ask her for a scope or something similar as a present for Elly.
Quest location: Obtained from the desk in your room after reading the note about the feast of gratitude at the city board. Requires all previous paperwork, which requires you to have Kurohime’s training done, and the bathhouse.
Reward: A present for Elly.
Envoy of Hope (Quest no.108)
You got a message from Queen Jeanne Apelia of Begus for Rutia in Pumumu, a village in the north of Begus.
Reward: 2500 exp
Event: Thremten Festival (Quest no.55)
If you have Mira and Mirel in your party you can agree to go to the festival at the city board. The forest where you festival takes place can be entered from the bottom right corner in Thremten.
Quest location: Obtained from the city board in Aldlyn. Reward: 3000 exp
Evil Spirit (Quest no.25)
Second quest for Mira. She’ll ask you to go to the haunted mine in Calterburry. The quest is finished after your encounter with the Icespirit is over. Helping the Icespirit will lower your relationship with Mira, choosing to fight her will cause several fights in a row.
Quest location: Obtained from Mira at the sleeping chamber after finding the angel gates in the north dungeon (map no. 4) if her level is 10 or above.
Reward: 1500 exp
Exploration (Quest no.6)
Mira wants to go to North Dungeon, map no. 4. The quest is finished once you opened the gate with angel wings on it. Quest is skipped if you already found the gate with Mira in your party before speaking with her about it.
Quest location: Obtained from Mira in the sleeping chambers. Reward: 2500 gold
Farm Caretaker (Quest no.137)
For Kayelinth’s new farm, you need to find a suitable caretaker.
Talk with the farm clerk in the bottom left corner of Aldlyn first. She’ll tell you about her niece Amara, who you can find at the Bitterroot Farm in the south of Central.
Reward: 400 exp
Feisty Lover (Quest no.147)
After the brawler battle of Brad against Ash and Grimace in Kagabangui, the events will continue and Brad will realize that he has romantic feelings for Ash.
The first step of the quest is to increase Brad’s popularity before talking to Ash again. There are 5 events to increase Brad’s popularity in Kagabangui, 1 in Minsk Harbour, 2 in Newkungu, 1 in Rakake, and 1 in Tajurata Fort.
You can also buy the brawler parfume in Lalizan and Orchel. Both give Brad +1 popularity. They are unique, and can be purchased only once.
The training with Tsiom at the main base of the Brexeet Isles increases Brad’s popularity by +3, but he needs his class changed to martial artist before he can train with Tsiom.
Before Brad’s duel with Grimace, there will be a short event where Ryen will have the choice to prevent Grimace from cheating or not. If you do nothing, Brad will lose and get an NTR scene where he has to watch Grimace Fk Ash.
Reward: 1250 exp
Final Battle (Quest no.102)
Prepare yourself for the final battle against Raziel. Once your preparations are done, have a meeting with the General at Lualombo to discuss the strategy.
Quest location: Given to you by Varea during the main story events. Reward: 7500 exp, 25000 gold
Finding Lucilla (Quest no.89)
Continuation of the main storyline. After defeating Lace, Varea will tell you about a demon called Lucilla. She might be able to tell you more about the fragments.
Quest location: Obtained from Varea in Manastyr. Reward: 3000 exp
Firewood (Quest no.9)
Cut 6 orange trees around Witton. Finishing the quest will give you a locked box. With Sandra in the party you’ll get a „Magic Apple“, otherwise a „Damaged Magical Apple”.
Quest location: Obtained from a villager in Witton. Reward: 1500 exp
First Meeting With Amagal (Quest no.20)
After arranging the meeting with Theremis in your throne room, you can enter the castle of Amagal in Manastyr.
Quest location: Obtained from Theremis in the throne room. Reward: 1500 exp
First Meeting With Begus (Quest no.21)
After arranging the meeting with Theremis in your throne room, you can hold the meeting in your fort in the map center. (Map no. 5)
Quest location: Obtained from Theremis in the throne room. Reward: 1500 exp
Fish Request (Quest no.58)
Get 3 fish from the fisher at Calbridge Stronghold or Calterburry in Begus and bring it to Jackie in the herbalist in Aldlyn.
Quest location: Obtained from the city board in Aldlyn. Reward: 2500 gold
Flying Pride (Quest no.201)
This quest begins in the church of Aldlyn, when the marriage and vanguard systems are unlocked, and Tabsy’s big farm and the military command center were build.
The quest will unlock the vanguard squad leaders Eynhylde and Selka, and a CG scene with the nun Enaris.
Quest location: Obtained in the church of Aldlyn.
Reward: 1500 exp
Food Town (Quest no.136)
Kayelinth wants to visit the town Rakake in Dorgania, in the hope to get tasty vegetables there.
Reward: 1200 exp
Foxgirl Fight (Quest no.121)
The demon catgirl Ziki has given Shanna the information that Kathreena is hiding at the Seaside Tower in Dorgania. Shanna asked for your support to help capturing Kathreena at the tower.
Reward: 3000 exp
Fragment at Sunee (Quest no.90)
Negi told you about a fragment below the city Sunee in Dorgania. There is supposed to be a hidden dungeon entrance somewhere on the outside of the city.
The dungeon entrance is at the top right corner. You need to interact with the statue to open it.
Quest location: Obtained at the farm storage in Minsk. Reward: 3500 exp
Fragment Hunt (Quest no.92)
Frall has given you the “Fragment Map”, on which he has marked locations with fragments in Dorgania on it. You want to get your hands on at least one of them, in order to prevent Raziel from finishing the artifact.
[Riddle solution in the FAQ section.]
Quest location: Obtained from Varea after quest 90. Reward: 15000 exp
Fragments (Quest no.8)
Talk to Herold in Witton (Map no. 8).
Quest location: Obtained from Commander Brick when finishing the quest bordertown.
Reward: 3,000g
Fragments (2) (Quest no.44)
You were informed about disappearing fragments of an old artifact and a potential dangerous group being behind it.
Quest location: Obtained from Herold in the fort of Witton when finishing the quest Fragments (Quest no. 8).
Reward: 1750 exp
Fragments (3) (Quest no.45)
The archbishop of Begus told you about a mage named Frall in Amagal who should know more about the Fragments and their story. Frall will appear at the broken fort in Amagal if you have this quest and Chiyo in your group.
Quest location: Obtained during the quest no. 44 Fragments (2). Reward: 1500 exp
Framed Thief (Quest no.111)
Jenny was taken prisoner by the Central police force, but Flaire claims Jenny is framed for a crime she didn’t commit.
Reward: 4000 exp, 8000 gold
Friendly Turn (Quest no.15)
Vampire wants to go to a passageway slightly below where you found her in North Dungeon. Going through will bring you to a dark forest, where you can’t leave until the quest is solved. In the castle, Vampire will take constant damage until you have used the switch upstairs to turn off the trap, found the raw orangium in the cellar and turned it into refined orangium in the main hall. Finishing this quest will teach Vampire the skill „Basic Instincts“.
Quest location: Obtained from Vampire in the sleeping chambers if Ryen is level 10+. Reward: 2500 exp
Gambling (Quest no.35)
You need to win a total of 20 times at gambling with Hiroku. Those wins don’t need to be consecutively and don’t get reset by getting the rewards for previous wins.
Quest location: Obtained from Hiroku at the top right corner of Calbridge Stronghold.
Reward: 2500 gold
Ghost In Distress (Quest no.28)
The ghost Shey in the dungeon below Old Ashton (Map no. 29) wishes for her bones to be buried. Her grave is the tombstone in the top right corner of Old Ashton. After freeing her from the dungeon, she’ll appear in the sleeping chambers.
Quest location: Obtained from Shey in the dungeon below Old Ashton. (Map no. 29) Reward: 2500 exp
Glen’s Exam (Quest no.124)
Glen used to make custom exams for thieves. Sandra wants to take such an exam to help her figure out how to improve herself.
[Solution to the riddles are in the FAQ section in the bottom of this walkthrough.] Reward: 3000 exp
Gold License (Quest no.119)
Chiyo wishes to take her gold license test at the Whitestone citadel in Begus. The supervisor Maria of the academy is responsible for the tests.
[It’s not necessary to to solve all riddles in the last dungeon to finish the dungeon, it only makes the battle against the Sphinx a bit easier.]
Reward: 100000 gold, CG scene with Chiyo
Golden Cross Request (Quest no.51)
The priest of the church in Aldlyn requests golden crosses. Quest location: Obtained from the city board in Aldlyn.
Reward: 4000 gold
Grey Training Request (Quest no.75)
Grey wants someone strong to accompany him during his training. You can find him at the red keep.
Quest location: Obtained from the Aldlyn city board after you had the fight with Grey in Thremten. Requires that you built the bathhouse and met the woman in the outdoor bath.
Reward: 5000 gold
Grey’s Katana (Quest no.125)
Grey asked you to go to Calbridge Stronghold and give the blacksmith a note with the request for a custom made Katana.
Reward: 500 exp
Grey’s problem – Trey (Quest no.76)
To let your subordinates search for the woman that changed Grey, you need to talk with Trey privately.
Quest location: Obtained automatically after the quest „Grey Training Request“. Reward: None
Grey’s problem – Tsubaki (Quest no.77)
For as long as Grey is a woman, he’ll need the help of another female to get a grip of his new lifestyle.
Quest location: Obtained automatically after the quest „Grey Training Request“. Reward: None
Grey’s problem – Kurohime (Quest no.78)
Kurohime might be able to help with the search for the woman that changed Grey into a woman.
Quest location: Obtained automatically after the quest „Grey Training Request“. Reward: None
Gunslinger Elly (Quest no.16)
To help Elly get her gun from the church you first need to get into the cellar. The cheapest way is by going to the priest and letting Mira talk to him. If you don’t have Mira, bribing a guard to help is possible. The bribes are cheaper with Sandra in your group. Only the guard left from the entrance and the guard looking at a flower on the right side will accept the bribe to help you.
In the cellar, you have to avoid being seen by guards. Most turn around regularly, making it possible to get through the entire map without being noticed. The chest on the bottom center can’t be reached, since the guards will always see you. The room is cleared if you find Elly’s gun in the box in the top left corner.
Quest location: Obtained from Elly at the blacksmith of Calterburry. Reward: 2500 exp
Inspection (Quest no.22)
In the paperwork on your desk you’ll find the request to visit Witton. Talking to Lady Akira in the fort will finish the quest. (Map no. 8)
Quest location: Obtained from the desk in your room at the sleeping chambers. Reward: 3000 exp
Internal Rage (Quest no.126)
Ryen wants to get the wild feelings of the dragon inside of him under control, but that’s not that easy….
Reward: 2000 exp
Into The Fire (Quest no.23)
Second character quest for Vampire. She’ll ask you to go to the lava dungeon (Map No. 20), where you can find more raw orangium. This quest requires you to find the way to the volcano on map no. 19 and afterwards to talk with Vampire in the sleeping chambers. Her first character quest (Quest no. 15) has to be done before this quest can be obtained.
Quest location: Obtained from Vampire in the sleeping chambers after finishing her first quest and finding the way to the volcano at the big camp (map no. 19) or alternative reaching level 12 with vampire.
Reward: 3000 exp
Iron Request (Quest no.52)
Hiroku needs 6 Iron. You can find him east of the Calbridge Stronghold. Quest location: Obtained from the city board in Aldlyn.
Reward: 4500 gold
Jessy’s New Clothes (Quest no.146)
This quest is obtained after the quest “Bandit Investigation” and unlocks the CG scene with Jessy. It requires you to talk with the maid Louise in the treasury. The stairs to the treasury are at the top of the sleeping chambers. If Louise is not standing in the treasury, but somewhere else, talk with her and Elina in the chambers of the noble families to advance their dialogs.
Reward: 700 exp
Just One Glass (Quest no.181)
After solving the murder case in Millwater, Jillia invites you to a fine wine later. After leaving and re-entering the area, you can see her talk with Winona about a potion to ensure that she gets pregnant when she sleeps with you. The player gets the decision if he wants to allow the certain pergancy or do something about it to prevent a pregnancy.
Reward: None.
Kayelinth’s feast of gratitude present (Quest no.74)
The old woman from the food stand in the south west of Aldlyn might have a salad dressing I can give to Kayelinth as a present.
Quest location: Obtained from the desk in your room after reading the note about the feast of gratitude at the city board. Requires all previous paperwork, which requires you to have Kurohime’s training done, and the bathhouse.
Reward: A present for Kayelinth.
Last chance (Quest no.103)
Prepare your country for the unavoidable battle with Raziels forces. Talk with Varea at the sleeping chambers once you think you’ve done enough. [This quest can’t be advanced yet!]
Quest location: Given to you by Varea during the main story events. Reward: 1000 exp
Letter of Friendship (Quest no.162)
For this quest you need Brad and Sandra in your group, open borders with Dorgania, the events with Mike and the release of a vampire in Kagabangui done, and the dialog with King Lancafew about his opinion on slavery.
The quest is just a short delivery quest without much story. It’s main purpose is to lead players to a specific location to ensure they don’t miss a different event.
Quest location: Obtained from a guy with black hair in Aldlyn. Reward: 250 exp
Letter to Kat (Quest no.166)
The succubus Nemorvyra asked you to bring a letter to a woman called Kat in the castle of Calterburry, since it’s easier for you to get to her than for Nemorvyra.
Reward: 200 exp
Library Exploration (Quest no.113)
Vampire wants to look for information about the mage Alexus, to figure out what has really happened in her past.
Reward: 4000 exp
Lielle’s Ancient Demon (Quest no.132)
After her previous events are done, you can find Lielle at the magestore in Newkungu. She wants to break a seal and summon an ancient demon, in the hope that it’ll help her with savng her sister.
You need to bring Lielle several things before she can remove the seal, then you have to fight the demon to finish the event.
Reward: 3000 exp
Lizzle Cold Cure (Quest no.107)
Queen Jeanne Apelia of Begus asked you to help her in the search of an alternative cure of the lizzle cold.
Reward: 1500 exp
Lookout (Quest no.135)
Kayelinth wants to explore the Greencoast Tower in Dorgania, in the hope of finding vegetables there.
It’s the quest to unlock Kayelinth’s and Mira’s first flight CG scene. Reward: 3000 exp
Lualombo Commander (Quest no.159)
The female commander with red hair, who is in charge of Lualombo, is said to have doubts about the government. Maybe there is a way to convince her to support the rebellion.
Quest location: Obtained from Mike in Kagabangui when you support the rebels. Reward: 2000 exp
Lualombo Tunnel (Quest no.158)
In order to prepare a future assault on Lualombo, Mike wants to dig a tunnel to get behind the walls of the fort at the day of the attack.
Quest location: Obtained from Mike in Kagabangui when you support the rebels. Reward: 1000 exp
Luminous Torch (Quest no.101)
In order to counter Fuka’s invisibility, you need to make a special torch with the help from three spirits.
[You need the events with the thief girl in Parverhill to get to the Magicspirit. After those events, you can use the Teleport Orb to get back to the spirit.]
Quest location: Given to you by Varea during the main story events. Reward: 3500 exp
Magic License (Quest no.42)
Chiyo wants to get her silver magical user liberty license at the Whitestone citadel in Begus.
Quest location: Obtained from Chiyo in the sleeping chamber with 45+ relationship. Reward: 3000 exp
Magic Vibrations (Quest no.165)
Vivian is missing some magic stones for her sex toys, to make them vibrate. According to her, the magic store in Witton might sell such stones. They would make for a good present for Vivian.
Quest location: Obtained from Vivan in the monsterhall, after you had her blowjob scene via the selection screen of the headmaid, and Vivian’s first dialog about the monsterhall.
Reward: 250 exp
Marriage (Quest no.168)
You get this quest and unlock the marriage system when you talk with Trey at the sleeping chambers when Ryen has a relationship of 100+ with all main party girls.
Reward: 5000 exp
Mechanical Parts (Quest no.17)
In order to fix the broken parts from map no. 30, you’ll have to go to the mechanic in front of your castle. He’ll ask for his „Old Document“ in return to fix them (Quest no. 18).
Quest location: Obtained when using the broken switch on map no. 30. Reward: 2350 exp
Military Corruption (Quest no.110)
Queen Jeanne Apelia of Begus needs help to fix the corruption in her military to stand a chance against the church. She gave you the names of three people that require some special attention.
Reward: 3000 exp
Millaine’s Box (Quest no.27)
In the Jade Cave, Millaine will ask you to get her box out of the undead infested mine. The box can be found in the bottom right corner. Opening the box against her wish will unlock her sex CG scene.
Quest location: Obtained when talking to Millaine in Jade Cave. Reward: 150 exp
Millaine’s Errand (Quest no.61)
If you didn’t open Millaine’s box during the quest “Millaine’s Box” you’ll be able to receive this quest. Millaine will ask you to get a package from a shop in Whitestone citadel. This quest will give you her CG scene at the end.
Quest location: Obtained from Millaine in the Jade Cave. Reward: 3000 gold
Mira’s feast of gratitude present (Quest no.66)
You want to ask in the church if they have any blessed or otherwise special cross necklaces you could get for Mira.
Quest location: Obtained from the desk in your room after reading the note about the feast of gratitude at the city board. Requires all previous paperwork, which requires you to have Kurohime’s training done, and the bathhouse.
Reward: A present for Mira.
Mirel’s feast of gratitude present (Quest no.68)
You want to get some wood polish as a present for Mirel. The maid Bess at the herbalist of Aldlyn might be able to help you with it.
Quest location: Obtained from the desk in your room after reading the note about the feast of gratitude at the city board. Requires all previous paperwork, which requires you to have Kurohime’s training done, and the bathhouse.
Reward: A present for Mirel.
Mirel’s Bow (Quest no.12)
Mirel will ask for your help to find her old bow. The bow can be found in the top right corner of the forest of Ebron. You can access this forest area by following the road going east in Ebron.
Quest location: Obtained from Mirel in the sleeping chamber with 20+ relationship. Reward: 1500 exp
Mushroom Gathering (Quest no.178)
Mii wants you to protect her while she gathers some mushrooms in the forest north of Pumumu.
Quest location: Obtained from Mii in Pumumu. Reward: 800 exp
New Blade (Quest no.100)
Tsubaki needs a new custom made katana in order to use the combo attack. This quest is part relationship events with her and unlocks after the previous events done and the relationship high enough.
Quest location: Starts in a dialog with Tsubaki at the sleeping chambers. Reward: 3000 exp, new weapon for Tsubaki
New Home (Quest no.130)
According to Trey, the Bitterroot farm in the south of Central might be a good new home for the tribe elf refugees at Orchel.
Reward: 1200 exp
Newkungu Gambling (Quest no.115)
Naomi told you about rich people gambling in the cellar of the casino in Newkungu. She gave you an invitation the go down to them, in order to check if they do any shady business there.
By playing a dice game against one of the guys downstairs you win the slave Mai. Reward: 1500 exp
Next Step (Quest no.98)
Return to Varea in Manastyr to talk about your next steps. Quest location: Obtained after defeating Lace.
Reward: 1000 exp
Old Barrack (Quest no.5)
Sir Edward in the throne room will request your help with a ghost in the old barrack. After defeating the ghost report back and Sir Edward will ask for help to rebuild the barrack. You can repair it on the country overview map.
Quest location: Obtained from Sir Edward in the throne room. Reward: 3000 exp
Old Chest (Quest no.29)
You can find the old chest in the swamps below Bitterroot Farm when you follow the road in the farm down south. If you have Sandra in your group, she’ll fail to open the chest and start this quest. To get the required Mithril Lockpick you have to go to Glen in the wooden house (Map no. 26). With the lockpick the chest will open, but a trap activates and dissolves Sandra’s clothes. This will show her naked CG picture.
Quest location: Obtained when trying to open the old chest in the swamps below Bitterroot Farm with Sandra in your party.
Reward: 3500 exp
Old Document (Quest no.18)
The old document can be found on the second floor of the Tower of Ash.
Quest location: Obtained from the mechanic in the capital, when you talk with him about the broken parts from quest no. 17. This quest is skipped if you already have the document when you talk to the mechanic.
Reward: 3500 exp
Open Your Eyes (Quest no.26)
In the Fision Tower (Map no. 22) you’ll encounter an invisible enemy. In order to see her, you’ll need a „Colorful Smoke Bomb“. A stranger in the capital, in the house with a red roof, will give you one after you gave him 3 beer and 15 Dispel Herbs.
Quest location: Obtained after meeting the invisible enemy in the Fision Tower. Reward: 3500 exp
Orchel Trading Route (Quest no.143)
After the About Racism quest, you can talk with Saphielle to help her establish a trade route between Orchel and Cental.
Quest location: Saphielle in Orchel. Reward: 25,000 exp
Organisation (Quest no.105)
You offered your help to get the repairs of the Norhall Stronghold in Begus done. Talk to the dwarf with red hair at the Drunken Cave to make a deal for the necessary resources and manpower.
Quest location: Starts when going to the library of the castle in Calterburry after reporting back to the girl from quest 30 “Crumbly Fort”. You have three choices and you can get either no quest, quest 104 or 105 based on your decision.
Reward: 4750 exp
Playmates (Quest no.128)
Rina, Rena and Maescia want to play ball with Kayelinth. The elf Renna in Orchel can make you a ball when you bring her the necessary items.
Reward: 600 exp
Portrait (Quest no.38)
Your butler told you about an artist who lives near the prison in the east of Aldlyn who’ll make a portrait of you.
Quest location: Obtained from your butler at the sleeping chambers after the abandoned barracks have been repaired and the butler gave you your crown.
Reward: 1750 exp
Pregnant Slave (Quest no.97)
Purchase the pregnant slave at the slave trader in Kagabangui and bring her to the girl with pruple hair in front of the building in order to get Mike’s support with freeing the servant at the castle.
Quest location: Left bottom corner of Kagabangui. Obtained when talking to Mike during the quest 95 “About Servants and Princes.”
Reward: 1500 exp
Protected Chest (Quest no.85)
Flaire wants the content of a green chest of a merchant living in the north-west of Parverhill. The chest is behind a sealed iron gate, so you’ll need to figure out a way to open it first. There are several ways to solve this issue. Last of the questline for the gold weapons recipe, but Flaire has one more quest you need to finish for the gold armor recipe.
Quest location: Obtained from Flaire Reward: Gold weapon recipes
Question of guilt (Quest no.80)
The Icespirit, Aura, claims to be innocent. Since her story is backed by the angel Maria, you agreed to check it and figure out the truth. Maria wants to meet you again in front of the Ironholm Prison in Begus, after she regrouped with her escort.
Quest location: Obtained after the quest „An Angels request“ is done. Reward: 2500 exp
Raise Antipathy (Quest no.164)
One of the two options to crush the rebellion in Dorgania is to raise the antipathy in the country against the rebels.
Only either this or quest 163 “Arrest All Rebels” are needed to get Sinrul’s CG scene and finish the route of supporting the government in Dorgania, but you can finish both quests.
Quest location: Obtained from Sinrul in Dorgania on the route to support the government in the events ot the Doragnia rebellion.
Reward: No reward.
Rebel Hunt (Quest no.152)
This quest is obtained when you choose to support the government in Dorgania against the rebels. You can either raise the antipathy of the citizens against the rebels, or arrest all rebels. → Quest 163 “Arrest All Rebels” or 164 “Raise Antipathy”
Reward: 5000 exp
Royal Invitation (Quest no.106)
The queen of Begus has invited you to her room at the highest floor of her castle in Calterburry to talk in private.
The invitation can be found on the table in your bedroom. Reward: 2500 exp
Ryoko’s feast of gratitude present (Quest no.73)
You decided to get a cute dress as a present for Ryoko. The headmaid may be able to help you with this idea.
Quest location: Obtained from the desk in your room after reading the note about the feast of gratitude at the city board. Requires all previous paperwork, which requires you to have Kurohime’s training done, and the bathhouse.
Reward: A present for Ryoko.
Ryoko’s Quest (Quest no.184)
This quest is part of Ryoko’s events and requires the first meeting with Akai in the workarea near Aldlyn, Shey’s event including her help for Maria at the Ironholm prison, that you defeated Raidy in the Spire of Courage challenge floor to get to the raid area, and that all previous events for Elly and Ryoko are done.
The quest brings you to the area in the south, where you meet Cassedy and the Luminous Order.
After these events, the marriage for Ryoko and Elly can be unlocked. Reward: 8000 exp
Sandra’s feast of gratitude present (Quest no.69)
Try to find a gambler to get a rare gold coin as a present for Sandra. You can find the gambler Hiroku at the Calbridge Stronghold.
Quest location: Obtained from the desk in your room after reading the note about the feast of gratitude at the city board. Requires all previous paperwork, which requires you to have Kurohime’s training done, and the bathhouse.
Reward: A present for Sandra.
Second Attack (Quest no.131)
Flaire wants to destroy the assassin guild. With your help, she wants to raid them with full force this time, which gives you the chance to backstab her and capture the thieves guild and assassin guild member’s all at once.
Quest location: Obtained from Flaire at the thieves guild below Thremten. Reward: 100,000 gold
Shocking Collar (Quest no.134)
Part of the good path events for Lace.
In order to improve the trust with Lace, you want to let her leave the prison for a while. But to make sure she doesn’t run away or cause you problems, you need a custom made magic collar.
Reward: 750 exp
Skilltree (Quest no.4)
You can access the skilltree from the menu.
Quest location: Obtained when entering the sleeping chambers in the castle. Reward: 1 Skillstone
Soul Lantern (Quest no.57)
Use item synthesis to create a Soul Lantern and catch a Slimgirl or Imp for Meilira. She believes it’ll be able to befriend with the monster afterwards on her farm.
Quest location: Obtained from Meilira at the Whisperwind Farm in Begus. Reward: 3400 exp
Special Drink (Quest no.39)
Elly challenged you to another drinking party but in order to beat you she want’s to use a special drink. She didn’t tell you what it is but you can’t buy it in Central so she want to buy it somewhere else.
To solve the quest you first need to go to the capital of Begus Calterburry and talk to a clerk there. Afterwards you need to find a merchant in Crysthaven. After both dialogs you can start Elly’s 2nd scene in her room in the castle.
Quest location: Obtained from Elly with 60+ relationship and the headache from the previous scene cured.
Reward: 2600 exp
Special Gem (Quest no.84)
Flaire wants you to get a special gem from a merchant in the Twin ale tower. Second of a questline to receive the golden weapon recipes.
Quest location: Obtained from Flaire. Reward: None
Steam Gun (Quest no.122)
The engineer Akai in the workshop of the work area near Aldlyn requires some materials to make you a powerful steam gun.
[The required Red Flower Crystals can be found in the challenge floor of the Spire of Courage.]
Reward: Steam Gun weapon
Stone Boulder (Quest no.13)
The house on a hill in Parverhill has a secret way in its cellar. Ryen needs to be level 15 in order to be strong enough to move the boulder. Behind is a secret prison. The chest here contains an elixir.
Quest location: Obtained in the house on a hill in Parverhill. Reward: 1500 exp
Summoning Blade (Quest no.144)
Aiyana asks you to retrieve her blade Eagle, but you only get the blade without gems in Kagabangui and have to search for the 6 gems.
After you found gem 4 and 5, you won’t have a hint for the last gem anymore, and Ryen will tell you to go back to Aiyana. She’ll tell you about the gem in Old Ashton.
Locations:
- Tajurata Fort -> Second floor -> Shelf in the top left. (unlocks gem 3)
- Jewelry Store in Thremten (unlocks gem 4)
- Magic store in Witton (unlocks gem 5)
- Yin Tower otuside (Fight against some bandits)
- Diminus Castle (Guy in a small house)
- House of the priester in Old Ashton (requires that you have all 5 other gems first)
Quest location: Obtained from Aiyana at Havaria Port after you advanced the main story to the point where you found the empty fragment chest in Sunee.
Reward: Skill Crystal: Meteor Strike OR the sword Eagle
Support the Government (Quest no.150)
This quest can be obtained after the quest “Dorgania Slaves” is done.
For step 3, you can find Sinrul’s missing man in the farm storage in the bottom right of Newkungu. It’s necessary to have Sandra in your group with her lockpicking skilll at 10 or higher to open the door.
Reward: 25000 exp
Support the Rebellion (Quest no.149)
This quest can be obtained after the quest “Dorgania Slaves” is done. For step 3, you can find Sinrul’s man right of the casino in Newkungu.
Reward: 25000 exp
Tentacle Plants (Quest no.91)
A soldier in your secret prison offers to upgrade your secret prison with some tentacle plants, but needs spores from similar plants in the Spire of Courage in Begus. These are needed for a bonus CG scene with Irinlia and Lace, after both were captured and raped.
Quest location: Obtained from a soldier in the secret prison in your castle. Reward: 2750 exp
The Fate of Fane (Quest no.179)
You decided to help the maid of the Redwood family Fane in Millwater, after witnessing that the new head of the family might not be very kind to her.
Quest location: Obtained when you talk with Fane after the murder case events are done.
Reward: 400 exp
The First Gun Squad (Quest no.190)
After the events of Ryoko and Elly with the Luminous Order, you can talk with Cassedy about a gun squad for your country. The quest introduces the gunslinger Della, who becomes a squad leader at the end of the quest.
Reward: A gun squad for your vanguard forces.
The Forgotten Brexeet Isles (Quest no.171)
This quest is part of Sandra’s events. (Step 7 of her event sequence). It starts in Havaria port, where you can find the thief Shirinsya from Moriko’s events again. Requires the events with Flaire to get the gold armor and weapon recipes first, Sandra needs to be in your party and her previous events must be done, and Moriko’s events must be past the choice for her good or bad route in the police HQ.
The quest unlocks Sandra for marriage. Reward: 1200 exp
The King of Amagal (Quest no.93)
Varea followed the trace of the missing king until a red hexagon that was used as a teleport before. It was broken, after use, so that no one can follow them.
Once you find the king, he’ll give you hints about the riddles during the quest “Fragment Hunt”.
Quest location: Obtained from Varea after the quest “Fragment at Sunee”. Reward: 50000 gold
The Meeting (Quest no.114)
A note on the Aldlyn city board was posted from a person searching for Ryoko. You want to meet him in order to make sure he doesn’t cause any troubles for her and your group.
Reward: 2000 exp
The More The Merrier (Quest no.19)
You require at least 10 party member for the splitting scene on the 4th floor of South Dungeon.
Quest location: Obtained when going to the left bottom corner in the 4th floor of South Dungeon with less than 10 party member. If you have the needed amount of 10 party member, the quest is skipped.
Reward: 2750 exp
The Situation in Begus (Quest no.183)
This quest starts with the paperwork on the desk in your bedroom. It requires the events about Maria and your journey to the water temple island to fight Katreena, the events with Elly and Adrianna, the sex scene with Queen Jeanne, and that you use the teleport orb once after all of the previously mentioned conditions are met.
Reward: 3000 exp
The Sphinx’ New Dress (Quest no.120)
The sphinx Mozaik mentioned that she would like new clothes but for someone of her race it’s difficult to find something. The elf Saphielle in Orchel is said to be able to help.
Reward: 2500 exp
Trading Route (Quest no.83)
Flaire, from the thieves guild below Thremten, wants you to register a new trading route at Havaria Port. First of a questline to receive the golden weapon recipes.
Quest location: Obtained from Flaire. Reward: None
Training (Quest no.1)
You need to walk to the trainings cave. It’s south from the Academy onto the forest way, from which you need to go east.
Quest location: Obtained automatically. Reward: 150 exp
Training (2) (Quest no.2)
Walk to the forest way.
Quest location: Obtained automatically. Reward: 150 exp
Traitor? (Quest no.14)
Going to the second floor of the fort in Parverhill after your coronation will trigger the soldiers to attempt an assassination on you. Talking with Trey at the sleeping chambers will lead to a search of a catgirl mercenary. You can find the catgirl in the bar of Aldlyn. She’ll run away to the wooden storage below the bar.But when you talk with her again, she turns out to be innocent. After talking to Trey again, you’ll have to look for hints in the living area of the noble families. Looking at 6 books in this room will be enough for Trey. When you return to the sleeping chambers and talk to Trey once more, he’ll invite you for a trap on the suspect. The trap will cause 2 fights, first with soldier and second with assassins. After winning both fights, the unveiled traitor is arrested and will be seen in the capitals prison from now on.
Quest location: Obtained in the fort of Parverhill. Reward: 5000 exp
Treasure Hunt (Quest no.40)
Sandra wants to check out a newly found ancient temple to search for treasures.
In the first chamber you’ll need to input a code into 4 sockets. The code can be obtained from the 8 stone plates spread out on the walls in the dungeon. Each stone plates has one number in it to show which socket it belongs to. There are two stone plate for each socket but only the plates that hang higher are true. Every stone plate being directly above the ground is false and can be ignored. The description of something in the stone plates shows what you have to count for the value needed for the socket.
In the second chamber you need to set fire to 3 of 4 torches. At the top of the map are stone pillars directly above each torch. The one broken pillar indicates which torch needs to stay out.
Quest location: Obtained from Sandra in the sleeping chamber if her 60+ relationship quest has already been done.
Reward: 4000 exp
Trey’s feast of gratitude present (Quest no.65)
You want to get a quill as Trey’s present. The jewelry store in Thremten might have some for sale.
Quest location: Obtained from the desk in your room after reading the note about the feast of gratitude at the city board. Requires all previous paperwork, which requires you to have Kurohime’s training done, and the bathhouse.
Reward: A present for Trey.
Trouble at Mount Alberrane (Quest no.167)
After advancing the events with Ellanore at Ebron, and the dialogs with her at the sleeping chambers, you can encounter a new guy in front of the clinic in Aldlyn. His dialog will unlock this quest.
After observing the goat monstergirls a few times, you get into a battle with them. Defeating them will not advance the events. You need to survive for a while, and solve the problem by making the right choices during the battle, until the battle is aborted.
Reward: 500 exp
Tsubaki’s feast of gratitude present (Quest no.64)
You want to get the necessary items for Tsubaki to clean her katana. The blacksmith at the Calbridge Stronghold knows about Katanas so you want to ask him about it.
Quest location: Obtained from the desk in your room after reading the note about the feast of gratitude at the city board. Requires all previous paperwork, which requires you to have Kurohime’s training done, and the bathhouse.
Reward: A present for Tsubaki.
Tulup Plant (Quest no.37)
A woman at the clinic needs a tulup plant for her treatment. She promised you 2,500 gold reward for helping her get it. To solve the quest you must talk to the clerk of a store in Aldlyn, then with the maid Flora at the top left corner of Aldlyn and afterwards with Liana before returning to the quest giver. Liana is the wife of the elven Chief and can be found in Ebron after you’re shown the village by the Chief.
Quest location: Obtained from a woman in the clinic of Aldlyn once you have purchased the first public health upgrade from Edward.
Reward: 2500 gold
Vampire Hunt (Quest no.88)
A bounty has been placed on the heads of some vampires, living in a cave behind the Norhall Stronghold in Begus.
Quest location: Obtained at the Aldlyn city board when you have Vampire in your party.
Reward: None
Vampire’s Past (Quest no.112)
Vampire wants to know what you and the woman at the bottom of the north dungeon were talking about.
(During the second quest step, you can find the woman with three eyes in a cell on the right in the prison building of Lualombo, which is the building with the green roof in the bottom right of Lualombo. You can talk with her by interacting with the prison cell door.)
Reward: 3500 exp
Vampire’s feast of gratitude present (Quest no.67)
You want to get a special toothbrush for Vampire. A store in Witton makes custom made items if you ask for them. Maybe you’ll be able to get it there.
Quest location: Obtained from the desk in your room after reading the note about the feast of gratitude at the city board. Requires all previous paperwork, which requires you to have Kurohime’s training done, and the bathhouse.
Reward: A present for Vampire.
Vanguard Squad Leaders (Quest no.127)
You met the squad leader Jessy at the barracks where you first met Mira. She told you the location about the other 5 squad leaders. You want to talk with them, and after all of them have returned to the barracks, you can send them to fight bandits and other problems.
Reward: Unlocks the strategy battle system.
Varea (Quest no.47)
Chiyo wants to meet her sister Varea at a broken fort in Amagal. This quest is only available if you currently have the quest “Fragments (3)” running.
Quest location: Obtained from Chiyo at the sleeping chambers. Reward: 3500 exp
Vegetable Garden (Quest no.56)
Kayelinth would like to use the garden up north between the castle and the river in Aldlyn to grow some vegetables.
Quest location: Obtained from Kayelinth in the sleeping chamber after you turned her into her human shape.
Reward: 3500 exp
Vegetable Request (Quest no.188)
This quest guides you to the swamp area below Bitterroot Farm in the south of Central, to ensure that players find the locked chest while Sandra is in your party.
Quest location: Obtained from the Aldlyn city board when Sandra is in your party. Reward: 250 exp
Wanted: Kunoichi (Quest no.53)
Sara from the north east of Aldlyn wants you to capture a certain Kunoichi for her. You can find the Kunoichi in the main building of the Meddling Castle. After bringing her back to Sara you can go back into the building and see Sara having fun with the Kunoichi in the cellar.
Quest location: Obtained from the city board in Aldlyn. Reward: 2500 gold
Wanted: Thief (Quest no.54)
Lady Talley wants you to get rid of a thief that stole a treasure map from her and bring it back to her. He is in the Yang Tower in Amagal.
Quest location: Obtained from the city board in Aldlyn. Reward: 3500 gold
Water Fetching (Quest no.94)
You agreed to help a slave in Kagabangui by fetching some water from the well in the south east of the town.
Quest location: From a slave in a tent, top right corner of Kagabangui. Reward: +Trust with Brad
Wedding with Chiyo (Quest no.177)
You can marry Chiyo after the Mystery forest event with Kayelinth, and when the main story is past the point when Varea comes to your castle. (Varea doesn’t have to be there anymore when you start the wedding events.)
Reward: Combat superiority through magic firepower!
Wedding with Elly (Quest no.186)
After you unlocked the wedding and vanguard battle system, and finished the quest “Ryoko’s Quest,” you can talk with Elly for an animated sex scene, after which she’ll be available for marriage.
Reward: Superior firepower thanks to two massive guns.
Wedding with Kayelinth (Quest no.175)
You need Kayelinth’s CG scene on the farm you build for her, and the events with Jaylin about the different shapes of dragonics, to unlock the marriage for Kayelinth.
Reward: Countless bright smiles, and a lot of fun.
Wedding with Mira (Quest no.173)
After all previous character events of Mira, you can select her on the marriage system screen in the church of Aldlyn.
Reward: An unlimited supply of angel feathers and innocent smiles.
Wedding with Mirel (Quest no.170)
After you unlocked the marriage system (quest 168 “Marriage”) you can select to marry Mirel when all of her previous character events are done.
Reward: A life long subscription for long ear cuteness.
Wedding with Ryoko (Quest no.185)
After the quest “Ryoko’s Quest” you can select Ryoko on the marriage screen in the church of Aldlyn to marry her.
Reward: Everlasting support on every level.
Wedding with Sandra (Quest no.172)
After finishing the quest “The Forgotten Brexeet Isles” you can select to marry Sandra.
Reward: A secured gold income from questionable sources.
Wedding with Tsubaki (Quest no.169)
After you unlocked the marriage system (quest 168 “Marriage”) you can select to marry Tsubaki when all of her previous character events are done.
Reward: Eternal happiness and unlimited self baked bread.
Wedding with Vampire (Quest no.174)
Vampire’s wedding on the marriage screen becomes available after Mira’s wedding is done. It requires the previous events of Vampire to be done, including the encounter with Neya in Kagabangui, the dragonic event which unlock Ryen’s dragonic powers, and the blowjob with Mira and Vampire.
Reward: There is no reward, but not doing it might get you murdered in your sleep.
White Silver (Quest no.109)
Queen Jeanne Apelia of Begus requires 4 silver ore and a mage able to enhance it in order to make white silver weapons. These weapons can defeat undead enemies and help to weaken the grip of the church on the government of Begus.
You can find silver ore at the Jade Cave or below Old Ashton. Reward: 15000 gold
Wild Dispel Herb Request (Quest no.59)
The doctor in Aldlyn need some Wild Dispel Herbs. You can find them at the forest near Thremten or Ebron.
Quest location: Obtained from the city board in Aldlyn. Reward: 2000 gold
Wyvern Leneth (Quest no.49)
You met the wyvern Leneth imprisoned in the Norhall stronghold. She claims to be only incredible clumsy which doesn’t seem like a crime to you so you want to talk to the commander about her release.
Quest location: Obtained from Leneth in the storage of the Norhall stronghold. You need Sandra to open the door of the storage before you can get to her.
Reward: 800 exp
Shop list
Aldlyn Herbalist:
Without upgrade: Potion, Magic Water, Dispel Herb, Stimulant, Fabric, Monster Repel Perfume
Added with first country tier upgrade: Big Potion, Improved Magic Water, Small TP Potion
Added with second country tier upgrade: Excellent Potion, Elixir, Big TP Potion
Aldlyn Blacksmith:
Without upgrade: Shield, Hat, Cloth, Light Armor, Simple Shoe, Simple Coat, Simple Helmet, Ground Ring, Simple Sword/Axe/Cane/Bow/Katana/Spear/Dagger/Glove/Mace
Added with first country tier upgrade: Iron Armor, Iron Shield, Heavy Armor, Leather Armor, Leather Shoe, Iron Knife/Blade/Katana/Spear, Improved Cane/Bow, Fire Magic Mace, Leather Glove
Added with second country tier upgrade: Shield Ring, Nice Coat/Hat/Helmet/Shield, Heavy Helmet, Big Shield, Nice Blade/Axe/Cane/Bow/Katana/Spear/Glove/Dagger/Mace
Aldlyn Bar:
Beer, Magic Water, Whiskey
Aldlyn farmer in the bottom left corner of the city:
Vegetables, Flowers, Apple
Red Keep:
Potion, Magic Water, Big Potion, Small TP Potion
Calbridge Stronghold:
Iron Blade/Katana/Armor, Heavy Armor
Witton Magic store:
Potion, Magic Water, Dispel Herb, Stimulant, Big Potion, Improved Cane, Magic Robe, Magic Hat, Fabric, Imp Leather
Thremten Jewelry:
Earring, Necklace, Expensive Earring/Necklace, Jewel
Thremten Author:
Book
Bitterroot Farm:
Vegetables, Flowers, Meat, Fabric, Bread, Hay
Ebron Blacksmith (Knocky):
Special Arrow, Iron, Rope, Iron Knife, Iron Blade, Improved Bow, Leather Armor, Leather Show, Magic Robe, Grenades Recipe
After main events about the Katryx Blade also available: Katryx Armors Recipe
Crysthaven Merchant:
Magic Water, Improved Magic Water, Red Slime Essence, Map Amagal, Improved Cane, Magic Hat, Talisman of Preservation
Calterburry Magic store:
Big Potion, Improved Magic Water, Big TP Potion, Beer, Simple Helmet, Magic Robe, Earring, Necklace, Improved Cane, Magic Hat, Golden Cross, Map Begus South, Stinky Coat
Calterburry Blacksmith:
Iron Knife/Blade/Katana/Spear/Axe, Improved Bow, Iron Armor, Light Armor, Running Shoe, Explosive/Ice/Flash/Holy Grenade
Whitestone Citadel:
Potion, Magic Water, Big Potion, Improved Magic Water, Fire Magic Mace, Nice Cane, Hat, Simple Coat, Magic Robe, Magic Hat, Rope, Toys, Book
Whisperwind farm:
Potion, Magic Water, Dispel Herb, Small TP Potion, Vegetables, Flowers, Fabric, Cheese
Diminus Castle Magic store:
Potion, Magic Water, Big Potion, Improved Magic Water, Rope, Book, Whiskey, Jewel, Hat, Simple Coat, Magic Robe, Magic Hat
Diminus Castle Blacksmith:
Simple Sword/Axe, Katana, Improved Bow, Iron Spear, Nice Axe, Iron Armor, Good Heavy Armor, Heavy Helmet, Big Shield, Wind Blade, Lightning Glove, Thunder Armor
Simple Gun available after an event with Elly
Spire of Courage shop floor:
Vegetables, Meat, Fish, Cheese, Potion, Magic Water, Stimulant, Big Potion, Small TP Potion, Earring, Expensive Earring, Golden Cross, Jewel, Necklace, Expensive Necklace, Toys, Shortsword, Iron Knife, Iron Spear, Nice Dagger, Nice Bow, Simple Shoe/Coat, Leather Shoe, Magic Robe/Hat, Headband, Nice Hat, Nice Mace, Iron Armor, Iron Shield, Big Shield, Heavy Helmet, Heavy Armor, Thunder Gloves, Steel Armors Recipe, Steel Weapon Recipe
Minsk Harbour Merchant:
Fish, Rope, Hay
Kagabangui Item and accessories shop:
Rope, Chains, Poison, Oriental Herbs, Cheese, Bread, Goldbar, Big Potion, Oriental Shoes/Coat/Hat, Cute Oriental Dress
Kagabangui Blacksmith:
Light Blade/Katana/Spear/Dagger/Axe/Mace, Glowing Bow/Cane, Improved Gun Recipe, Safety Shoes
Lalizan General Store:
Potion, Magic Water, Dispel Herb, Special Arrow, Earring, Necklace, Silk
Siriveta General Store:
Dispel Herb, Big Potion, Small TP Potion, Rope, Golden Cross, Book, Fabric, Fish, Apple, Cheese, Bread, Hay, Toys, Wild Dispel Herb
Newkungu Magic Store:
Excellent Potion, Improved Magic Water, Small TP Potion, Golden Cross, Book, Oriental Herbs, Oriental Hat, Expensive Hat
Orchel Magic Store:
Potion, Magic Water, Dispel Herb, Big Potion, Book, Harpy Feather, Oriental Herbs, Oak Staff Rod, Crystal, Magic Robe, Nice Robe, Magic Cane, Lucky Ring
Rakake
Vendor 1: Magic Water, Big Potion, Fabric, Flowers, Oriental herbs, Water Bottle, Water Bucket
Vendor 2: Fish, Rare Fish, Pulverized Crab, Fish Oil, Strange Fish Egg Vendor 3: Rope, Crystal, Iron, Silk, Ice Harpy Feather
Vendor 4: Vegetables, Apple, Cheese, Bread, Red Mushroom, Blueberry, Cherry, Blue Cooking Book
Vendor 5: Bread, Hay, Brown Mushroom, Blueberry
Bar: Beer, Whiskey, Cowgirl Milk, Cocktail, Red Wine, White Wine, Coffee
Caverns of the enigmatic warlord:
Big Potion, Magic Water, Small TP Potion, Beer, Whiskey, Meat, Adventurer Ring
Recipes:
Basic Recipes [ID 99]
Allows you to craft iron-level weapons and equipment, maps, basic potions, and steel. You get it automatically when you have the dialog about alchemy tables with a blacksmith or other npc.
Grenades Recipe [ID 102]
Allows you to craft grenades for Elly.
Skill Crystal Recipe [ID 103]
Allows you to craft the skill crystals for the skills “Silence”, “Confusion”, “Power up!” and “M. Shields up!”
Improved Gun Recipe (removed?) [ID 105]
Allows you to upgrade Elly’s starting gun.
Soul Lantern Recipe [ID 116]
Allows you to craft Soul Lanterns, which can capture monstergirls in order to release them at a farm or the monsterhall in your castle, to befriend them and get their drops without having to fight them. You get it at the Whisperwind farm in Begus.
Katryx Armors Recipe [ID 124]
Allows you to craft katryx armor, which has higher M.DEF and a little magic evasion.
Magic Potion Recipe [ID 132]
Allows you to craft magic potions, which increase the M.ATK by 25% for 1 battle. You get the recipe from Flora during the events of Mirel.
Steel Armors Recipe [ID 138]
Allows you to craft steel armor. You can get it at the Spire of Courage in Begus.
Steel Weapon Recipe [ID 139]
Allows you to craft steel weapons. You can get it at the Spire of Courage in Begus.
Gold Armors Recipe [ID 144]
Allows you to craft gold armor. You get it during the events with the Thremten thieves guild.
Gold Weapon Recipe [ID 145]
Allows you to craft gold weapons. You get it during the events with the Thremten thieves guild.
Ring of Ice Recipe [ID 148]
Allows you to craft the ring of ice. After meeting the snowgirl Sia in the igloo in the top right corner of the worldmap, you eventually get a quest that will reward you with this recipe when you talk with the maid Linda in your castle.
Monster Craft Recipe [ID 162]
Allows you to craft elemental weapons with the drops of monstergirls. You receive this recipe from maid Vivian in the monsterhall in your castle.
Oak Staff Recipe [ID 210]
Allows you to craft the grey, blue and black oak staff, which give you +10% M.ATK,
+25% M.MP or +10% M.DEF.
Protection Potion Recipe [ID 224]
Allows you to craft protection potions to raise your resistance against fire, thunder, water, ice, earth, wind, light or darkness element attacks for a while. Can be obtained in the fire raid on the challenge floor of the Spire of Courage.
Widowmaker Recipe [ID 227]
Allows you to craft the widowmaker gun for Elly. Can be obtained in the fire raid on t he challenge floor of the Spire of Courage.
Jade Recipe [ID 233]
Allows you to craft jade jewelry, which are very effecive present items. You obtain the recipe during the character events of Sandra.
Katryx Blade Recipe [ID 97]
Allows you to build the Katryx Blade. This special blade enables Ryen to use the “Armor breaking” skill, which is needed to defeat Lace during the main story events.
Green Cooking Book [ID 309]
Allows you to cook Disgusting Food, Poisonous Food and Mushroom Soup. Can be found in a hole in the top left corner of Greencoast Tower.
Blue Cooking Book [ID 317]
Allows you to cook Fried Fishm, Fried Mushrooms, Fermented Fish and Berry Potion. Can be purchased in Rakake.
Yellow Cooking Book [ID 317]
Allows you to cook Berry Smoothie, Cherry Smoothie and Sparkling Smoothie. Can be obtained during the events with Kayelinth.
FAQs – Renryuu: Ascension Walkthrough
Q: Can I keep the save game from my old version when upgrading to a new one?
A: Yes, you can copy the save files from the old version into the save folder of the new version. I made a video about updating using the update files and copying save files here: https://www.youtube.com/watch?v=yFXqZE_jQng
Q: Why can’t I see the elf village Ebron on the worldmap?
A: The party doesn’t know the location of the elf village at first. If you talk to the elf at the blacksmith of Aldlyn with Mirel in your party he’ll offer you to show you the way to their village. After talking to him again in the bottom left corner of Aldlyn you’re shown the way to the village and it’ll appear on the worldmap.
Q: I can’t increase the relationship with a character anymore?
A: All characters have favorite present items. With the right present you can get all girls to a relationship of 70 after which you’ll need love potions to increase it any further. Love potions are very rare at the moment.
Q: Where do I get the Mithril Pickaxe to harvest Iron?
A: The Mithril Pickaxe is given to the party during the quest no. 46 „Armor breaking“. You’ll need to play the main storyline to obtain this quest.
Q: What is the solution for Sandra’s treasure dungeon?
A: The code in the first area is 2-5-6-4. You get it by counting the things shown on stone plates hanging higher, not directly above the ground. A hint about the god is given saying „In his opinion only those who were above others had any worth.“, which is supposed to tell you which plates are correct and which to ignore.
In the second area, there are stone pillars in line with the torches at the top of the map. The third pillar is broken, indicating that this torch should not be lit, while every other should be. When you have the right combination, there is no sound or message, but the iron gate will be open now.
Q: What is the solution for the murder crime in Millwater?
A: After speaking with everyone downstairs, you can go up and find a strange potion. After finding the potion you have to talk to Winona, Lady Redwood and then Irinlia. The order is important, since their dialog’s affect each other in this order. Afterwards, Ryen can solve the crime by talking to the soldier next to the corpse of Sir Redwood. The right choices are Irinlia – poison – by mistake.
Q: What are the answers for the bronze license test at the Whitestone Citadel event? A: 1. Less limbs
- Amagal
- Blizzard 4. 20%
5. Once
- HP
- Exp. Gain
- Alfred Lambida
- Magic Reflection
- Silenced
Q: Where can I find the Spores for the 2. CG with Lace?
A: You have to activate the Quest by talking to the Guard in the secret prison after Sandras Scene in the dungeon with the tentacles. Further you need to go with Naevy to the demoness the first time and there you can get the Spores afterwards.
Q: What is needed for Lielle and her 2. scene?
A: You need to reach level 30 to get the quest on the city board. Afterwards you can talk again to her and get into an dungeon with some riddles and a Boss that is hard to defeat. It might be better to wait till the party is on level 40.
Q: How do I get through Lielle’s dungeon with the switches?
A: You need to turn every switch once (to the left), but the switch in the flame riddle room has to be set back (after obtaining the chest). In the top right are 3 switches close to each other. The lowest of those three also needs to be turned back after the other two are active.
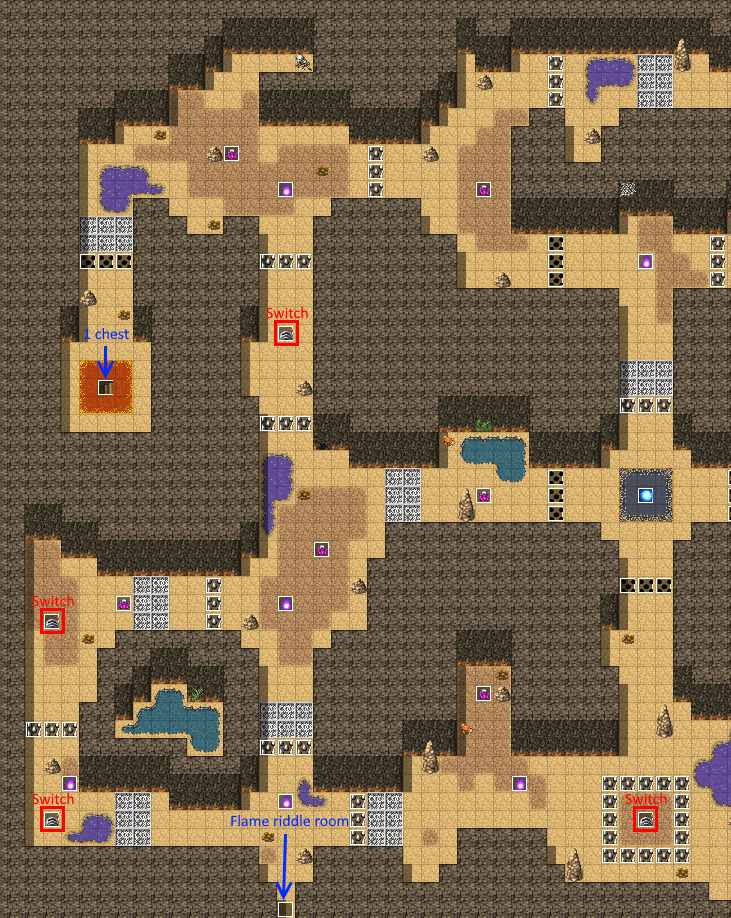 Lielle dungeon main area left side:
Lielle dungeon main area right side:
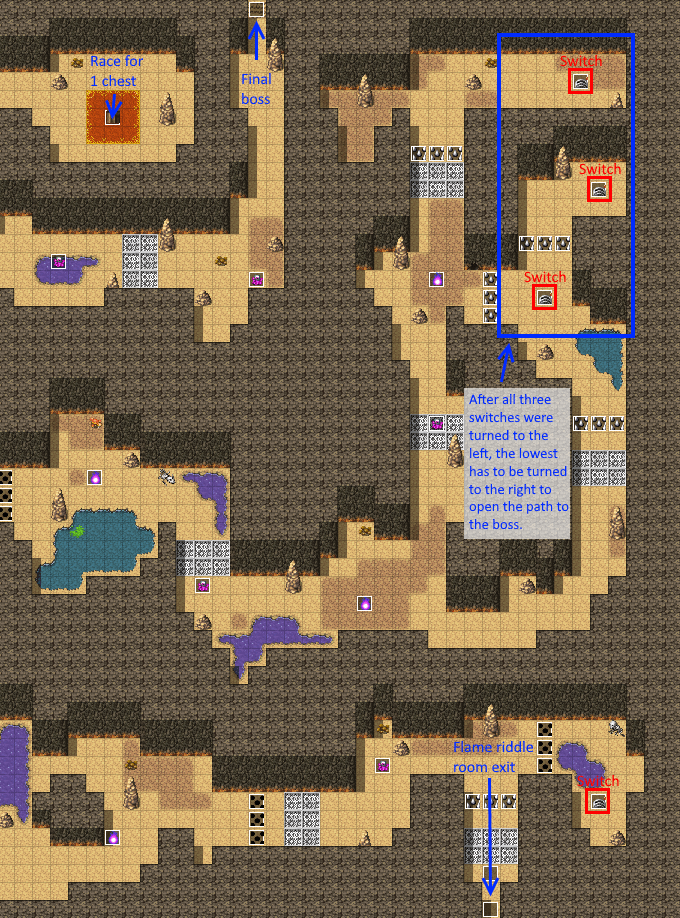
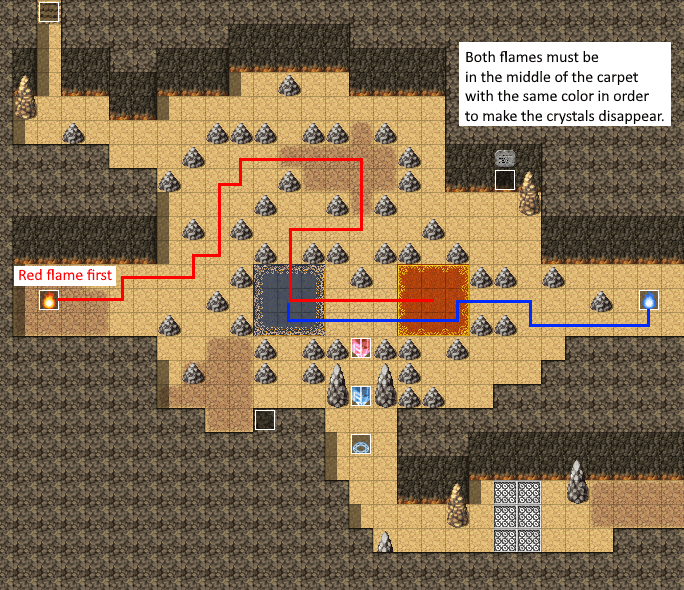 Lielle dungeon flame area left side:
Lielle dungeon flame area right side:
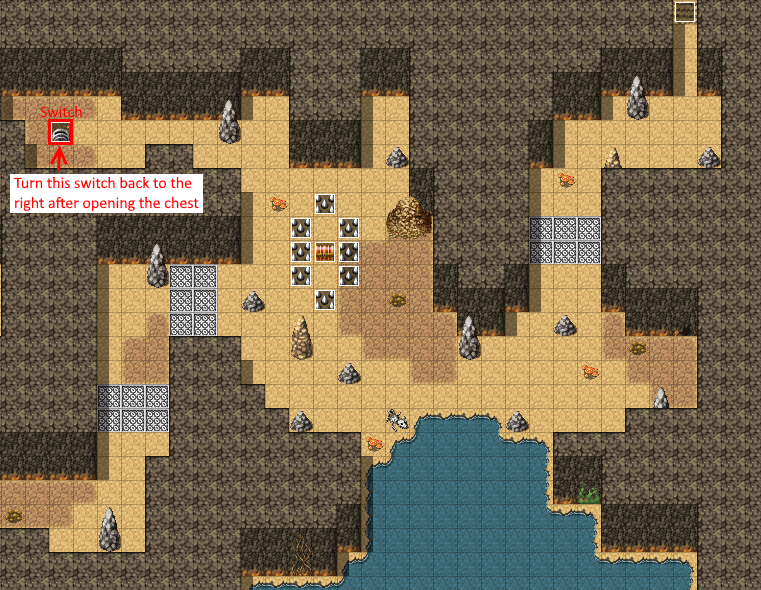
Q: How do I get upstairs in the Skylo Tower?
A: For the first floor, you need to find all things, which are different between the left and the right room. Interact with them first in the original room on the left, then Ryen will notice they’re different when interacting with them in the right room.The 6 things you need to find are the bookcase in the top right, the mirror on the wall, the picture above the mirror, the statue, the big chair, and the stone pile in the bottom left corner. On the second floor, you need Chiyo with a Magical Knowledge above 40 to get rid of the barrier.
The locked door on the last floor require Sandra with at least 35 in her lockpicking skill for the left, and at least 60 for the one on the right.
Q: How do I solve the riddles in the dungeons during the „Fragment Hunt“ quest?
A: In Lualombo, you need to move all switches to the left side to unlock the dungeon at Sinasoka, or all right to unlock the dungeon at El Arma Gravesite. It’s impossible to have both unlocked at once.
The door at Lualombo requires the combination 5571, which is the count of the switches in the dungeon at Sinasoka. The switches don’t need to be used, you only need to count them to get the number.
At the Poisonwood Keep dungeon, you need to walk on the path indicated by the tiles with the number 7:
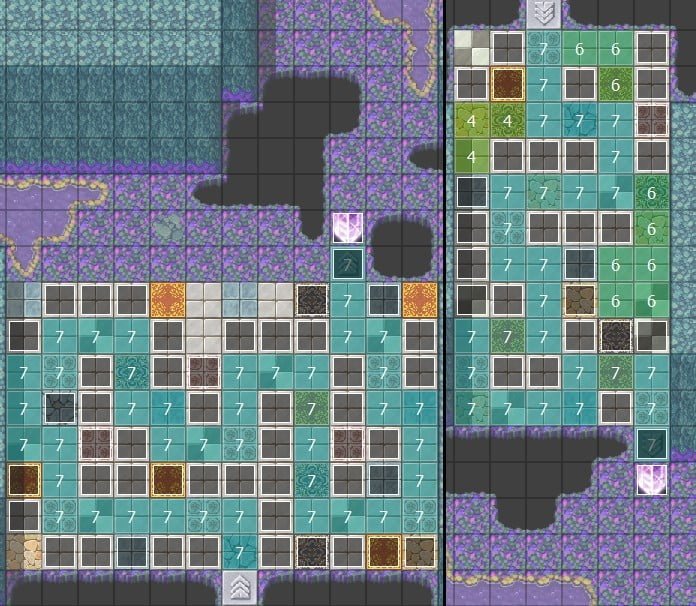
Q: Where can I find the Magicspirit for the fragment hunt?
A: You can find an elf thief girl n the bottom right corner of Parverhill. Depending on how the event goes she’ll open a portal to the Magicspirit either right there, in the top right behind a building, or in a prison cell below the fort in Parverhill.
Afterwards you can only get back to the spirit by using the Teleportorb.
Q: How can I unlock the good path scene of Ariana?
A: After you wake her up in the spire you can get a new quest on the Aldlyn city board to help her with a spell. Once that quest is done and Ariana is in your castle you can find Mekboss Mashgul in the dungeon below Crysthaven to continue Ariana’s events.
Q: How to get to the secret hot spring?
A: You have to talk with six npcs: In Aldlyn, Ebron, Parverhill, Red Keep, Thremten and Witton. But you must have Mirel in your party already.
In Ebron talk with a child, in Witton talk with the person near snowman, in Parverhill talk to the woman in a big house, in Thremten talk with the green-haired man, in Red Keep talk with the sleepy guard near tent, in Aldlyn talk with the visitors of the Inn.
It’s also necessary that you had the events with Mira and Mirel at the festival of Thremten and that your relationship with them is high enough.
If all conditions are fulfilled you can go to the top right corner of the Calbridge Stronghold, pass the gamble on a small mountain path, and press the action button on the tile directly on the border of the map.
Q: How can I craft things?
A: You can interact with alchemy tables for crafting. They’re at most blacksmith and always look the same. It’s also possible to talk with Chiyo at the sleeping chambers for crafting later in her events.
It’s necessary to have the recipe to craft something.
You can switch left or right between the weapon, armor and item category while in the crafting menu.
Q: How to make steel?
A: Steel can’t be found or bought, you need to craft it with Iron and Coal at an alchemy table. You get the recipe for it at the Spire of Courage in Begus.
Q: How does the raid battle in the fire area against Funeral and Shika work? A:
- Talking with the blonde elf before the raid gives you the option to teach Elly or Mirel the Mark Target skill. By using this skill on one of the boss enemies will focus all damage attacks from the raid group on that target instead of switching between them.
- If you decide to go left at the first battle, your healer will be knocked out, causing you to miss heal and buffs in the boss battle.
- When you decide to go right and save the healer, resting will have a 2/5 chance to heal you up without having to fight again. Else it’ll always be a thrid battle against small flames.
- Staying at distance against the firewalker will do noting good but reduce the mana of your entire party.
- The boss Shika will have red or blue glowing hands before the battle. Red hands mean you have to wait before attacking while blue means you have to rush in immediately.
- The box of ash from the firewalker enemy is needed to remove the invulnerability of the boss.
- Funeral can be silenced to stop her fireball, but every 3 turns Shika will check if Funeral is silenced and will cure it if she has it.
- Shika has mana regeneration but not much MP in general. Burning her mana can prevent her from casting her aoe spell.
- Funeral has more physical def, Shika more magic def. Since you only need to defeat one target focusing on whichever you can kill faster makes sense.
- The burning debuff does 30% Max.HP damage after the characters action, so it can always be healed before it triggers.
- You can get water bottles/buckets against the burning debuff from water fairies in front of the dungeon, or you can buy them in Rakake.
- Each piece of clothes has 5000 HP, and you need to destroy three pieces, which means their effectiv HP is 15000 each.
- After the battle the healer offers to heal you, which also recovers your MP.
- Legendary equipment has a 15% chance to drop but is always unique. If you roll a legendary item you already have you’ll get another one from the list until you have all of them from a chest. Then you’ll get epic (purple) items even when rolling a legendary loot.
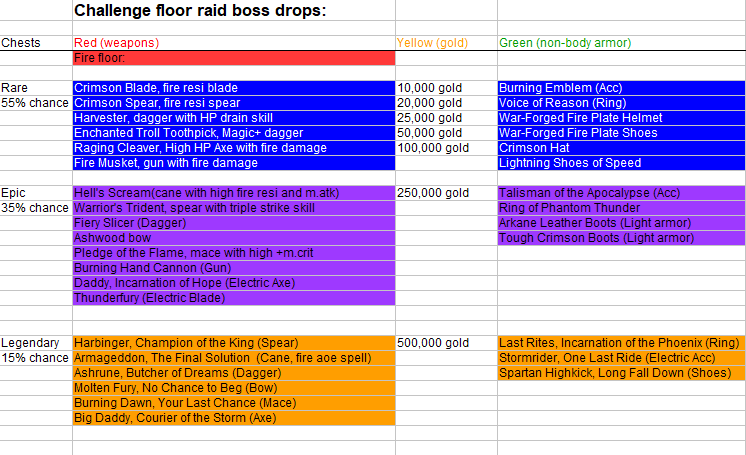
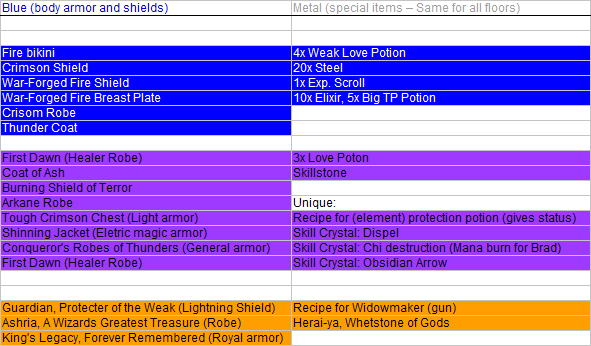
Q: How to solve the riddles at the haunted mansion during Sandra’s events with Glen?
Cave Rock Puzzle
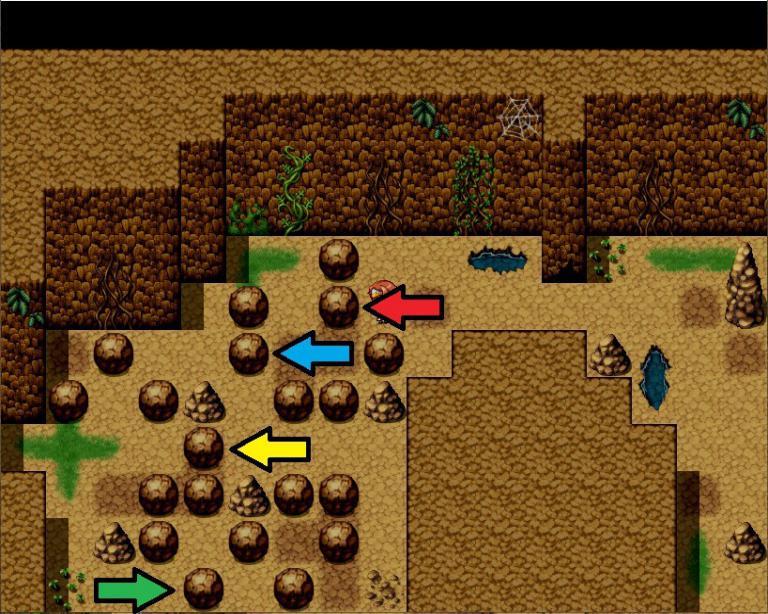 If you come from the top, move the rocks like this:
- Red Arrow: Move left 1 time
- Blue Arrow: Move left 1 time
- Yellow Arrow: Move left 3 times
- Green Arrow: Move right 1 time
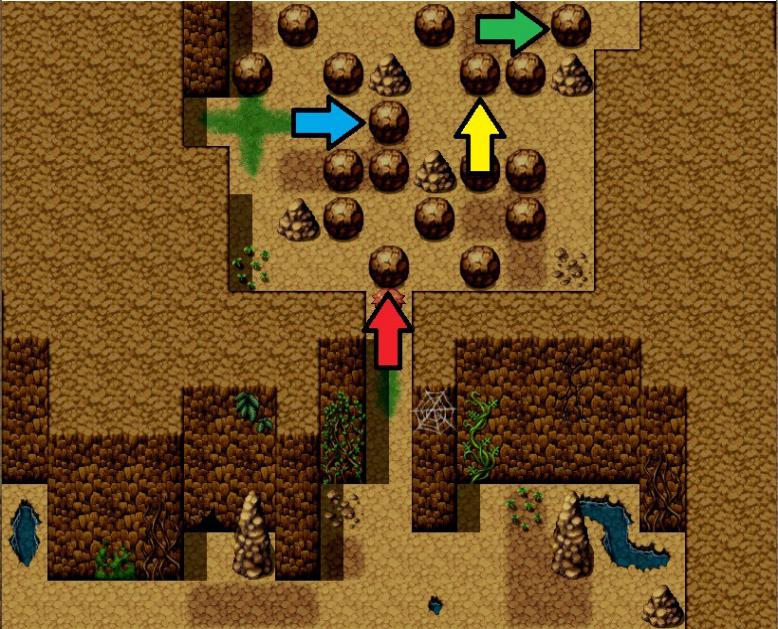 If you come from the bottom, move the rocks like this:
- Red Arrow: Move up 1 time
- Blue Arrow: Move right 3 time
- Yellow Arrow: Move up 2 times
- Green Arrow: Move right 1 time
Cave Switch Puzzle
All switches need to be turned to the right. If you turn one switch all adjacent ones also turn. You only need to turn 3 switches:
- In the middle row, turn the first switch (leftmost) and third switch (third from left).
- Turn the switch in the bottom row.
Books & Colors
When you enter the mansion you see a closed book directly ahead on a table, called “The Alphabet – From A to Z: Learning letters in a most colorful way”. It has a button which can be pressed to reset the puzzle if you do something wrong.
In the northwest room are several bookshelves you can interact with. All have names, a short story and a switch you can press.
The first book on the table gave you a hint about “the alphabet” and “color”. In order to solve the puzzle you need to activate the switches at the bookshelves which have colors in their title and you have to do this starting from the letter “A” to “Z” for the colors.
If it still sounds to complicated, you need to press these buttons in order:
- First, press “Blue Mountain”
- Second, press “The Red Wedding”
- Third, press “The King in Yellow”
If you have done this, go to the three crystals blocking the eastern path and press the button there. If you did everything correctly, the crystals should disappear. Else you did something wrong, go back to the book on the table and press the switch and retry the puzzle.
Getting up the stairs
In front of the stairs to the first floor is an open book on a table. You need to read it first in order to start the puzzle. It gives you a hint where you need to look next. You always have to interact with dolls, teddy bears and other such objects. After the initial hint the rest of the puzzle takes place in the East Wing.
- Go to the east wing and search for a room with a mirror. There, interact with the doll.
- Next, go the dining room and interact with the plush bear.
- Next, look for a room with a picture of a woman and interact with the plush bear.
- Finally, go to a room with several bookshelves and interact with the plush bear.
- Afterwards interact with the bust on the table. Now you can enter the first floor of the mansion via the stairs in the entrance area.
The Girl and her Pictures
Going upstairs from the entrance, you find a little girl. She forgot her pictures and asks you to
bring them to her. She wrote down hints where to find them.
After you talked to her you can find the pictures when you interact with various objects throughout the mansion. The hints should help you find them.
- The first hint references “Time” and more specifically a “clock”. Search for a clock in the entrance area.
- The second hint is – quite literally – referencing a “sink”. You can find one in the kitchen.
- The third hint is rather obscure. All those letters are musical notes. Search for a piano in the entrance area.
- The last hint is referencing ti weapons. Look for 3 swords on the floor where the little girl is in the north of the map.
After you found all four pictured talk to the girl again. The next path to the eastern side opens up.
Colored Orbs
In order to solve this puzzle you need to push every small colored orb onto the carpet in front of the same colored big orb. However, once pushed the orbs moves until it hits an obstacle.
In order to solve this push the orbs like this:
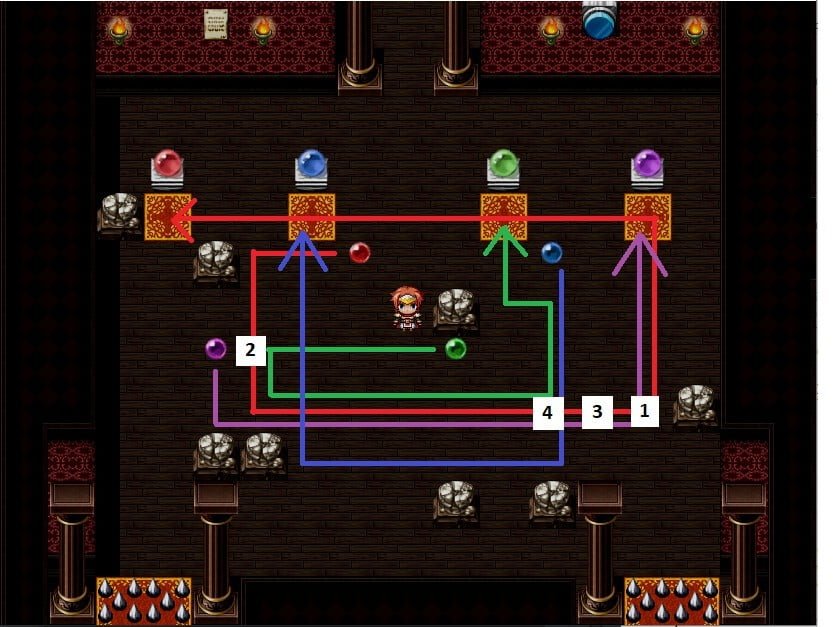
- Move the red orb left, down, right so it’s on the tile marked as “1” in the screen.
- Move the green orb left so it’s on the tile marked as “2” on the screen.
- Move the purple orb down, right so it’s on the tile marked as “3” on the screen.
- Move the green orb down, right so it’s on the tile marked as “4” on the screen.
- Move the red orb up, left so it’s on the carpet in front of the big red orb.
- Move the green orb up, left, up so it’s on the carpet in front of the big green orb.
- Move the purple orb right, up so it’s on the carpet in front of the big purple orb.
- Move the blue orb down, left, up so it’s on the carpet in front of the big blue orb.
And with that, the puzzle is solved. If you did something wrong you can press the blue button and reset the puzzle.
Q: How to get to the “hellhound village”?
A: The “hellhound village” becomes available inside of the volcano in Amagal (Map no. 20), after you got far enough in Hellhound’s events. The event requires that you impregnanted the wyvern Leneth, to get Hellhound’s scene in maid uniform at your secret bedroom in the castle. The maid scene is not always available, as the trigger for it is a randomly generated number, which can be re-rolled by using the teleport stone.
Q: How do I unlock the turn-based strategy battle system?
A. After meeting Mira at the broken barracks, you can repair them on the country overview map. Once the barracks are repaired, you can go there on the worldmap and meet the squad leader Jessy inside. Jessy will give you the quest to unlock the battle system. [Quest 127. Vanguard Squad Leaders]
Q: How do I get through the dungeon of the assassins guild below Witton?
A: The dungeon has 7 different routes to the end. There is always just 1 path that won’t trigger a trap when you walk on it, but it’s randomised which path it is each time you get back to the start.
The clock near the entrance tells you which path is available and in which direction it is.
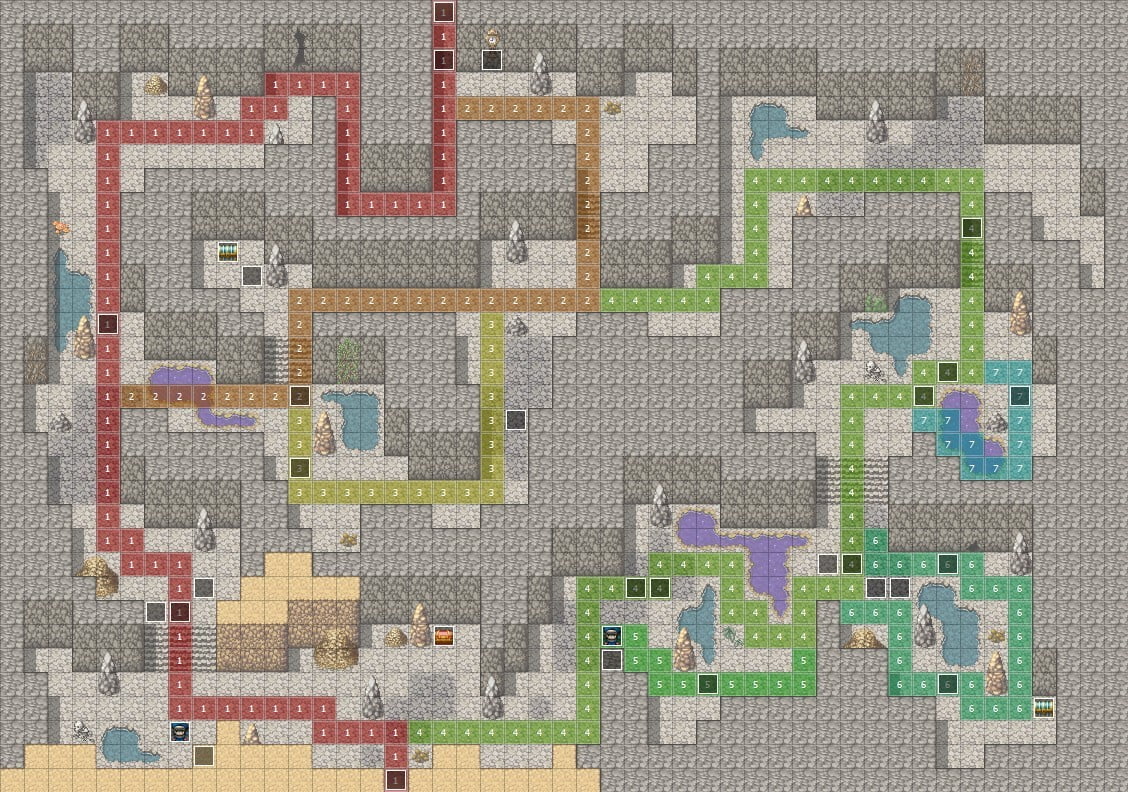
Ice raid walkthrough:
The cards appearing in the ice raid are randomly decided by a dice roll. Usually it’s from 1- 200 and has the following outcome:
1-30 Green heal
31-55 Blue heal
56-65 Purple heal
66-70 Orange heal
71-80 Green ATK
81-90 Green DEF
91-100 Green AGI
101-105 Blue ATK
106-110 Blue DEF
111-115 Blue AGI
116-119 purple ATK
120-122 purple DEF
123-127 purple AGI
- ORANGE ATK
- ORANGE DEF
- ORANGE AGI
131-160 Blue key
161-170 Purple key
171-180 Orange key
181-185 „Chance“
186-190 Champion
191-195 Rarity orb
196-200 Memory orb
The outcome will be re-rolled if you get Champion, Rarity orb, or Memory orb when you already had them.
A random number between 1 and 100 is rolled at the start of the raid. „1-15 Ice Dragon“ for example means that at a number from 1-15 an ice dragongirl will appear at that spot. All numbers that aren’t mentioned have no special action, and you can only pick a card before advancing.
Ice raid map 1:
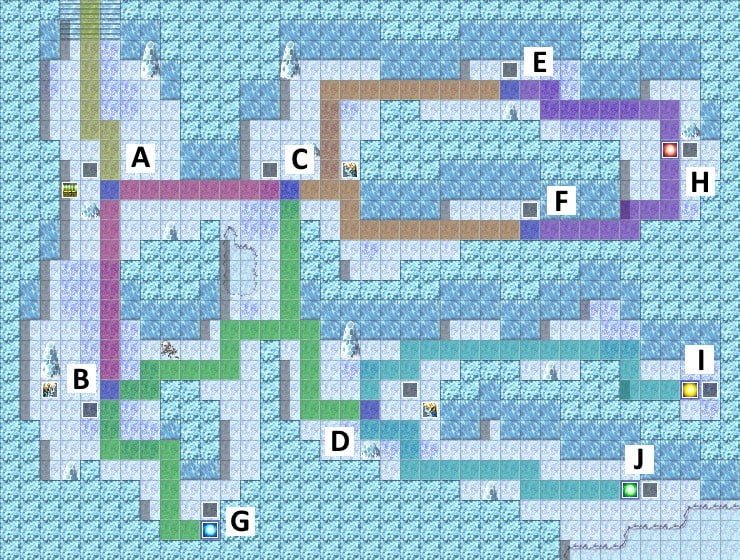
A:
100% chance for a green chest
No healing cards will be shown on this spot
B:
1-15 Ice Dragon
16-30 Water Dragon
31-45 Green Chest
46-50 Blue Chest
C:
51-65 Ice Dragon
66-80 Water Dragon
81-95 Green Chest
96+ Blue Chest
D:
86-95 Water Dragon
96+ Blue Chest
E:
Nothing special
F:
Nothing special
G:
1-25 Blue teleport
26-50 Red teleport 51-75 Yellow teleport 76+ Green teleport
H:
1-25 Red teleport
26-50 Yellow teleport 51-75 Green teleport
76+ Blue teleport
I:
1-25 Yellow teleport 26-50 Green teleport
51-75 Blue teleport
76+ Red teleport
J:
1-25 Green teleport
26-50 Blue teleport
51-75 Red teleport 76+ Yellow teleport
Ice raid map 2:
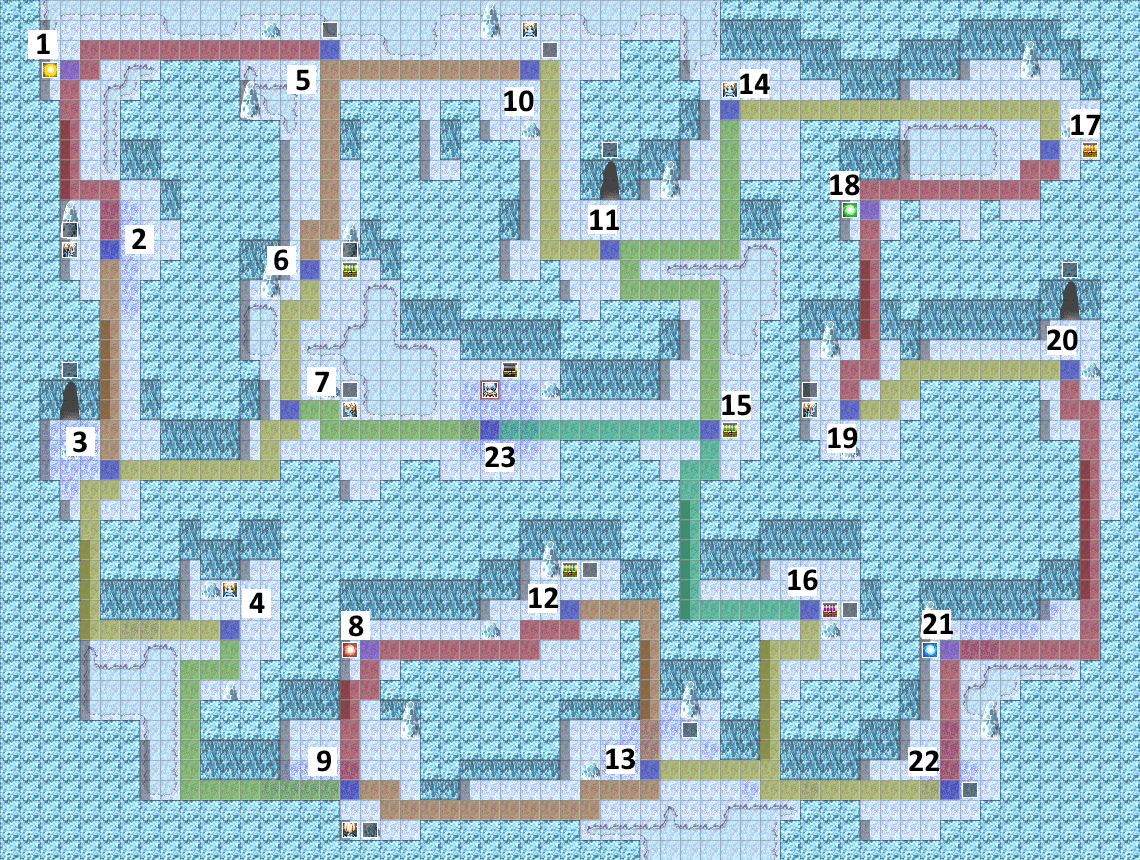
1:
Yellow teleport
2:
1-10 Ice Dragon
11-20 Blue Chest
21-30 Water Dragon
31-35 Purple Chest
36 Orange Chest
3:
Left card is always for entering the cave. Cave outcome by a roll from 1-50:
1 Memory orb (Roll from 2-50 when the party already has this orb) 2-10 Party splits → Choice of CG scene with Firah or Kalia, or exit 11-15 Green chest loot
16-20 Blue chest loot
21-30 Trap – Reduces all buffs by 25% (min. 0%) 31-50 Battle against an Ice Dragon
4:
100% chance for an encounter with a Water Dragon
5:
Nothing special
6:
1-50 Green Chest
51-80 Blue Chest
81-90 Purple Chest
91+ Orange Chest
7:
41-50 Ice Dragon
51-60 Water Dragon
61-70 Blue Chest
71-77 Purple Chest
78-79 Orange Chest
8:
Red teleport
9:
21-30 Ice Dragongirl
31-40 Blue Dragongirl
71-80 Blue chest
81-87 Purple chest
88-89 Orange chest
10:
100% chance for an encounter with a Ice Dragon
11:
Left card is always for entering the cave. Cave outcome by a roll from 1-50:
1 Memory orb (Roll from 2-50 when the party already has this orb) 2-10 Party splits → Choice of CG scene with Firah or Kalia, or exit 11-15 Green chest loot
16-20 Blue chest loot
21-30 Trap – Reduces all buffs by 25% (min. 0%) 31-50 Battle against an Ice Dragon
12:
41-60 Green chest
61-70 Blue chest
71-75 Purple chest
76-85 Ice Dragongirl
86-100 Blue Dragongirl
13:
Nothing special
14:
21-30 Ice Dragongirl
31-40 Water Dragongirl
15:
1-45 Green Chest
46-60 Orange Chest
61-80 Purple Chest
81+ Blue Chest
16:
1-8 Purple Chest
17:
1-30 Orange chest
31-40 Purple chest
41-50 Blue chest
81-90 Blue Dragongirl
91-100 Ice Dragongirl
18:
Green teleport
19:
25-35 Ice Dragongirl
36-55 Water Dragongirl
20:
Left card is always for entering the cave. Cave outcome by a roll from 1-50:
1 Memory orb (Roll from 2-50 when the party already has this orb) 2-10 Party splits → Choice of CG scene with Firah or Kalia, or exit 11-15 Green chest loot
16-20 Blue chest loot
21-30 Trap – Reduces all buffs by 25% (min. 0%) 31-50 Battle against an Ice Dragon
21:
Blue teleport
22:
Nothing special
23:
BOSS ENCOUNTER
1-50 Tiena
51+ Frozen Queen
Both boss enemies have a total of 44,000 HP and 1,600 MP. TIENA:
Has 5% EVA, 5% CRT, and 5% ,magic EVA.
Takes extra damage from lightning element attacks, and reduced damage from fire and water.
Skills:
Hailstorm: Ice attack against all enemies. Lowers the AGI of all targets. Frost: Single target ice damage spell.
Frostbite: Causes the debuff Frostbite, which decreases EVA by 100% und the target takes 3% HP/MP damage. Debuff gets removed after the target took 30% of his max HP as damage.
Water Slash: Has a 50% chance to make the target wet. Wet targets take 300% damage from ice attacks.
FROZEN QUEEN:
Has 5% EVA, 5% CRT, and 5% ,magic EVA.
Takes extra damage from lightning element attacks, and reduced damage from fire and water.
Skills:
Hailstorm, Frost, and Frostbite are the same as for Tiena. Forst Lance: Ice damage against one enemy.
Loot chance is a roll from 1-24. At 1-12 you get legendary loot, 13-24 purple. When you have the rarity orb and the roll is above 12, the amount is reduced by 5 to increase your chance to get the legendary loot.
Boss drops by a roll from 1-12:
1 Albizia, Frozen Luck 2 Bow of Aphylla
- Icicle Blade
- God’s Fury, Fist of Steel 5 Pain Day, A Wet Surprise 6 Broken Grip of Legends
7 Celastris, Shika’s Albtraum 8 Egoria, Bright as Daylight
9 Memory Orb No. 4 (Tiena only) or Memory Orb No. 5 (Frozen Queen only)
10+ Tiena’s Panties (Tiena only) or Frozen Panties, A Rare Treat (Frozen Queen only)
(If you roll an item that you already have, the number is increased until you get one you don’t have yet. After 10, it starts at 1 again, if necessary.)
 Nature raid:
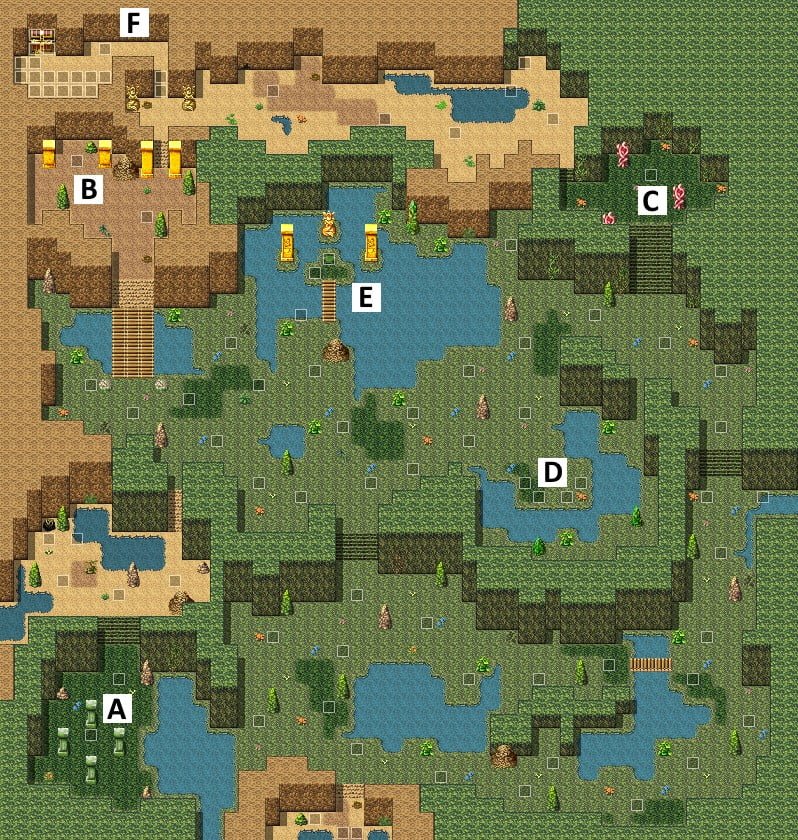 Nature raid:
A:
Location of the boss enemy Levia
Takes additional damage from fire, and reduced damage from nature and lightning.
DEF and M.DEF is equally strong. Her max MP is 600. Keeping her MP below 500 will prevent her from using her Curse spells.
Skills:
Steal Energy: Steals 90% MP of all enemies.
Ancient Curse of Death: Requires 500 MP. Does max HP –1 as damage to one enemy, so every character below 100% will die instantly from this spell.
Ancient Curse of Pain: Requires 500 MP. Does 75% max HP damage to all enemies. Nature’s Reclaim: Strong life leech against one enemy.
Plant Bite: Physical attack
Can drop:
3x Woolly Seed, 3x Sparkling Seed, and 3x Organic Fertilizer 5x Green Seed, and 4x Mineral Fertilizer
4x Purple Seed, and 5x Mixed Fertilizer
3x Brown Seed, 3x Magic Seed, and 3x Mixed Fertilizer 3x Brown Seed, 3x Magic Seed, and 3x Green Seed
4x Brown Seed, and 5x Woolly Seed
3x Organic Fertilizer, 3x Mineral Fertilizer, and 3x Mixed Fertilizer 4x Magic Seed, and 5x Sparkling Seed
3x Magic Seed, 3x Purple Seed, and 3x Mineral Fertilizer
3x Magic Seed, and 3x Organic Fertilizer, and 3x Mineral Fertilizer
B:
Location of the boss enemy Kiki
Takes additional damage from fire, and reduced damage from nature and lightning. Kiki turns into a Golem after losing 50% of her max HP.
She has strong M.ATK and M.DEF as fairy, but when she switches into a golem, it changes to strong physical ATK and DEF.
Skills:
Small Spark: Lightning damage against 1 enemy. Thunderstorm: Lightning damage against all enemies. Wind Burst: Nature damage against 2 random enemies.
Skills after transforming:
Mother Nature: Nature damage against all enemies
Skull Crusher: Does damage based on the targets DEF value.
Can drop:
3x Woolly Seed, 3x Sparkling Seed, and 3x Organic Fertilizer 3x Purple Seed, 3x Black Seed, and 3x Mineral Fertilizer
5x Purple Seed, and 4x Mineral Fertilizer 4x Black Seed, and 5x Mixed Fertilizer 5x Magic Seed, and 4x Organic Fertilizer 4x Magic Seed, and 5x Organic Fertilizer 4x Magic Seed, and 5x Mineral Fertilizer
6x Organic Fertilizer, and 3x Mineral Fertilizer 5x Organic Fertilizer, and 4x Mineral Fertilizer
Nature treasure key (for the locked door at spot F in the map)
C:
Location of the boss enemy Roseris
Takes additional damage from fire, and reduced damage from nature and lightning. Has a 35% chance to counter physical attacks.
Skills:
Stone Spike: Nature damage against all enemies. Chance to lower the target’s DEF. Whip Strike: High physical damage against 1 enemy.
Thorny Embrace: Does 35% max HP damage against 1 enemy.
Health Convertion: If the target has 50% or more of his max HP, he dies instantly. If the target is below 50% of his max HP, he takes 50% of his current HP as damage instead.
Wind: Nature damage against 1 enemy.
Can drop:
3x Rose Seed, 3x Sparkling Seed, and 3x Organic Fertilizer 6x Rose Seed, and 3x Mineral Fertilizer
3x Rose Seed, 3x Black Seed, and 3x Mixed Fertilizer
3x Black Seed, 3x Mineral Fertilizer and 3x Mixed Fertilizer 3x Brown Seed, 3x Magic Seed and 3x Mixed Fertilizer
3x Brown Seed, 3x Magic Seed and 3x Purple Seed 3x Black Seed, 3x Sparkling Seed, and 3x Purple Seed 4x Black Seed, and 5x Sparkling Seed
4x Magic Seed and 5x Organic Fertilizer
3x Organic Fertilizer, 3x Mixed Fertilizer and 3x Mineral Fertilizer
D:
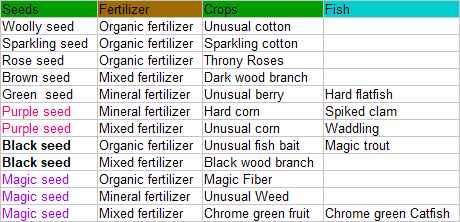 4 farming spots where you can grow seeds. You can see the combinations and results in the chart below.
E:
Location of the anvil, for crafting items with the materials gained from farming and fishing inside the dungeon. There is also 1 farming spot next to the anvil.
Necessary combinations for the different armor classes:
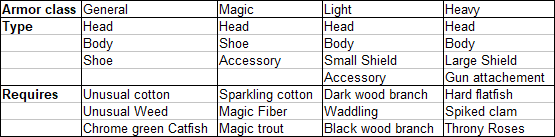
Possible crafting results:
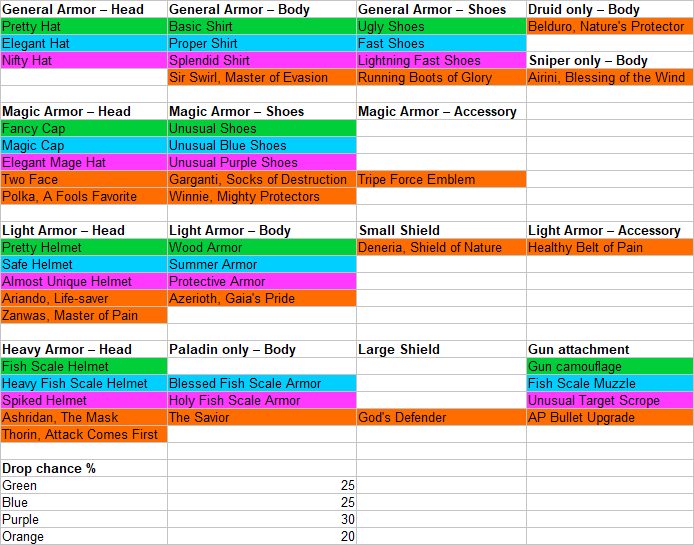
F:
Locked treasure door. You can get a key by defeating Kiki. It’s mostly gold and goldbars you get from here.
Q: How do I get to the challenge floor of the Spire of Courage?
A: You need to finish the advanced floor in the Spire once to make a note on the Aldlyn city board appear. After reading the note, the teleport option to go directly to the challenge floor will become available in the Spire at the teleport orbs in the battle areas.
Q: How do I get flower crystals?
A: You can find red, blue, and purple flower crystals on the challenge floor in the Spire of Courage.
Q: How do I get the “Dusty Crafting Book” item / How do I craft at the anvils in the fire and nature raid?
A: After winning the fire raid often enough, the option to do solo raids without the other group helping you becomes available. After winning a solo raid, you can find a chest with the “Dusty Crafting Book” in the fire raid area. This book allows you to use the anvils in the fire and nature raid areas.
Q: What are the requirements for the second raid on the assassins with Flaire and the Thremten thieves guild?
A: After the initial events about Moriko and the thieves guild, which start at the Aldlyn city board after you constructed the police HQ and upgraded it, talk with Flaire to further advance her events. Once her and Sandra’s events are far enough, you can get an event with Sandra and Jenny at the casino in Newkungu. Afterwards you have to return to Flaire to get the quest about helping Jenny.
When that event is also done, and you’re either on Moriko’s good path or you had her 2nd sex scene on her bad path, and you advanced the main events to the point where Commander Walcot gave you the access permit for the Dhranholl mine, you can talk with Flaire to start the second raid on the assassin guild. [Quest 131 “Second Attack”]
Q: Apart from the initial 6 vangaurd squad leaders, who can be recruited and how? A: There is currently a total of 16 recruitable squad leaders.
- Lili (healer) can be found in Pumumu in Begus after you advanced the political
meetings with Begus and met the young queen.
- Kurohime is met during an event in your secret bedroom. In order to recruit Kurohime as a squad leader, you need to tell Theremis to prepare a war against Dorgania, and you need to advance the events of Grey to have the meeting with Lady Akira. When all necessary conditions are met, and Kurohime is in your service, a spy mission will become available at Luolambo on the country overview map. This spy mission unlocks her as a squad leader.
- Alcena and Nemelphia (cavalier) are first met in the challenge floor of the Spire of Courage. The first meeting with them there is necessary for them to appear in
Calterburry, near the teleport stone plate.
- Wendy (archer) becomes available in a dialog in the inn of Calterburry after you had her first sex scene, and the first sex scene with the archery squad leader Ailluin.
- Frall (mage) can be found at the sleeping chambers after you advanced the main story far enough.
- Phyrra (dancer) can be recruited in Orchel in Dorgania after you finished the racism and trade route events with Mirel. Her special ability as a dancer is to transfer her AP to other squads. However, the current amount of any squad can never exceed the maximum amount that they can have.
- Owen, the commander of the military academy where you start the game, can be recruited at the academy after you unlocked the strategy battle system.
- After capturing Lind in the last vanguard battle with her, you can advance her event by speaking with her in the prison, and later at the meeting room in the sleeping chamber area. When you allow female soldiers in the finances and policy screen, you’ll get an event where the manticore Mia is recruited and send to the repaired barracks of the vanguards. Talk with Mia in the barracks when you have at least 1 captured blue and green slimegirl, and the events with Jackie and Lexi advanced to the point where they’re standing at the entrance of the monsterhall in your castle, to recruit Mia as a squad leader. Instead of equipment, her squad can change the monstergirls that she uses to fight with, which requires that you unlock their scenes first.
- Leneth can be recruited when you interact with the top right icon in the tasks section of the command center screen. It requires that you advanced the events with Jackie and Lexi, that you had sex with Leneth, and that at least one small and one big harpy was captured and released at the big farm. Leneth squad can fly, which allows her to ignore most, but not all, terrain limitations. She can’t fly over any other squads.
- Della can be recruited in Dorgania after you advanced the events with Elly and Ryoko far enough to have Cassedy in your castle, so that you can speak with her about a gun using vanguard squad.
Q: How do I unlock the 2021 Christmas special events?
A: After talking with the baker girl Nina at the bakery in Central (which you can build on the overview map), a scene with Dea and Mai may start automatically when you walk out of the bakery. (Requires that you had Dea’s first sex scene, and that Mai is on her good path) This scene will unlock the christmas special area.
If Mai is on her bad path for you, you can’t unlock the scene at the bakery. In that case, you can replay the scene via the CG room if her bad path is far enough, and unlock the christmas area that way.
Q: What are the special features of the 2021 christmas special events, and what are the solutions for the riddles?
A: – Fat Orc battles:
They’re immune to everything apart from either physical, fire, light, or earth element attacks. But once you found what element they’re vulnerable against and deal damage
to them once, their unique defense abilities disappear and everything does damage against them again.
The items Foul Food, Disgusting Food, or Poisonous Food can also be used to remove the unique defense ability of the Fat Orcs.
- Fat Orc Forest:
There is no real riddle here, but the path is made in a confusing way. The door to advance to the dungeon is in the bottom right and requires the combination 9999, which you get from a wooden chest in the top right.
There is a chest with 1 Skillstone Candy in the bottom left, and a chest with the legendary “Slippery Amulet” in the right center.
There are two present boxes with slot tokens in the top left and top right.
- Fat Orc button dungeon:
You need to press 7 Red, 8 Blue, 9 Yellow and 10 Green buttons, and use the switches of each color once you have the exact right amount of that color. (The amount of buttons for other colors don’t matter for the switches.)
The chest in the bottom right is only a distraction, in the hope that the player doesn’t notice the path further east behind the pile of rock at first, and is then happy to find the “hidden” reward.
- Flesh dungeon [Santa’s Lair]
Interacting with the cup in the top left corner will start a fight against Santa. Winning gives you 10 slot tokens, the legendary weapon “Santa’s Whip”, and a Red and Yellow Power Up Candy.
Santa has only two skills, a curse to completely remove your DEF/M.DEF/EVA, and a skill which gives random targets one of 12 presents. 3 of the 12 presents are good, the rest…not.
- Jellyfish dungeon:
The Jellyfish enemies don’t have much HP, but run away instantly when it is their turn. Defeating them gives 3 slot tokens, and when all of them are defeated, you can interact with the hexagon at the bottom to give Ryen +20 M.DEF permanently.
- Santa’s Factory:
You need to interact with the statue of an element first, and then with the crystal of the same color. Interacting with a different element will overwrite the previous element you triggered, which means you have to do one element after another. Once all 6 available crystals are triggered, the multi color crystal in the hallway in the top left can be used to get the legendary item “Trion’s Mask.”
- Slot machine:
The green chest (3rd in top row) gives you the legendary “Wet Ring” when you have a christmas key.
The flower (4th in top row) gives you a Magic Apple and 2x Skillstone Candies the first time you grow it 3 times. Afterwards 2x Elixir, 1x Skillstone Candy and 2x Slot token.
The brown bag (3rd in middle row) gives you one of 1-5 randomized rewards. Reward 5 is the legendary “Gamblers Ring”. After you obtained it, it’ll randomize between
item 1-4 and not give you another ring.
The golden clover in the bottom left gives you the legendary “Golden Four Leaf Clover.” Afterwards you’ll get 2x Love Potion at that spot.
The colorful ball (2nd in bottom row) gives you different power up candies the first 4 times you get it, then it changes to give you 2x Elixir each time.
Q: How to solve the riddles on the stone riddle island of the Brexeet Isles?
A: The grey stone needs to be moved onto the yellow hexagon to make the yellow crystals in front of the bridge disappear.
Inside of the cave, the switches will change the color of all orbs with the same color on the left and right side. The goal is to change all orbs on both sides to the same color as the orbs in the middle.

Q: What are the treasure locations of the Brexeet Isles?
A: The first treasure is part of Sandra’s events, and can be found on the island with a big tree and a forest.
Treasure 2: “I hit my treasure in a brown stone pillar which was engulfed by darkness.”
Found in the brown stone pillar in the south of the volcano island.
Treasure 3: “Somewhere between nature, but deep underground. In water, but where?” Found in the water on the left side in the dungeon below the big tree with a forest island.
Treasure 4: “Surrounded by lava on a hop spot.”
Found in the top left corner of the volcano island, where a darker spot is surrounded by lava.
Treasure 5: “In an old stump of a chopped down tree, near a very big tree, which is the only special part about the island. Apart from the color riddle.”
Found on the island with a big tree without a forest. The tree stump is right of the big tree.
Treasure 6: “Hidden in a hole in an old and remote stone house. It has no windows.” Found on the island with an abandoned house, by interacting with the hole in the wall in the top left corner inside the house.
Treasure 7: “The X marks the spot. But be careful! It’s not healthy “
Found in the top right corner of the volcano island. The X is made by purple poison on the ground. You need to interact with the middle of the X to get the treasure.
Treasure 8: “Inside a broken barrel next to a broken box.”
Found in the broken tower, in a broken barrel on the right side of the first floor.
Treasure 9: “Hidden inside a golden pillar. You need to press a secret button in the bottom right to open the hidden drawer and get the treasure in it.”
Found in the top right corner of the dark cave island.
Treasure 10: “I hid my treasure below an atrificial skeleton.” Found in a skeleton on the right side of the volcano island.
Treasure 11: “On an island where someone used to live a long time ago. The treasure is below a tree stump. It stands out, because it’s the only tree that was cut on the island.”
Found in a tree stump in the south of the island with the abandoned house.
Q: Which cards exist in the card collection system?
A: All cards with their ID numbers can be seen in the image below. Card names with colored background mean that the card can only be obtained when you had the necessary events to have seen the CG in the game before.
The chances are 55% for a common card, 30% for an uncommon card, 10% for a rare card, and 5% for legendary card.
Related Post
- 5 Games Like Treasure of Nadia
- 7 Games like summertime saga
- Renryuu: Ascension Walkthrough & Guide
- The Fate of Irnia Walkthrough
- Single Again Walkthrough
- Pale Carnations Walkthrough
- Night of Revenge Guide
- Long Story Short Walkthrough
- Hillside Walkthrough
- Happy Summer Walkthrough
- Dreaming of Dana Walkthrough & Cheats
- Deviant Anomalies Walkthrough
- Desert Stalker Walkthrough
- Another Chance Walkthrough